In simple terms we can say that Blazor is a tool that helps people make websites. When we make websites with Blazor, we use something called “components” which are like building blocks that we put together to make the website.
Each component goes through different stages of its life, like when it’s created, when it’s shown on the website, when it’s updated, and when it’s removed from the website. These stages are called the component’s “lifecycle”.
When a component is first created, it goes through a stage called “initialization” where it sets up its starting point. After that, it goes through a stage called “rendering” where it creates the code that makes up the component on the website. If something about the component changes, like the information it’s showing, it goes through a stage called “update” where it makes those changes to the code. And when the component is removed from the website, it goes through a stage called “destruction” where it cleans up after itself.
During each of these stages, there are different things we can do to customize the behavior of the component. For example, we can use a special method called “SetParametersAsync” to update the component’s properties and trigger a re-render of the component when something changes.
Understanding how the component lifecycle works is important because it helps us make websites that are fast and respond quickly when people use them. By using the different lifecycle methods, we can make our components work more efficiently and help our website run smoothly.

Now, lets understand it from the developing prespective.
The Blazor component model is built around the concept of a component’s lifecycle, which is a series of events that occur from the time a component is created until it is removed from the page.
Here’s an overview of the Blazor component lifecycle:
Initialization: When a component is first created, it goes through an initialization phase where it sets up its initial state and any dependencies it needs.
Rendering: After initialization, the component enters a rendering phase where it generates the initial HTML for the component and any child components.
Update: When a component’s state or properties change, it goes through an update phase where it re-renders itself with the new data.
Destruction: When a component is removed from the page, it goes through a destruction phase where it cleans up any resources it was using.
Throughout these phases, Blazor provides various lifecycle methods that we can use to customize the behavior of their components. These methods include OnInitialized, OnAfterRender, OnParametersSet, and Dispose.
Understanding the Blazor component lifecycle is important for us because it allows us to build efficient and performant web applications that respond quickly to user interactions and data changes. By leveraging the various lifecycle methods, we can optimize the components for different scenarios, such as improving initial load times or reducing unnecessary re-renders.
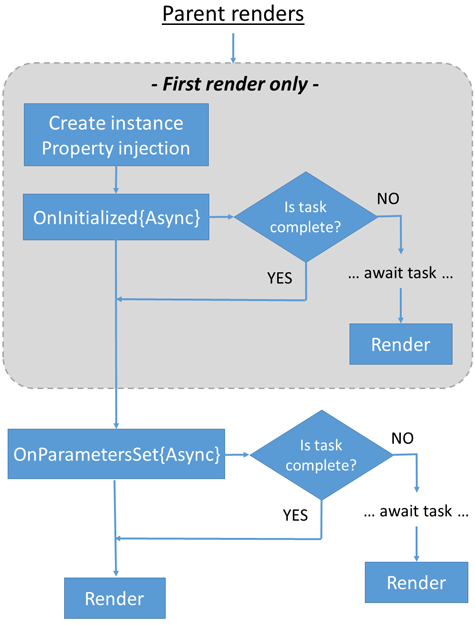
Initialization is the first phase in the lifecycle of a Blazor component. During this phase, the component is created and its initial state is set up. The following steps occur during initialization:
Construction: When a component is first created, its constructor is called. This is where the component’s dependencies are typically injected and any other setup work is done.
Dependency Injection: Once the component is constructed, its dependencies are injected by the Blazor runtime. Dependencies can include services, other components, or anything else the component needs to function.
Parameter Initialization: After the component’s dependencies are injected, its parameters are initialized. Parameters are values that are passed to the component from its parent component, and they can be used to set up the initial state of the component.
OnInitialized: Finally, the OnInitialized lifecycle method is called. This method is a hook that developers can use to perform additional setup work, such as setting up event handlers or initializing any internal state that is not dependent on the component’s parameters.
During the component initialization stage, the component is created and its properties and state are initialized. This stage is typically used to perform any setup logic, such as initializing variables or subscribing to events.
The rendering stage is where the component’s user interface is constructed and updated. When the component is first rendered, its Render() method is called, which generates the HTML for the component. This method is called again whenever the component’s state or properties change, which triggers a re-render of the component. Blazor uses a virtual DOM, similar to other modern web frameworks, to optimize the rendering process and minimize the number of DOM manipulations needed.
In terms of rendering methods, Blazor provides two main approaches: server-side rendering and client-side rendering. Server-side rendering (SSR) involves rendering the component on the server and sending the HTML to the client, while client-side rendering (CSR) involves rendering the component on the client’s browser using JavaScript.
The SetParametersAsync method is one of the lifecycle methods that is called when a component is initialized or when any of its parameters change. This method is responsible for updating the component’s properties and triggering a re-render of the component. The SetParametersAsync method is defined in the IComponent interface, which is implemented by all Blazor components.
The method takes a ParameterView object as its parameter, which represents a collection of parameters that are passed to the component. The SetParametersAsync method is called whenever the component is first initialized or whenever any of its parameters change. When the method is called, the component checks if any of its properties have changed and updates them accordingly. If any of the properties have changed, the component triggers a re-render of its UI.
In summary, the SetParametersAsync method is an important lifecycle method in Blazor that is called when a component is initialized or when any of its parameters change. This method is responsible for updating the component’s properties and triggering a re-render of the component.
Here’s an example of a Blazor component that uses some of these lifecycle methods:
@code {
[Parameter]
public string Title { get; set; }
private Timer _timer;

protected override void OnInitialized()
{
    // Initialize the timer
    _timer = new Timer(1000);
    _timer.Elapsed += (sender, args) => InvokeAsync(StateHasChanged);
    _timer.Start();
}

protected override void OnParametersSet()
{
    // Update the timer interval based on the title
    _timer.Interval = Title.Length * 100;
}

protected override async Task OnAfterRenderAsync(bool firstRender)
{
    if (firstRender)
    {
        // Wait for the DOM to update
        await Task.Delay(100);

        // Focus the title element
        var element = await JSRuntime.InvokeAsync<ElementRef>("getElementById", "title");
        await element.FocusAsync();
    }
}

public void Dispose()
{
    // Dispose the timer
    _timer.Dispose();
}
}
In addition to the SetParametersAsync method, there are other lifecycle methods that can be used to customize the behavior of a Blazor component:
OnInitialized: This method is called after the component has been constructed and its dependencies have been injected. This is a good place to perform any additional setup work that is not dependent on the component’s parameters.
OnParametersSet: This method is called after the component’s parameters have been set or updated. This is a good place to perform any additional setup work that is dependent on the component’s parameters.
OnAfterRender: This method is called after the component has been rendered to the DOM. This is a good place to perform any additional setup work that requires access to the DOM, such as initializing third-party libraries.
Dispose: This method is called when the component is removed from the page. This is a good place to clean up any resources that the component was using, such as event listeners or timers.
Here’s an example of a Blazor component that uses some of these lifecycle methods:
@code {
[Parameter]
public string Title { get; set; }
private Timer _timer;

protected override void OnInitialized()
{
    // Initialize the timer
    _timer = new Timer(1000);
    _timer.Elapsed += (sender, args) => InvokeAsync(StateHasChanged);
    _timer.Start();
}

protected override void OnParametersSet()
{
    // Update the timer interval based on the title
    _timer.Interval = Title.Length * 100;
}

protected override async Task OnAfterRenderAsync(bool firstRender)
{
    if (firstRender)
    {
        // Wait for the DOM to update
        await Task.Delay(100);

        // Focus the title element
        var element = await JSRuntime.InvokeAsync<ElementRef>("getElementById", "title");
        await element.FocusAsync();
    }
}

public void Dispose()
{
    // Dispose the timer
    _timer.Dispose();
}
}
In this example, the component uses the OnInitialized method to set up a timer that updates the component’s state every second. The OnParametersSet method is used to update the timer interval based on the length of the Title parameter. The OnAfterRenderAsync method is used to focus the Title element after the component has been rendered to the DOM. Finally, the Dispose method is used to dispose of the timer when the component is removed from the page.
Overall, understanding the Blazor component lifecycle and its various methods is important for building efficient and performant web applications.

