

Introduction to SQL Server
Introduction to SQL Server
SQL Server is an application software for Relational Database Management System (RDBMS), from Microsoft back in 1988, We can used it for creating, maintaining, managing, and implementing relational databases.
It is actually a backend application that allows us to store and process data.
It is called the relational database management system due to its nature to store the data in tables where the tables store the data about the same entity.
HOW DOES SQL SERVER MAKES WORK SO EASY?
Being based on open source it is very easy to access and the vast majority of programmers working in web development have used Microsoft SQL Server in some of their projects.
It supports various business intelligence operations, analytics operations, and transaction processing.
Download SQL Server 2019 Developer Edition!!!!
Step 1
Download installation media .
Step 2
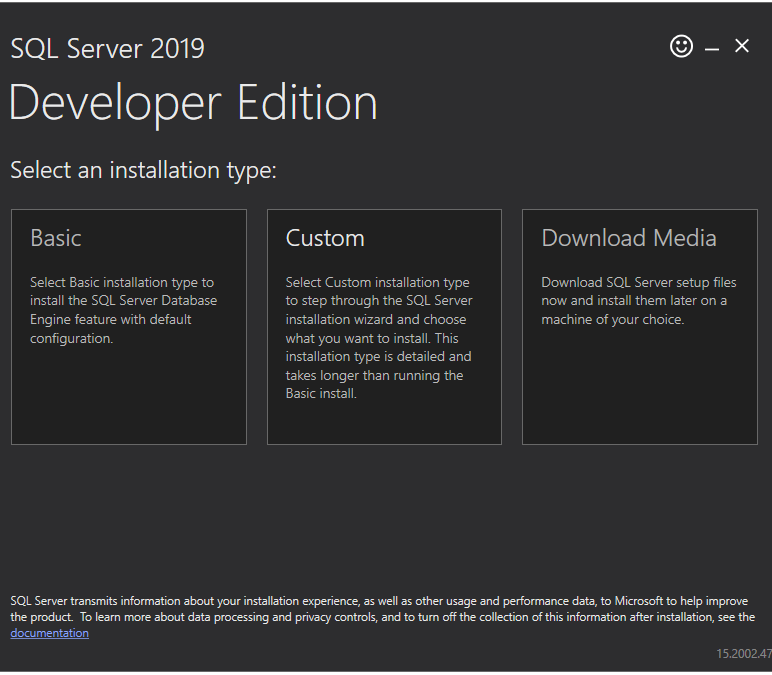
Run the downloaded file and you will see the below screen. Now select the third option – Download Media.
Step 3
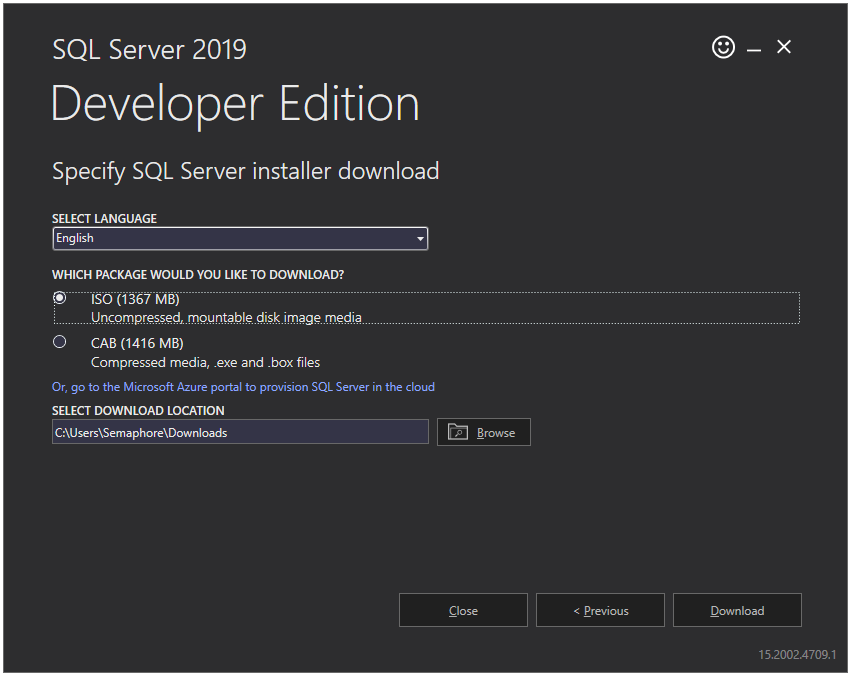
Now you will see the below screen. Please select the language you prefer and select the ISO radio button to download the ISO file. In addition, select the download location of your choice. I will go with the default location. Now press the Download button.
Step 4
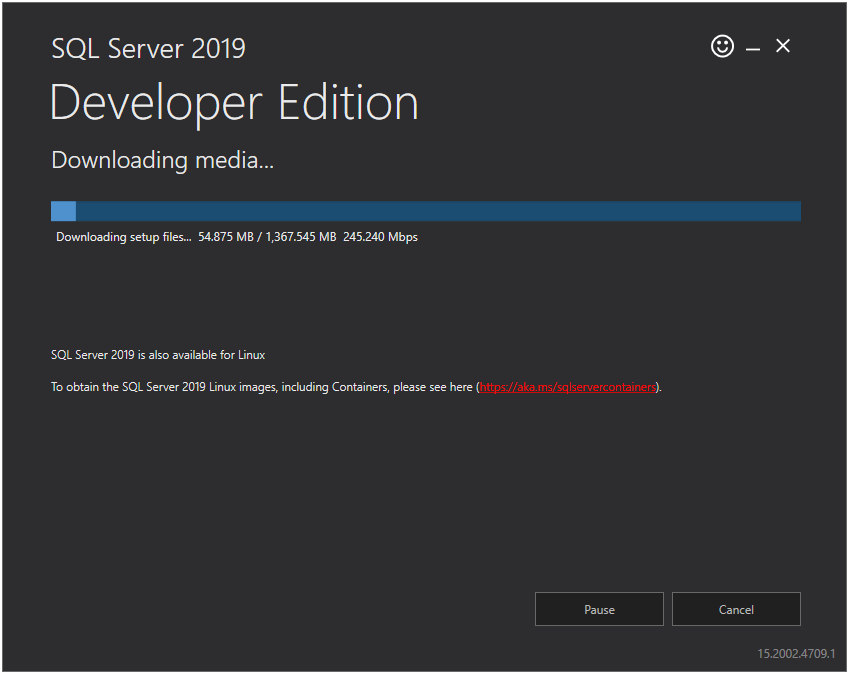
Now it will start downloading SQL Server installation media. It will take some time based on your internet connection speed.
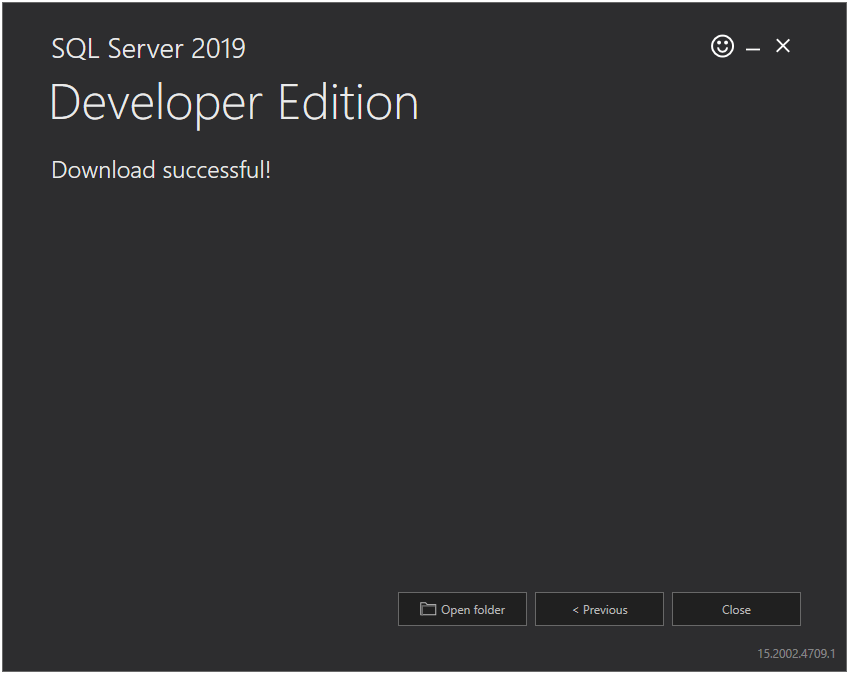
Step 5 After successful download of installation media, you will see the below screen. Click the Close button.
Install SQL Server 2019 Developer Edition!!!
Now that we have installation media, we can start the installation of the SQL Server. Let’s see how to install SQL Server step by step.
Step 1
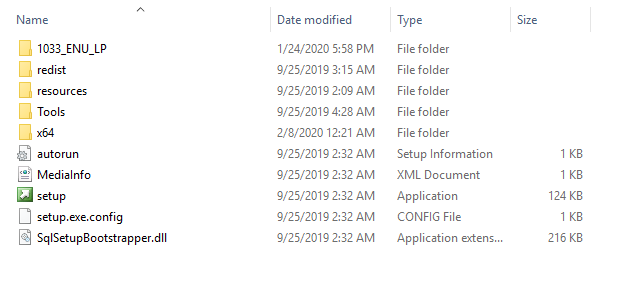
Run install media file (ISO file) downloaded in above section by double-clicking on it. It will extract/mount all the contents in a new temporary drive.
Step 2
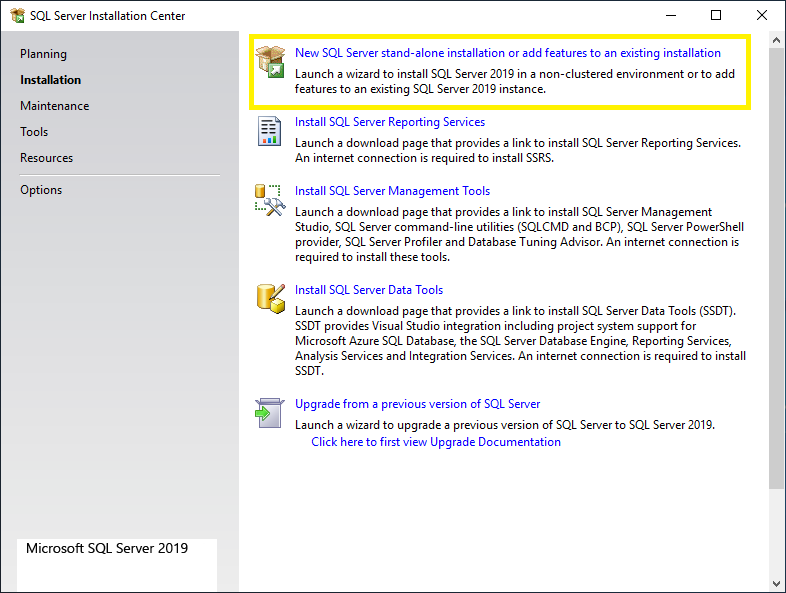
Once extraction is completed, double click on the setup.exe file and you will see the below screen. Click on the Installation option in the left panel and then click on New SQL Server stand-alone installation or add features to an existing installation option from the right panel.
Step 3
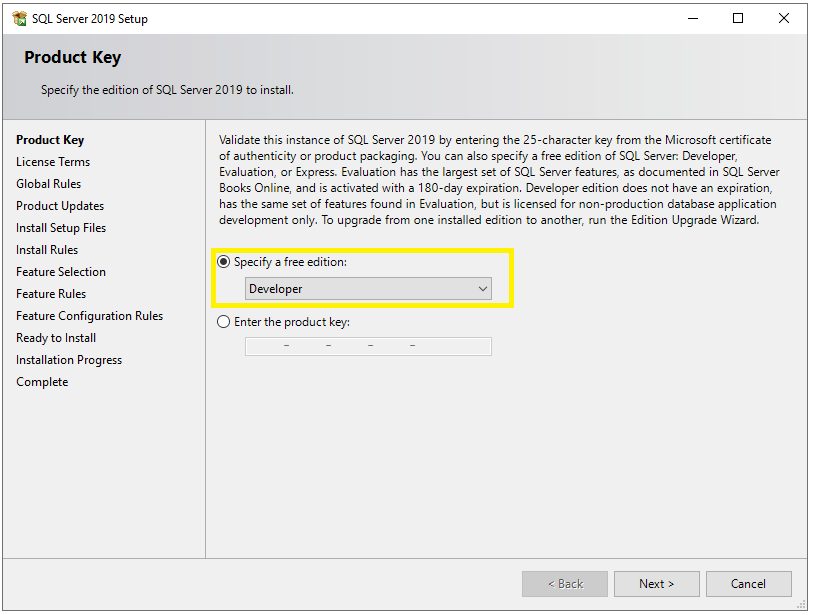
Now you will see the Product Key window. Select the Developer option from the dropdown and click on the Next button.
Step 4
Now you will see the License Terms window. Just select the checkbox and click on the Next button.
Step 5
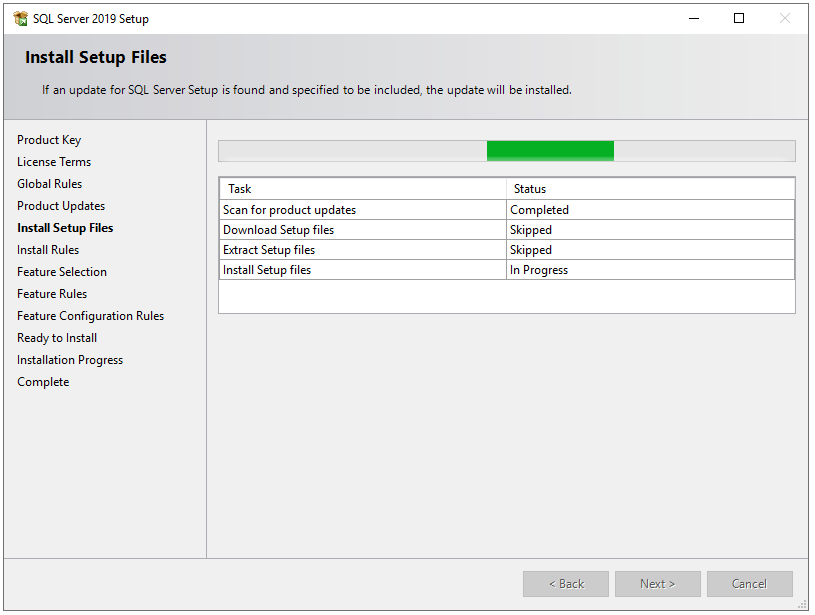
Now you will see the Microsoft Update window. It is not compulsory to check for the latest updates but it is recommended. So, select the checkbox and click the Next button.
Step 6
Now it will check for updates and install them if any.
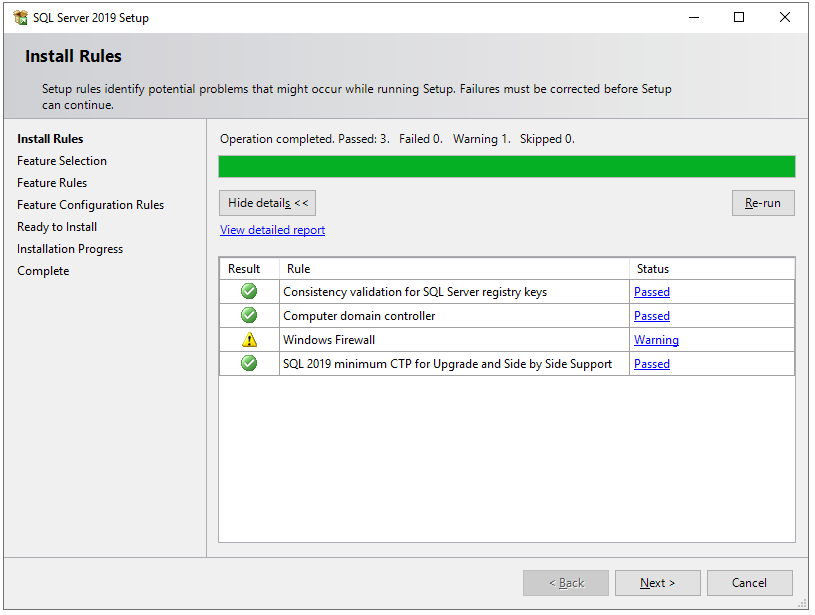
Step 7
After that, it will check some rules or prerequisites for the installation of SQL Server. Once all the rules passed, click on the Next button.
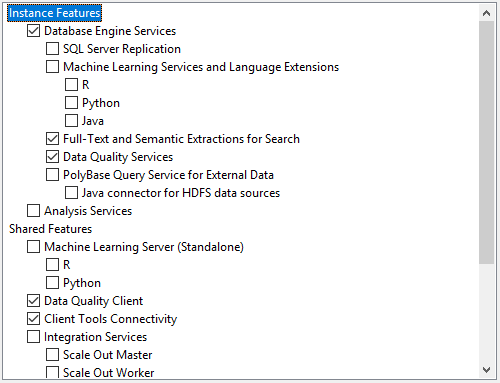
Step 8
On the Feature Selection window, select features as shown in the below screenshot. You can also change the location for SQL Server instance installation but I will go with the default location. After feature selection please click the Next button.
Step 9
It will check some feature rules/prerequisites and then you will see the Instance Configuration screen. Here you can choose between Default Instance and Named Instance. Here I will go with Named Instance.
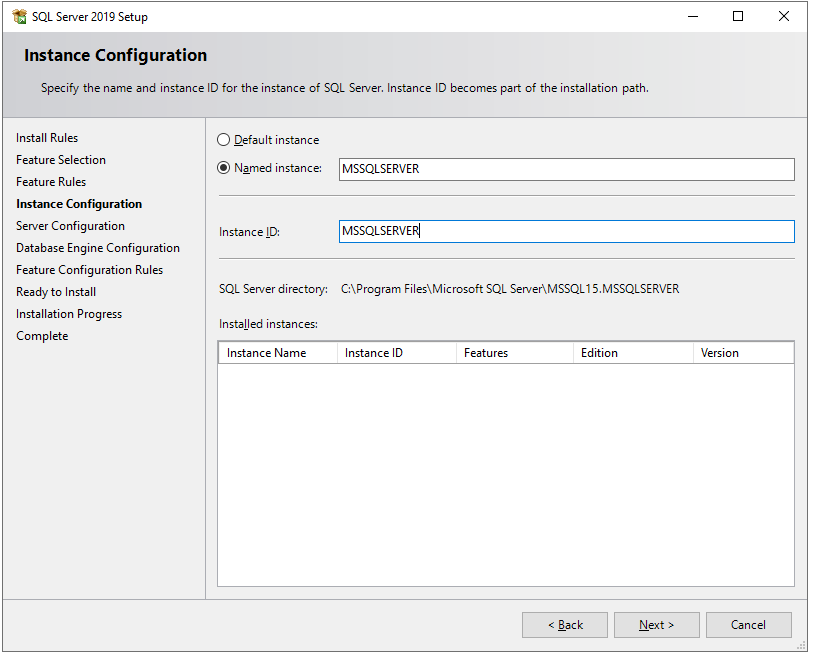
Note
Default Instance
When SQL Server is installed in the default instance, it does not require a client to specify the name of the instance to make a connection. The client only has to know the server name. For example, UPASNA-PC.
Named Instance
A named instance is identified by the network name of the computer plus the instance you specify during the installation. The client must specify both the server name and the instance name when connecting. For example, UPASNA-PC/MSSQLSERVER.
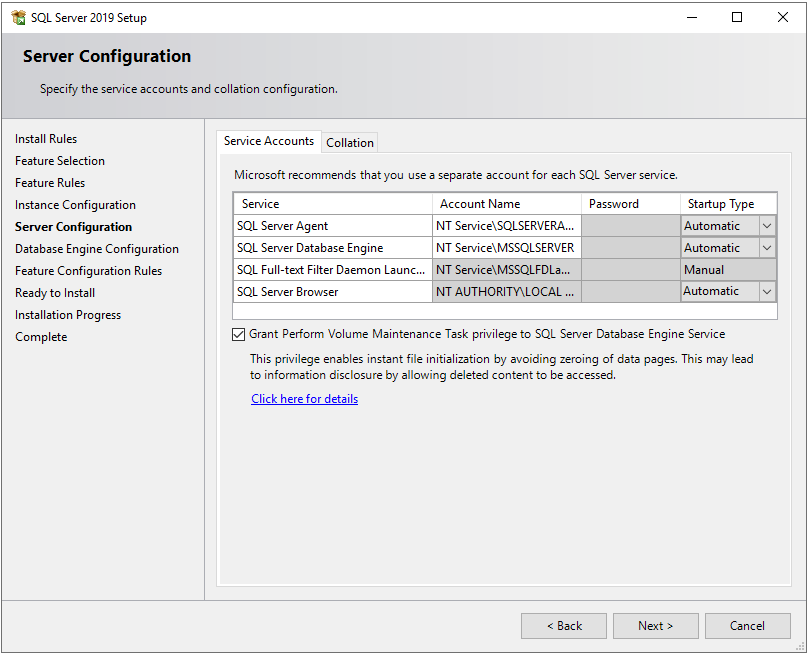
Step 10
Next, you will see the Server Configuration window. In Service Accounts tab, select Automatic in Startup Type for SQL Server Agent, SQL Server Database Engine, and SQL Server Browser services.
Step 11
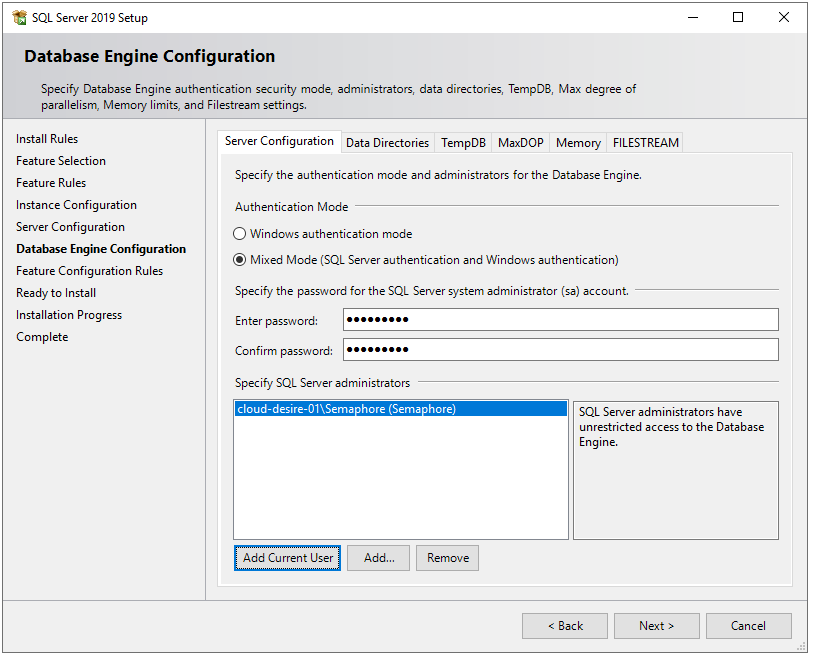
Next, you will see the Database Engine Configuration window. In the Server Configuration tab, choose Mixed Mode in the authentication mode section and enter a strong password. In Specify SQL Server administrators section, your current windows user should already be added automatically. If not, click on Add Current User button.
Step 12
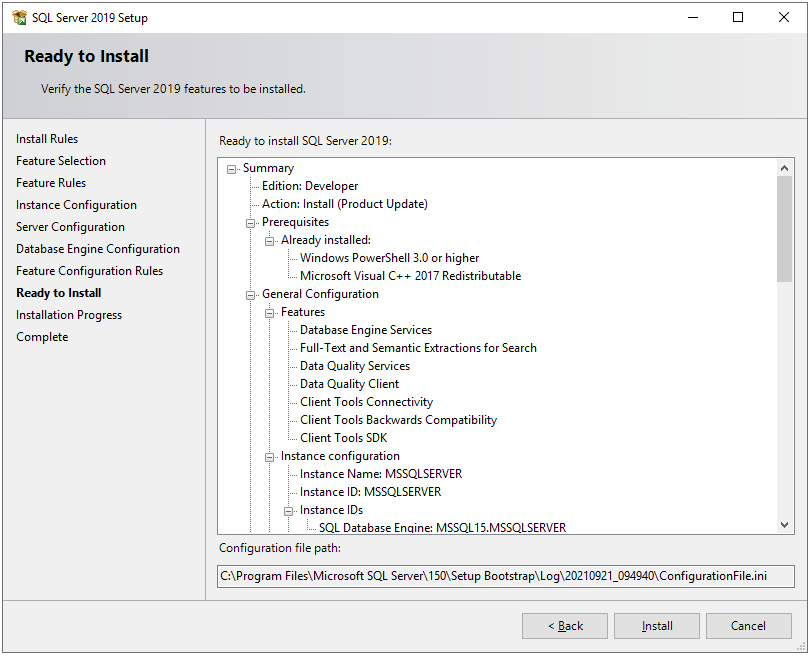
Next, the setup will check some feature configuration rules, and then the Ready to Install window will appear. This window shows the summary of all the features and configurations which we have done in the above steps. Once review the summary and click on the Install button.
Step 13
Now, the installation will start and it may take some time based on our configurations.

Step 14
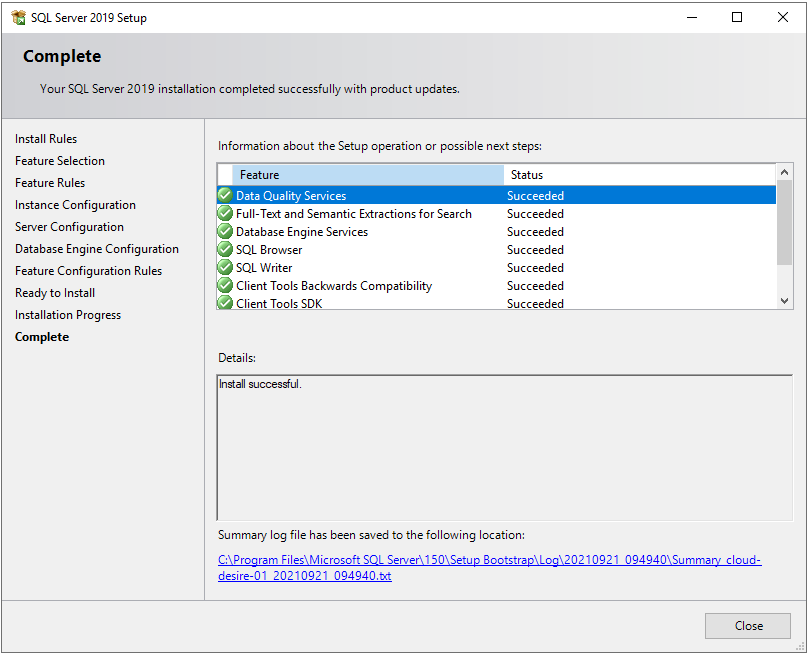
After installation, it will show you the list of features and their installation status. If any error occurred, it will show here.
Next, you can install SQL Server Management Studio to connect SQL Server and query SQL databases. Please follow below steps to install SQL Server Management Studio.
Install SQL Server Management Studio!!!!
Install SQL Server Management Studio
First, let us download SQL Server installation media from the official website.
Step 1
Download installation media.
Step 2
Below file will download.

Step 3
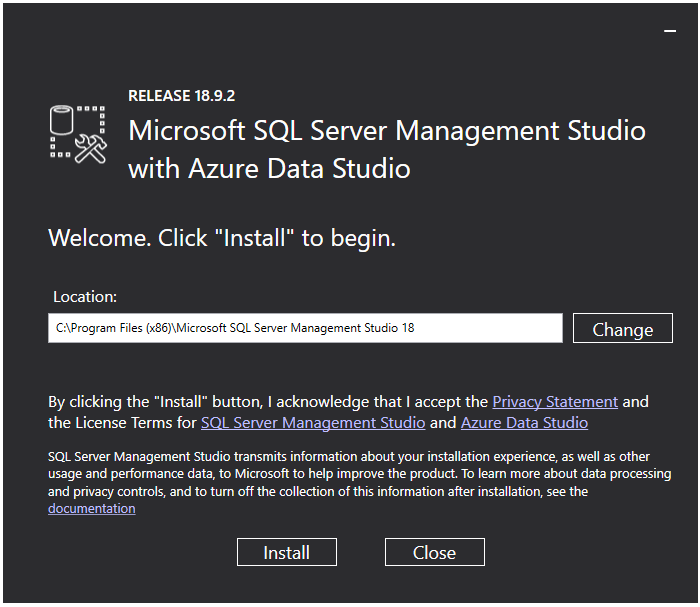
Run the downloaded file and you will see below screen. Just click on the Install button.
Step 4
It will start installing management studio. It will take some time.

Step 5
Once installation finished, close the installation wizard and open start menu and search for SQL Server Management Studio. You will see below application. Now, click on it to open the application.

Step 6
Next, you will see below screen. In Connect to Server window, you can see the SQL instance name, which we have just installed. (Ref. Step 9). You can connect an instance with either Windows Authentication or SQL Authentication, which we have created in Step 11.

Step 7
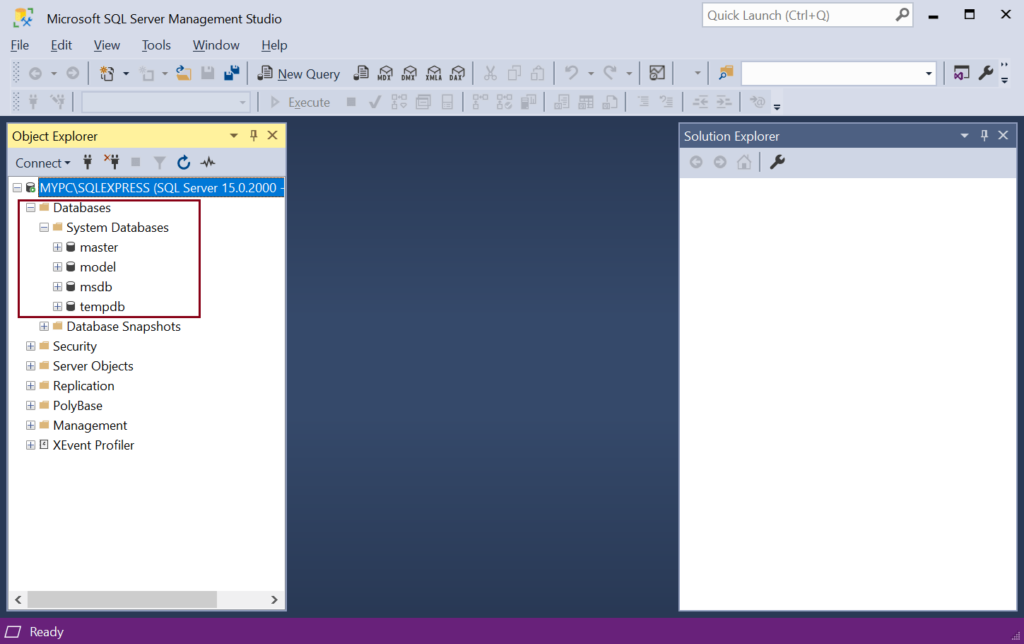
Once you successfully authenticated, you can see Object Explorer in which you can find database list and other SQL objects.

So, hope you understand how to install and connect SQL Server using SQL Server Management Studio.
SSMS Components..
SQL Server Management Studio has the following components:
- Object Explorer
- Security
- Server Objects
- Query and Text Editor
- Template Explorer
- Solution Explorer
- Visual Database Tools
Object Explorer
Object Explorer contains different components of one or more instances of SQL Server in a hierarchical manner. You can view and manage components such as Databases, Security, Server Objects, Replication, Management, etc.
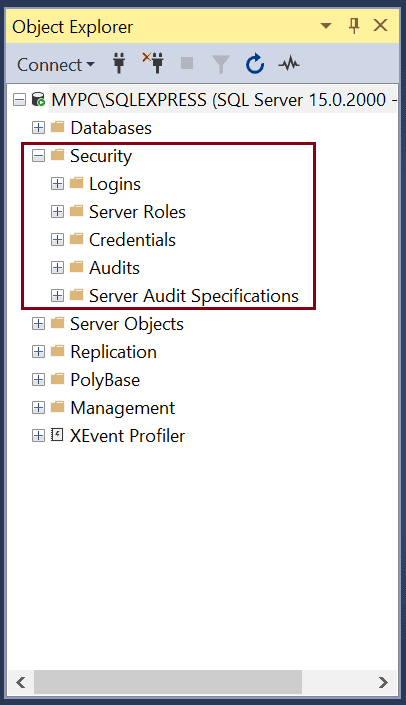
Security
Managing security for your database server is extremely important. The Security node is below the Databases node in the Object Explorer. You can create Logins and assign Server roles for any database instance. In addition, you can assign role-based security to logins and users. The Server roles you create here have server-wide scope.
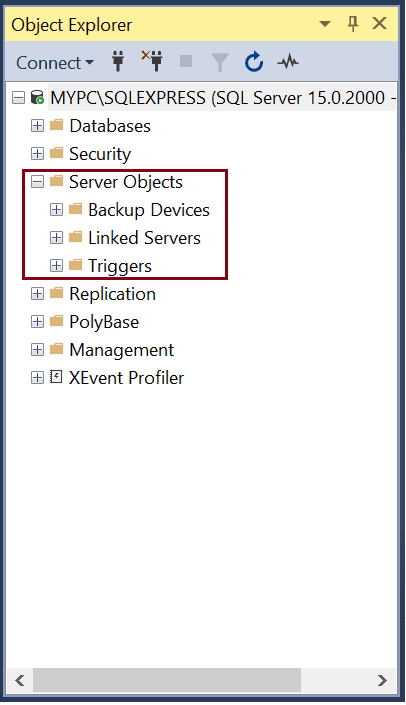
Server Objects
The Server Objects node in SSMS has four sub-nodes: Backup devices, Endpoint’s, Linked Servers, and Triggers. A linked server is a method by which a SQL Server can talk to another ODBC database with a T-SQL statement. SQL Server Endpoint’s are a point of entry into SQL Server. It is a database object that defines a way in which the SQL Server can communicate over the network. All objects under Server Objects have server-wide scope.
Replication
Replication is a set of technologies for copying and distributing data and database objects between databases and synchronizing databases. This is mainly used for maintaining consistency between databases.
Polybase
Polybase allows your SQL Server to query directly from other SQL Server, Oracle, MongoDB, Hadoop clusters, Teradata, Cosmos DB by installing client connection software using T-SQL separately. Polybase is used for data virtualization.
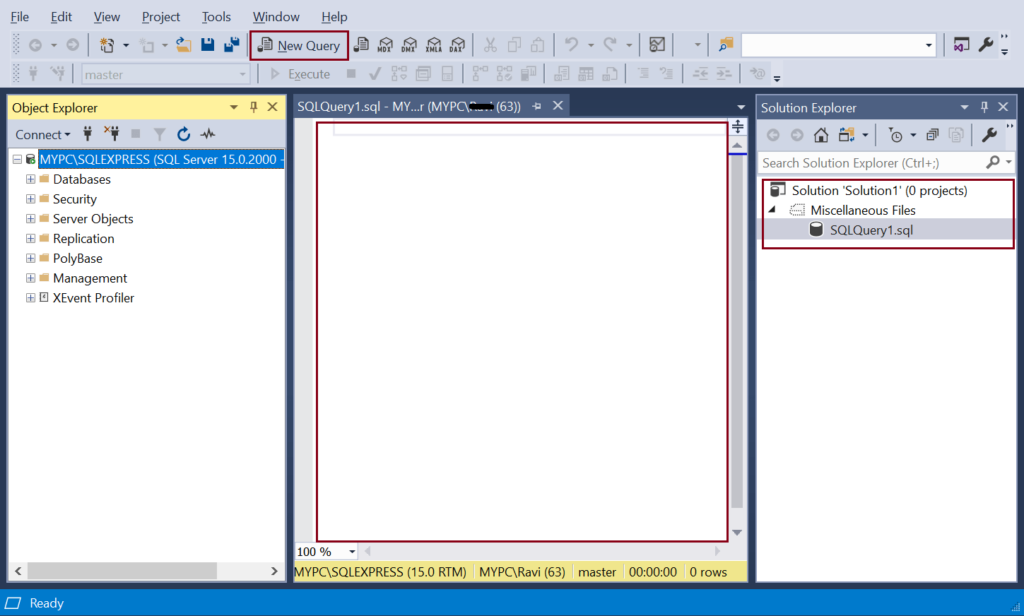
Query and Text Editor
Open a query editor by clicking on the New Query on the tool bar. Query editor lets you create, edit & execute Transact SQL (T-SQL) statements. It is equipped with IntelliSense support by auto-completing the script by suggesting variants. This makes writing & debugging code easier and faster.
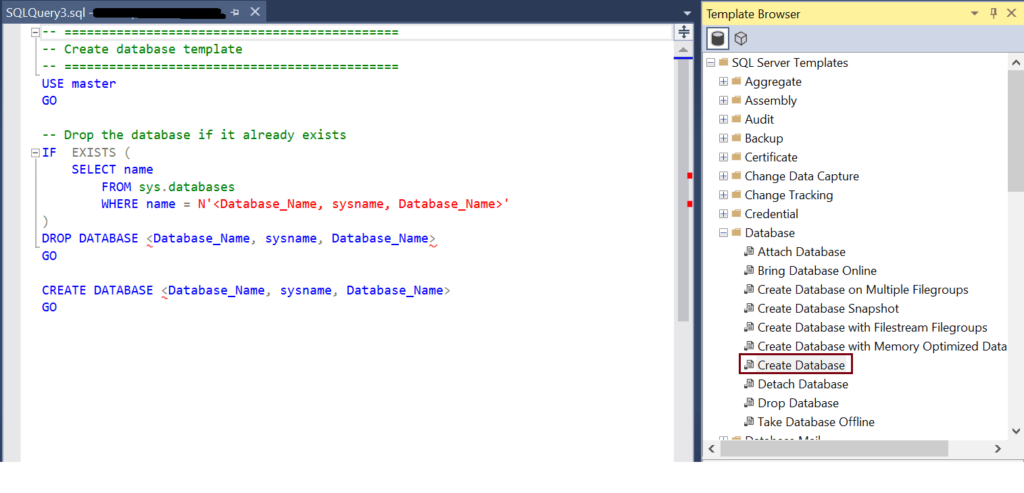
Template Explorer
Template explorer provides templates for creating various database objects. You can browse the available templates in Template Explorer and open it into a code editor window. You can also create your own custom templates.
Open Template Explorer from View menu -> Template Explorer. The following displays Create Database template.
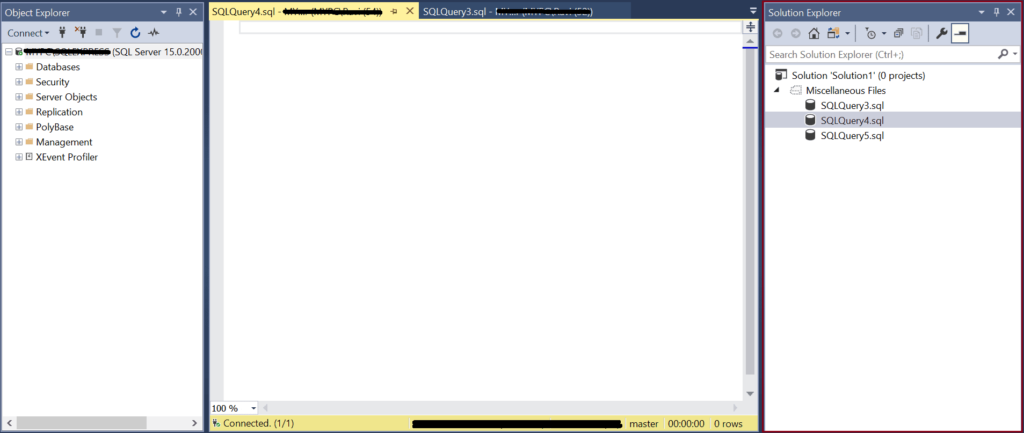
Solution Explorer
Solution explorer is used to manage administration items such as scripts and queries. Open it from View -> Solution Explorer menu.
Create Database in SQL Server 2019!!!!
In SQL Server, a database is made up of a collection of objects like tables, functions, stored procedures, views etc. Each instance of SQL Server can have one or more databases. SQL Server databases are stored in the file system as files.
Type of Database in SQL Server
There are two types of databases in SQL Server: System Database and User Database.
System databases are created automatically when SQL Server is installed. They are used by SSMS and other SQL Server APIs and tools, so it is not recommended to modify the system databases manually.
User-defined Databases are created by the database user using T-SQL or SSMS for your application data. A maximum of 32767 databases can be created in an SQL Server instance.
There are two ways to create a new user database in SQL Server:
- Create Database Using T-SQL
- Create Database Using SSMS
Create Database using SQL Server Management Studio….
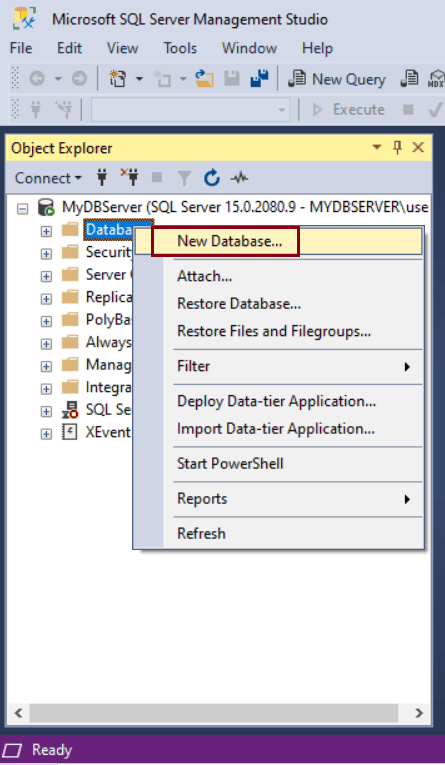
Open SSMS and in Object Explorer, connect to the SQL Server instance. Expand the database server instance where you want to create a database.
Right-click on Databases folder and click on New Database.. menu option.
In New Database window, enter a name for the new database, as shown below. Let us enter the database name ‘HR’. Every SQL Server database has at-least a minimum of two operating system files: Data file and Log file.
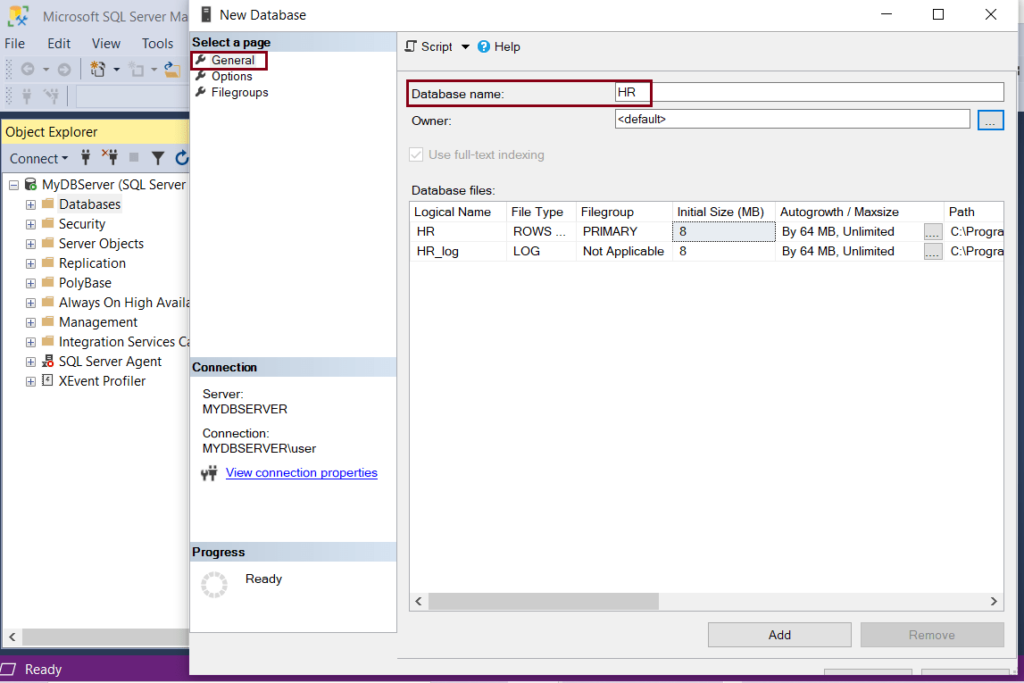
Click Ok to create a new ‘HR’ database. This will be listed in the database folder, as shown below.
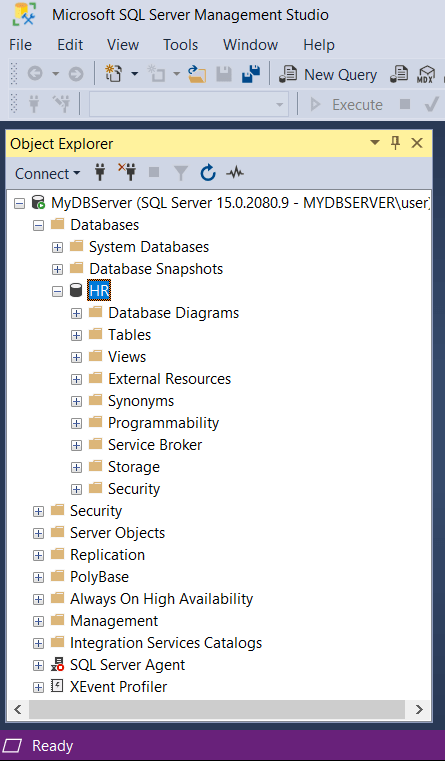
In the above figure, the new ‘HR’ database is created with the following folders:
Database Diagrams: It graphically shows the structure of the database. You can create a new database diagrams by right-clicking on the folder and selecting Create New Diagram
Tables: All the system and user defined tables associated with the database are available under this folder. Tables contain all the data in a database.
Views: All the System and used defined views are available under this folder. System views are views that contain internal information about the database.
External Resources: Any Service, computer, fileshare, etc that are not a part of the SQL Server installation are stored here. Contains 2 folders 1) External Data Sources 2) External File Formats
Programmability: The Programmability folder lists all the Stored Procedures, Functions, Database Triggers, Assemblies, Rules, Types, Defaults, Sequences of the database
Service Broker: All database Services are stored in this folder
Storage: Stores information on Partition Schemes, Partition Functions, Full Text Catalogs,
Security: Database Users, Roles, Schemas, Asymmetric Keys, Certificates, Symmetric Keys, Security policies are created & available in the Security folder of every database.
Create Table using SSMS..
You can design a new table using the table designer in SQL Server Management Studio.
To design a new table, open SSMS and connect to your sql server instance.
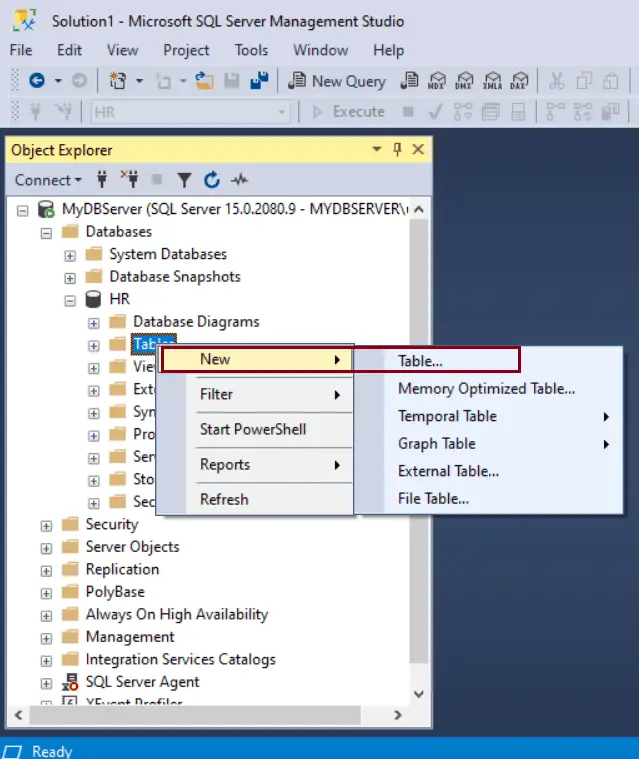
In Object Explorer, expand the HR database or the database where you want to create a new table.
Now, right-click on the Tables folder and select New Table, as shown below.
This will open a table designer where you can enter a name of a column, its data type, and check the checkbox if a column allows null, as shown below.
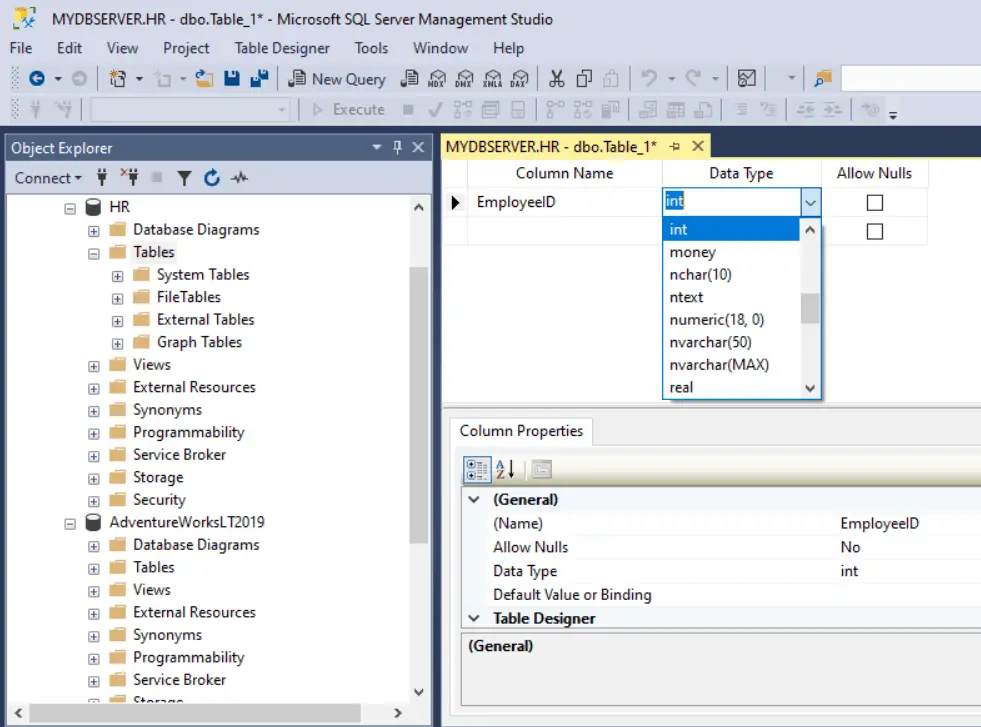
Column Name: Type a unique column name.
Data type: Choose a data type for the column from the dropdown list. Choose the appropriate length for the string data types.
Allow Nulls: Choose whether to allow Nulls for each column by check the check-box.
Enter columns info in a separate row for all the columns you want to take in your table. The followings are columns of the Employee table.
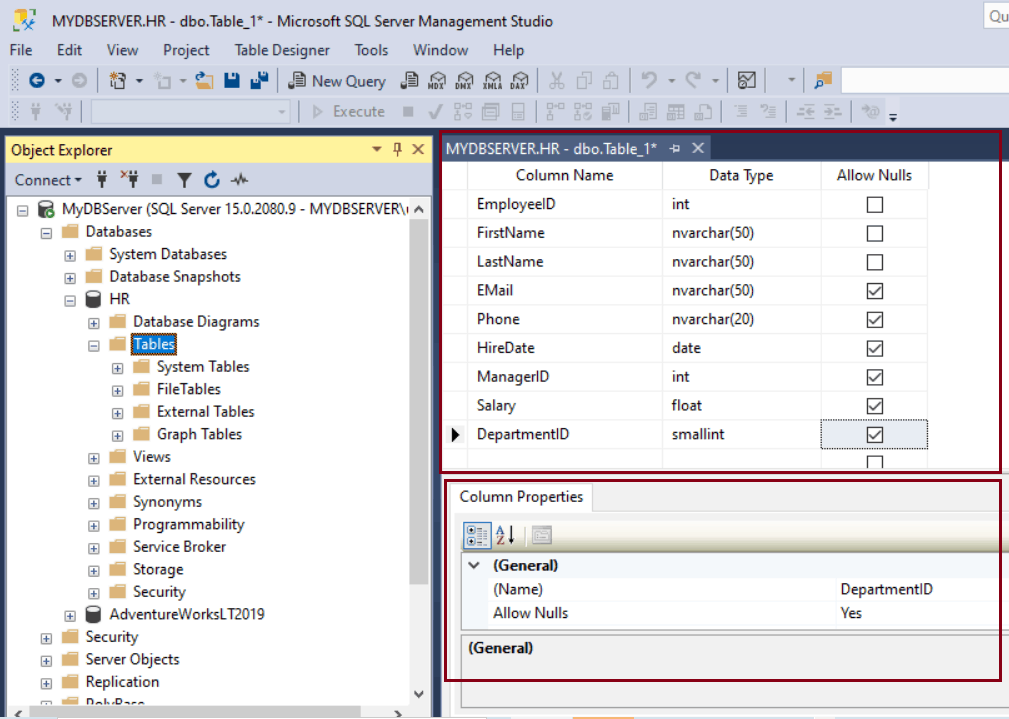
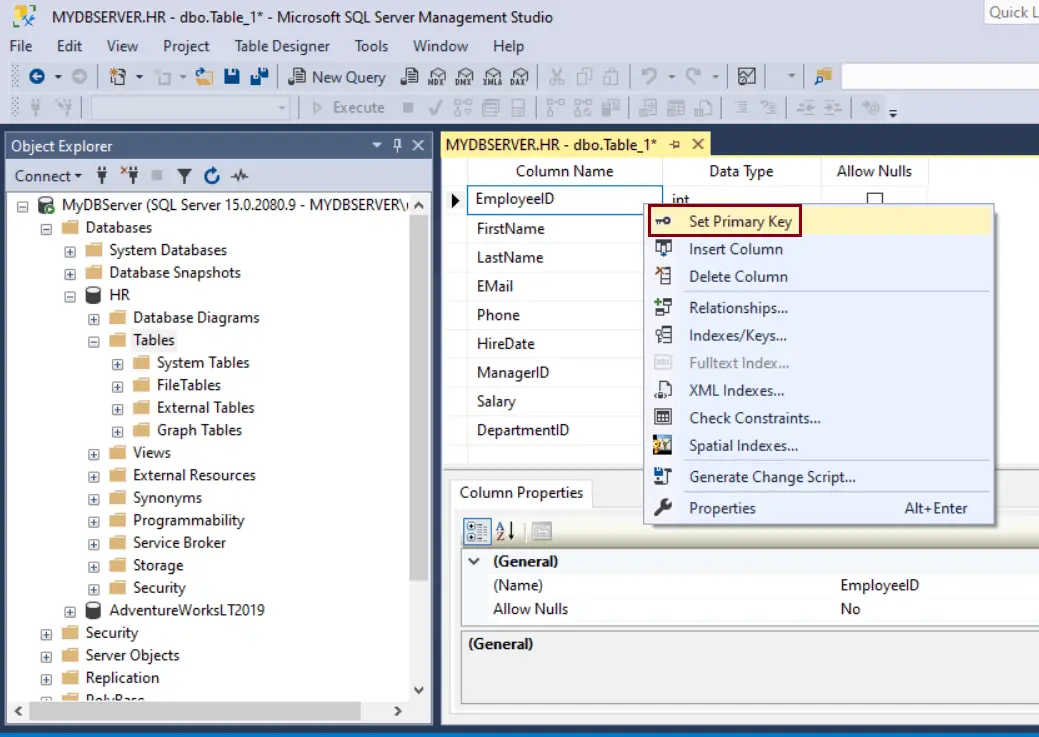
To set the properties for a column, such as identity specification, computed column specification, etc., select a column and set the property value in the Column Properties tab in the bottom pane.
To specify a column as a primary key column, right-click on the column row and select Set Primary Key, as shown below.
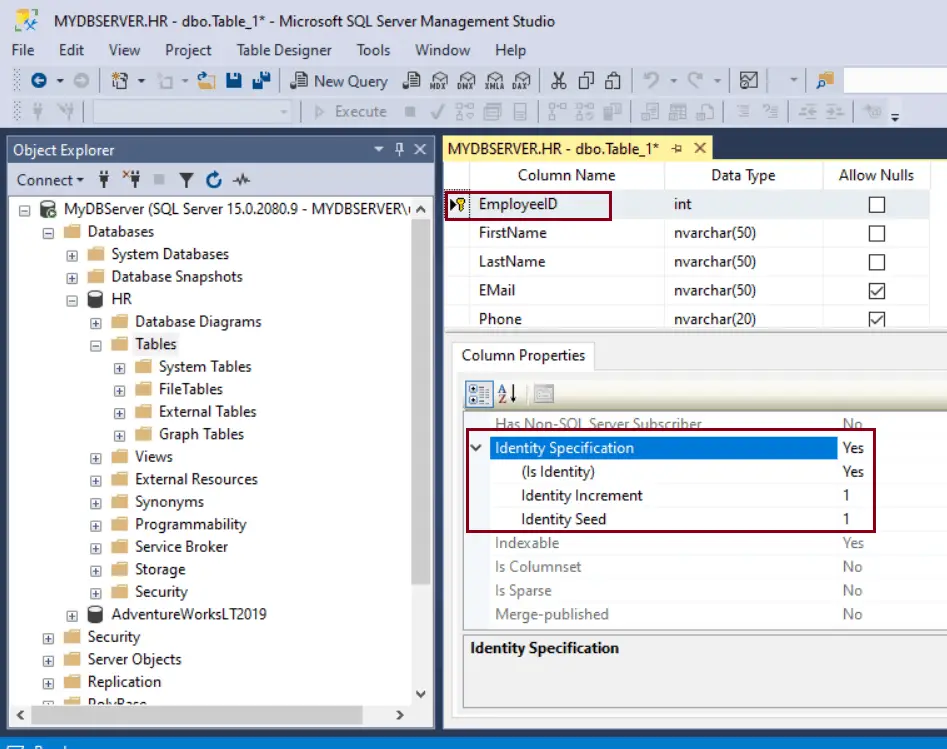
You can configure the primary key that will auto generate unique integers by setting it as identity column, as shown below.
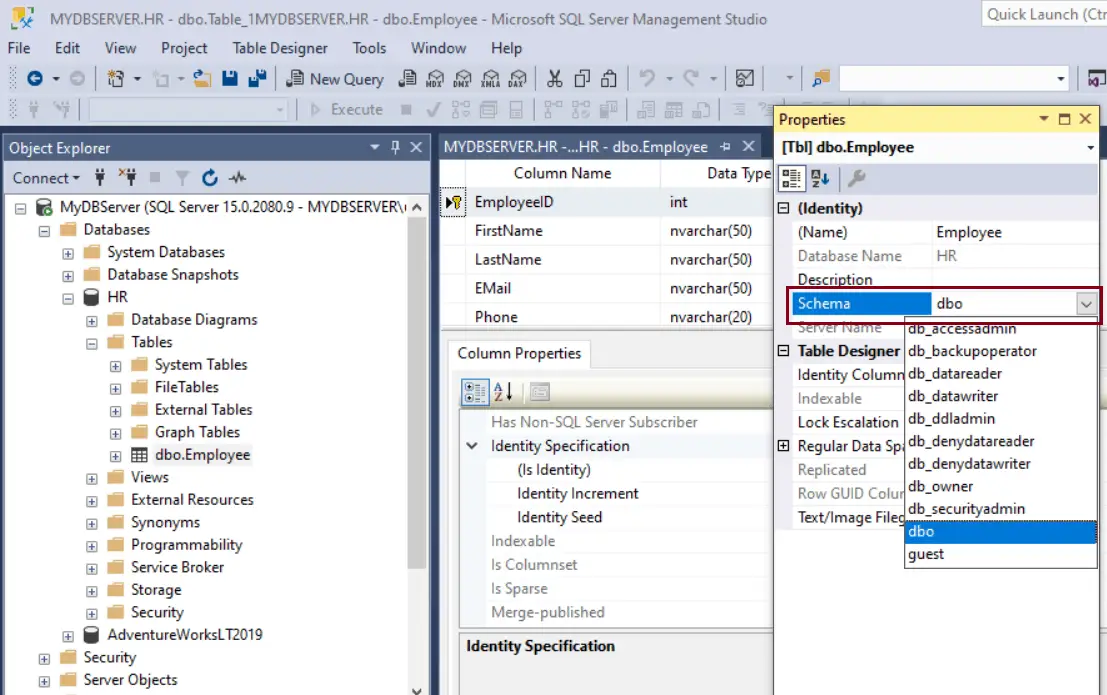
By default, the table is created in the dbo schema. To specify a different schema for the table, right-click in the Table-Designer pane and select properties. From the Schema drop-down list, select the appropriate schema.
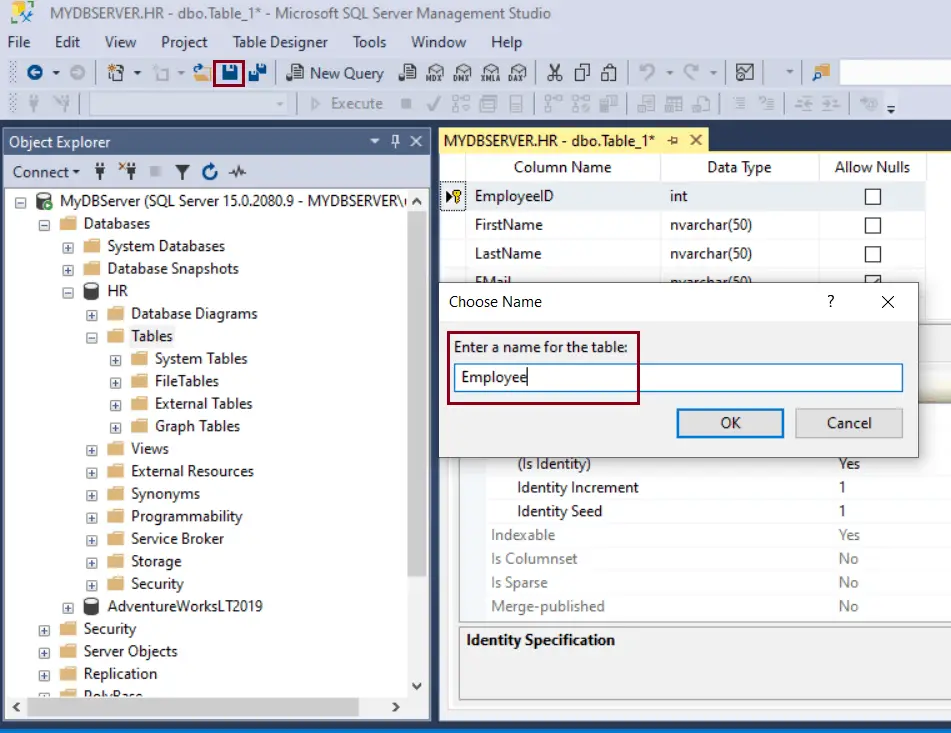
Now, from the file menu, choose Save to create this table. Enter Employee as a table name and click OK.
To view the new table, refresh the Tables folder in the Object Explorer. The EMPLOYEE table is now available under the Tables node.

Add Columns Using SSMS:
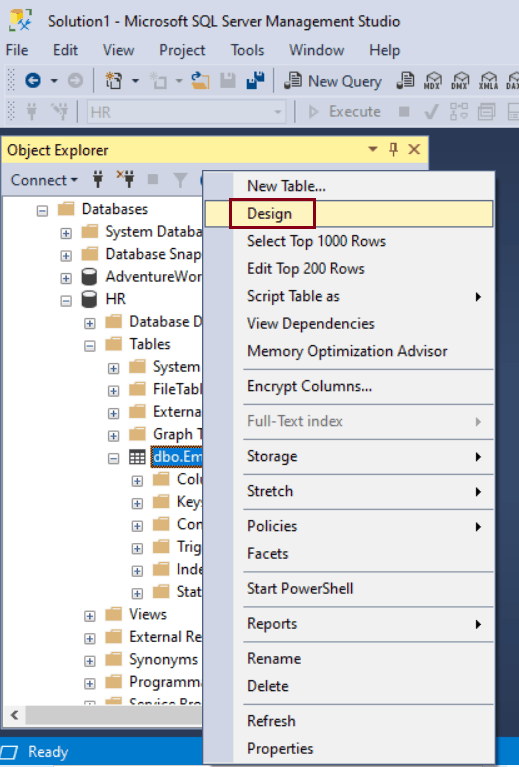
In Object explorer, right-click the table to which you want to add new columns and choose Design.
Click the first blank cell under the last column name column and enter the name of the column, as shown below.
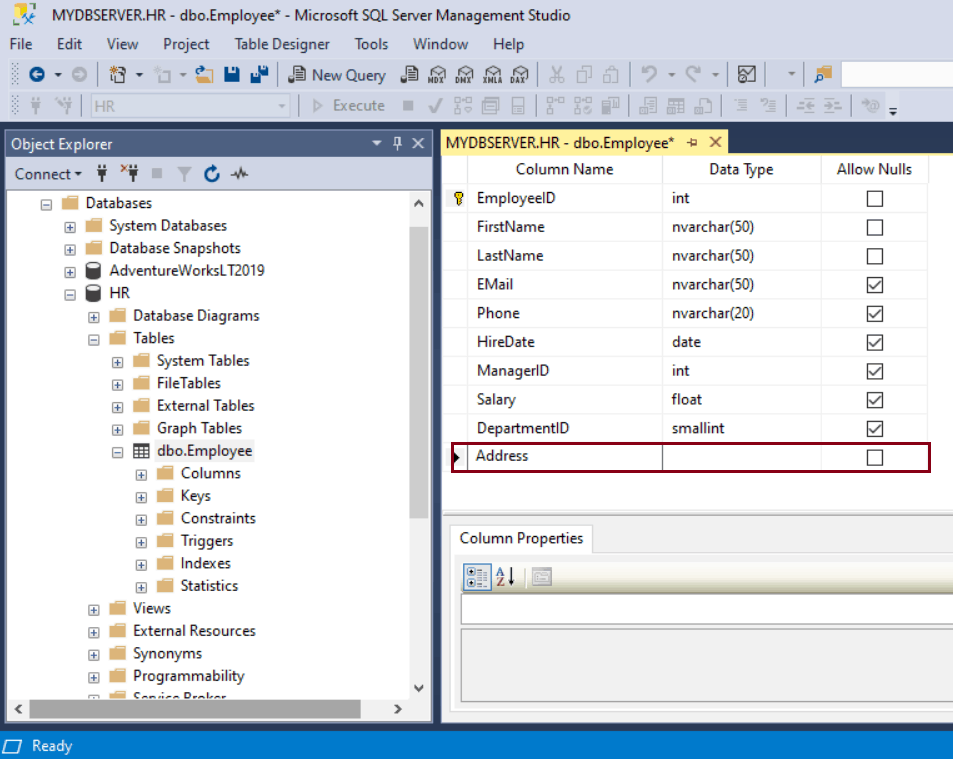
In the next column, select the data type from the dropdown and the length if applicable.
In the last column of a row, check Allow Nulls checkbox if it is nullable. Now, save the table from file -> Save menu to save the modified table.
Rename Table and Columns Using SSMS:
Open SSMS and expand the database folder.
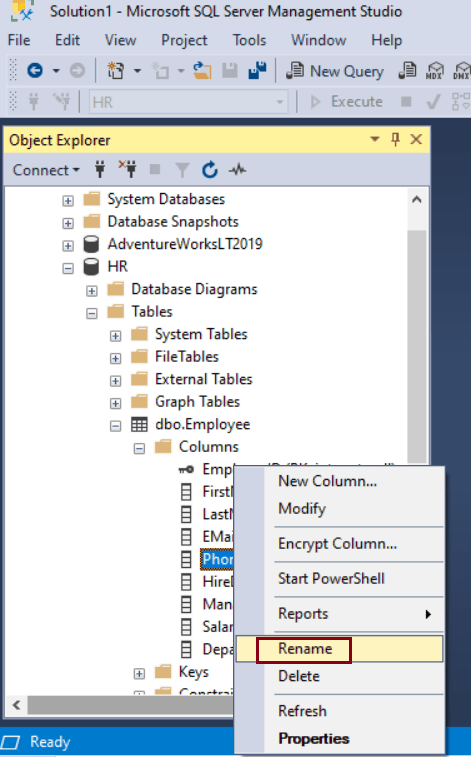
Select and right-click on a table or a column you want to rename and click Rename. Enter a new name by over writing on existing name.
Go to the file menu and click Save.
Delete Columns Using SSMS
Open SSMS and connect to the SQL Server instance. In Object explorer, expand the database and the Tables folder. Locate the table and expand the columns folder to display the column names.
Right-click on the column name which you want to delete and click delete.
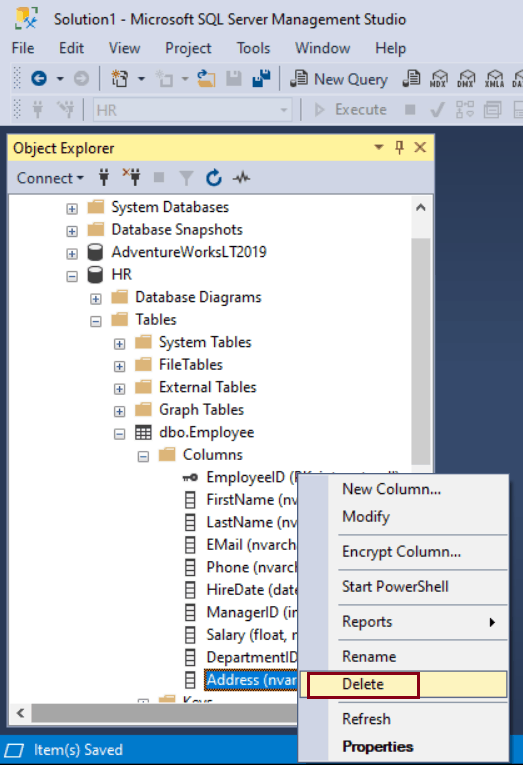
This will open “Delete Object” page, as shown below.
Click OK to delete a column.
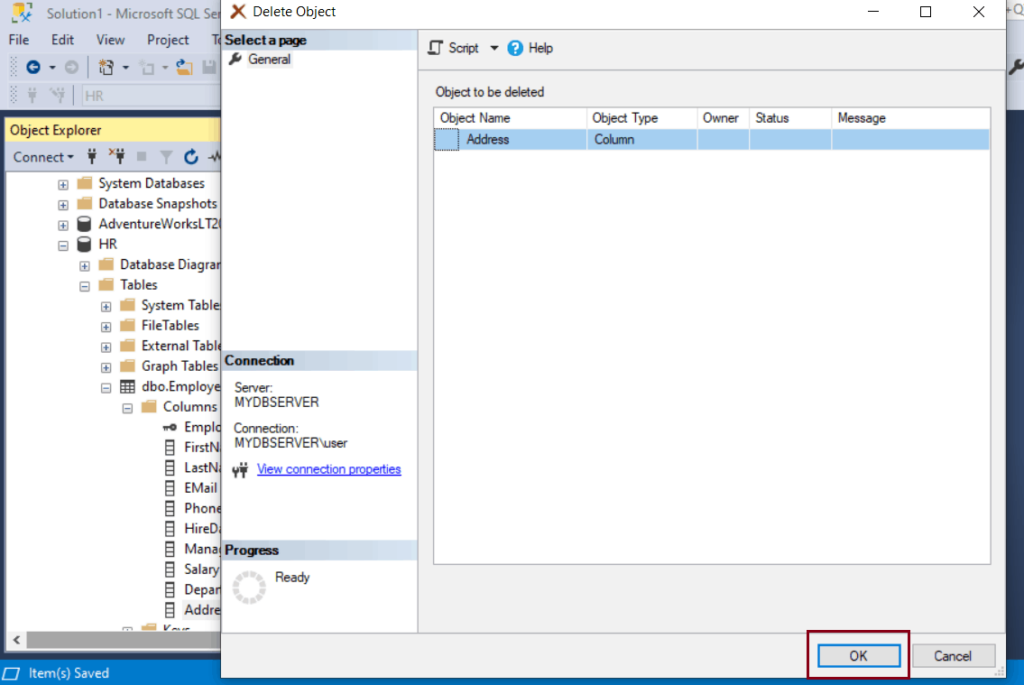
Finally, save the changes from File menu -> Save.
Create a Foreign Key using SSMS..
What is Foreign Key?
The foreign key establishes the relationship between the two tables and enforces referential integrity in the SQL Server. For example, the following Employee table has a foreign key column DepartmentID that links to a primary key column of the Department table.
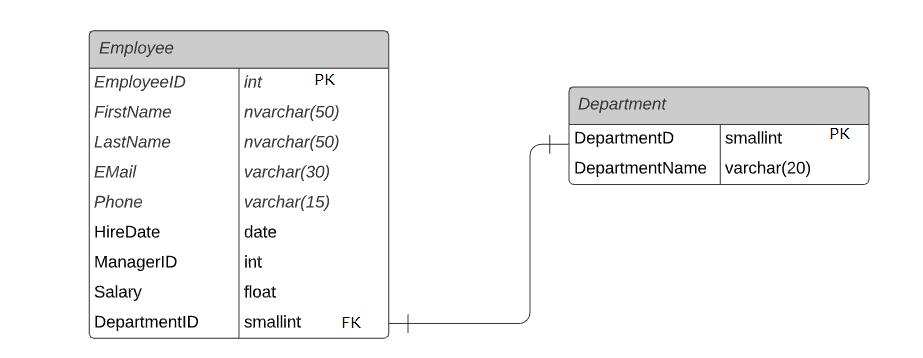
Here, we will configure the DepartmentID column as a foreign key in the Employee table that points to the DepartmentID PK column of the Department table using SQL SERVER MANAGEMENT STUDIO.
Open SSMS and expand the HR database. Right-click on the Employee table and click on the Design option, as shown below.
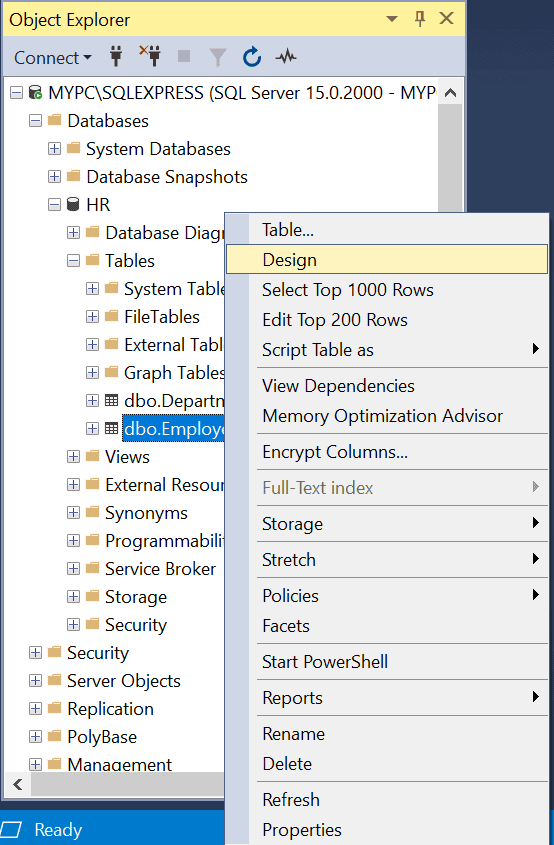
This will open the Employee table in the design mode.
Now, right-click anywhere on the table designer and select Relationships…, as shown below.
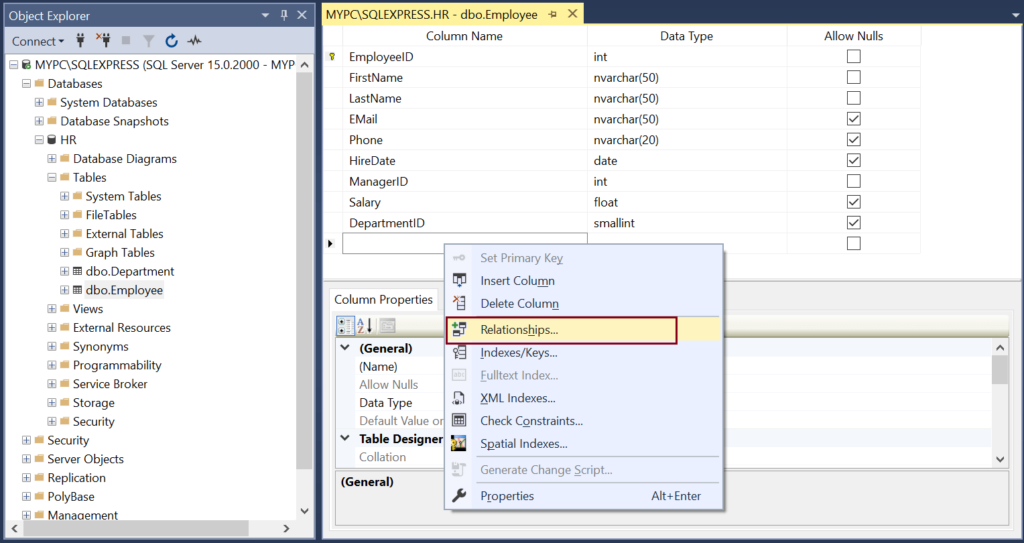
This will open the Foreign Key Relationships dialog box, as shown below.
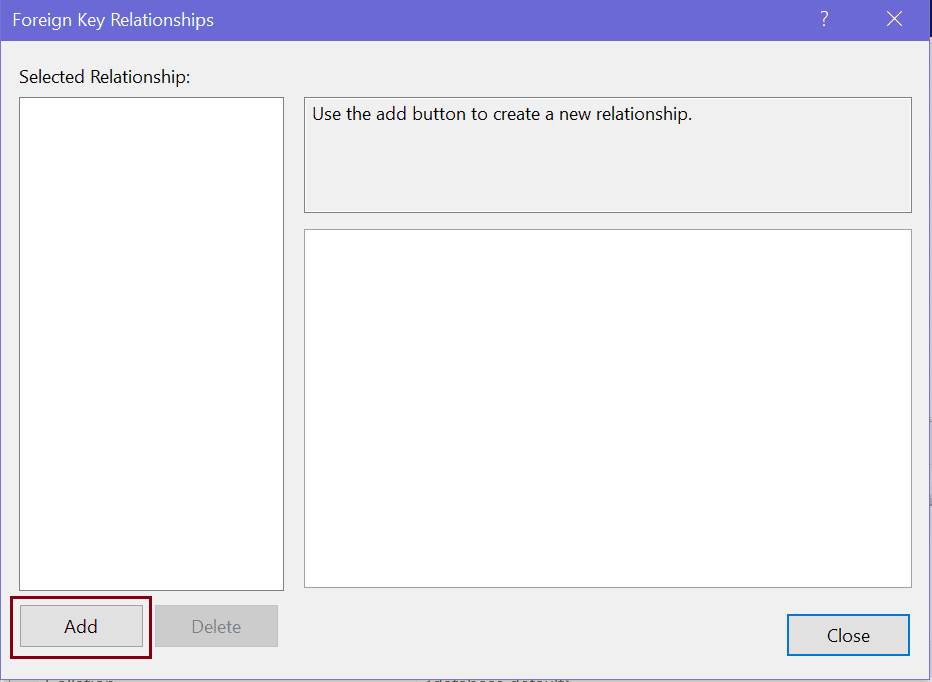
Now, click on the Add button to configure a new foreign key, as shown below.
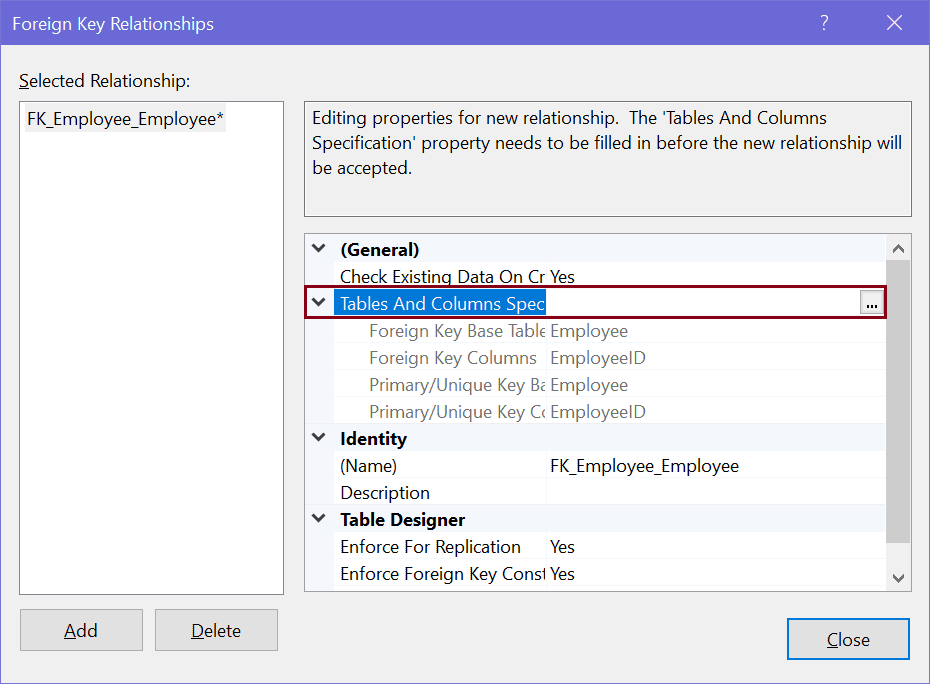
Now, to configure the primary key and foreign key relationship, click on the Tables and Column Specification […] button. This will open Tables and Columns dialog box where you can select primary key and foreign key relationship.

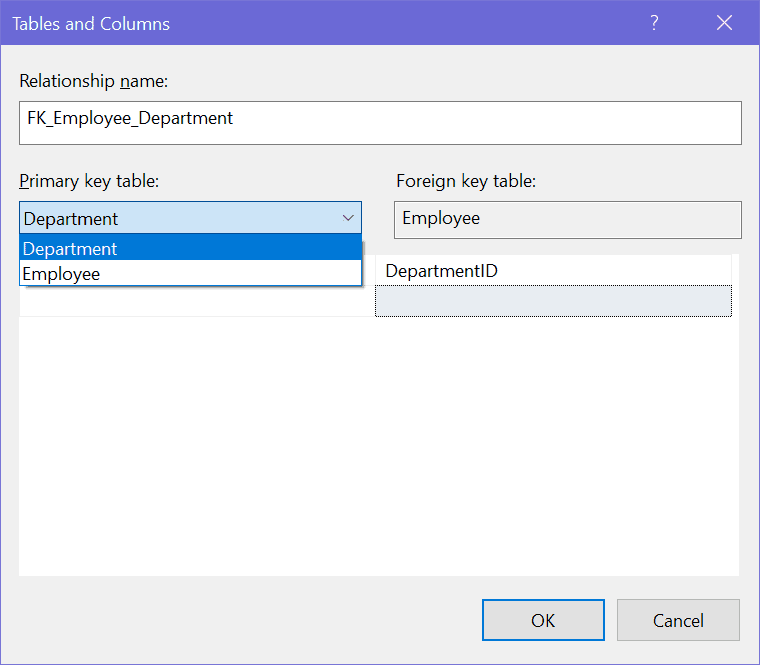
Here, we are configuring the DepartmentID column in the Employee table as a foreign key, which points to the primary key column DepartmentID of the Department table. So, select primary table and key in the left side and foreign key table and column in the right side, as shown below.
The following defines a foreign key DepartmentID in the Employee table.
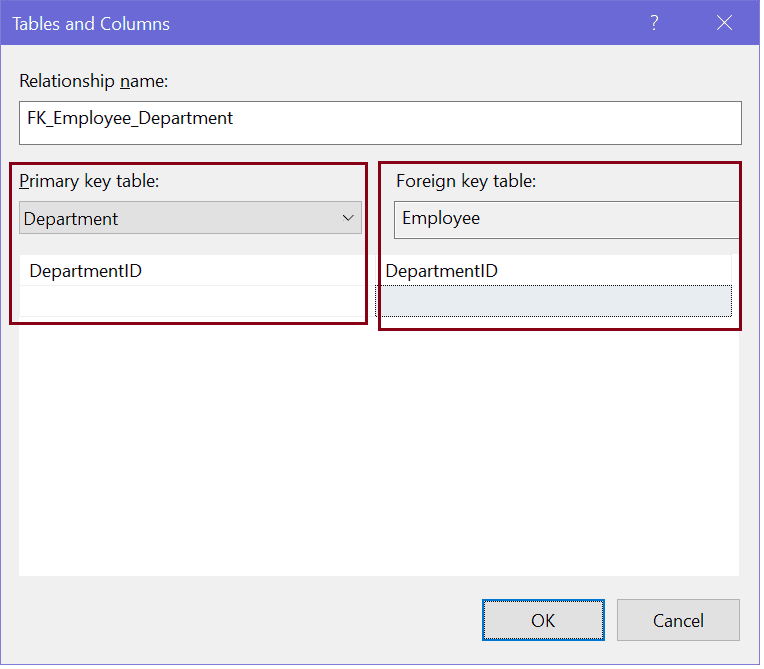
Click OK to create the relationship and click on Close to close the dialog box.
Now, save your changes. This will create a one-to-many relationship between the Employee and Department table by setting a foreign key on the DepartmentID column in the Employee table, as shown below.

IF YOU FIND MY BLOG USEFUL,FOLLOW,SHARE AND COMMENT!
THANK YOU!