MudBlazor is an open-source UI component library for Blazor, a .NET web framework for building web applications using C# instead of JavaScript. MudBlazor provides a collection of reusable UI components such as buttons, forms, dialogs, and more that can be easily integrated into Blazor applications.
MudBlazor aims to simplify the development process of web applications by providing a set of pre-built UI components that can be easily customized and extended. It also follows the Material Design guidelines, providing a consistent and modern look and feel across all components.
Both Blazor and MudBlazor are good technologies, but they serve different purposes.
Blazor is a web framework for building web applications using C# and Razor syntax. It provides a rich set of features for building interactive and responsive web applications, such as components, routing, and data binding. Blazor can be used to build full-stack web applications that run entirely in the browser, or server-side web applications that run on the server and communicate with the client using SignalR.
MudBlazor, on the other hand, is an open-source UI component library for Blazor that provides a collection of reusable UI components that can be easily integrated into Blazor applications. It follows the Material Design guidelines, providing a consistent and modern look and feel across all components. MudBlazor can help developers create high-quality and responsive web applications more quickly and efficiently by providing a set of pre-built UI components that are easy to use and customize.
So, the choice between Blazor and MudBlazor depends on your specific needs and requirements. If you are building a web application from scratch and need a full-stack web framework with rich features, Blazor would be a good choice. If you are already using Blazor and need a set of pre-built UI components to enhance your application’s look and feel, MudBlazor would be a good choice.
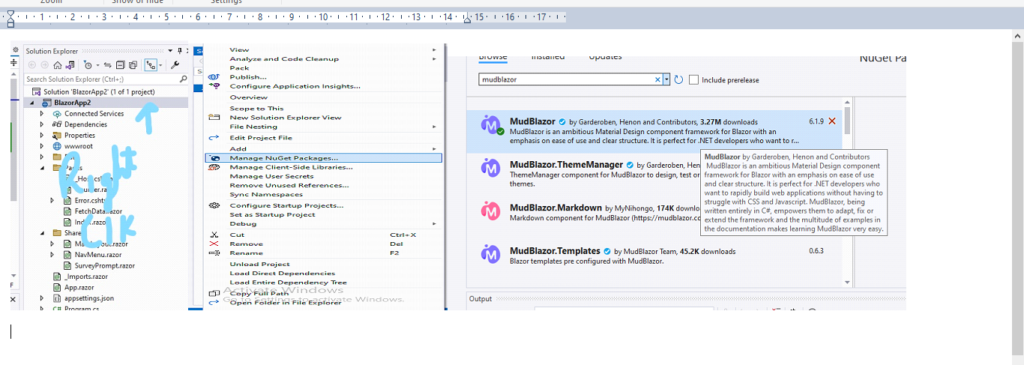
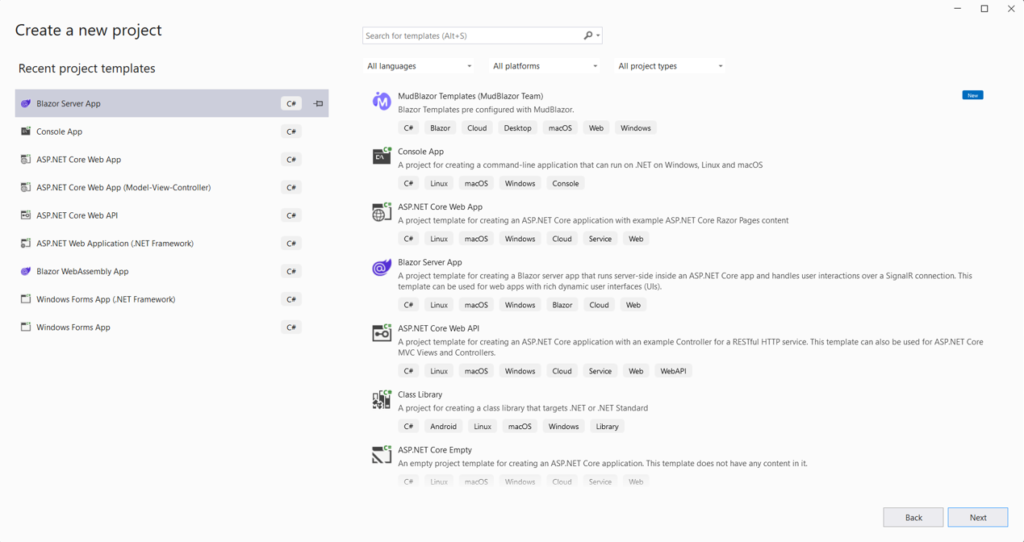
To install and configure MudBlazor in your project, you can follow these steps
First
1. Install-Package MudBlazor
2. Go in solution explorer—>right click on project name —>Manage Nuget Package–>browse MudBlazor—>install it.
3. Configure the MudBlazor services: In the Startup.cs file, add the following code to the ConfigureServices method:
This will configure the MudBlazor services in your application.
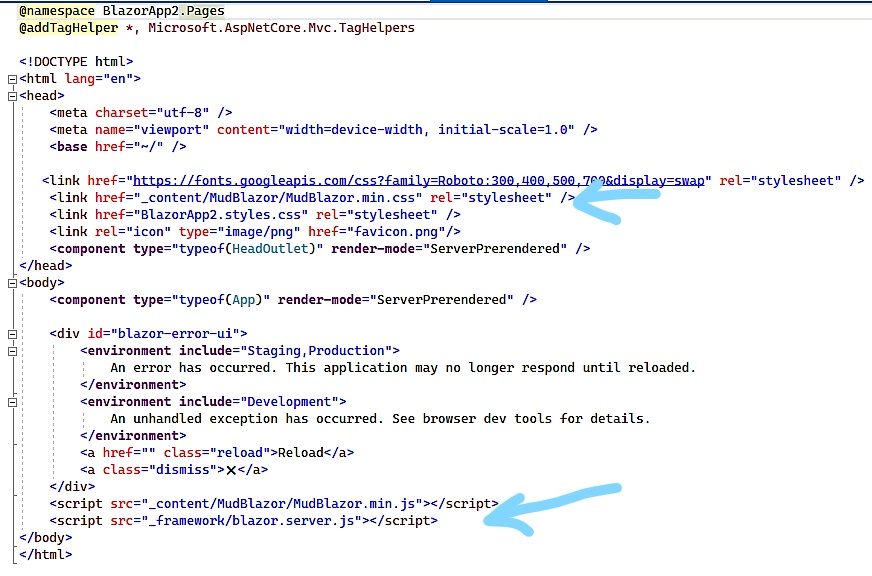
4. Add the MudBlazor CSS files: MudBlazor uses its own set of CSS files that need to be added to your project. You can add these files by adding the following line to the head section of your _Host.cshtml file (for Blazor Server) or index.html file (for Blazor WebAssembly):
5. Also you can add these files by adding the following two lines to the bottom just above the closing </body> tag of your _Host.cshtml file.
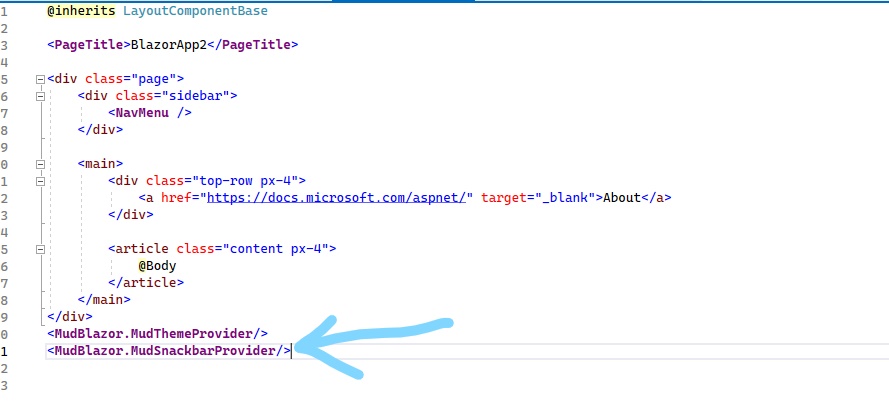
6. Open up the Shared/MainLayout.razor page and add the following code to the end of the file.
<MudThemeProvider/>
<MudSnackbarProvider/>
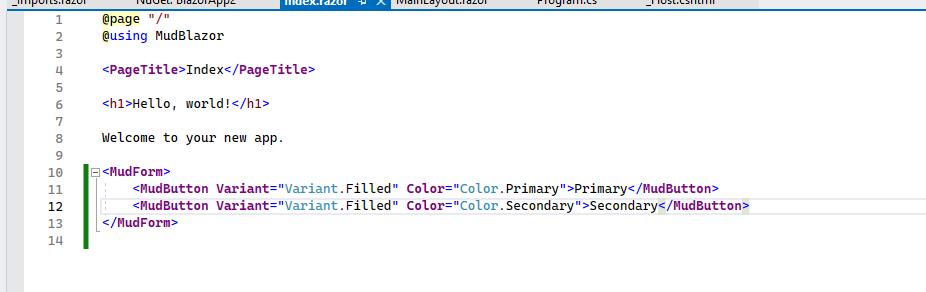
7. Use MudBlazor components in your Razor pages: You can now start using MudBlazor components in your Razor pages. For example, to add a MudButton component to your page, you can use the following code:
8. Run your project: Build and run your project to see the MudBlazor components in action.
These are the basic steps to get started with MudBlazor 7.0 in your project.
MudBlazor's Advanced Features
MudBlazor also offers advanced features that can help developers create powerful and responsive user interfaces. Some of MudBlazor’s advanced features and how they can be used in real-world scenarios.
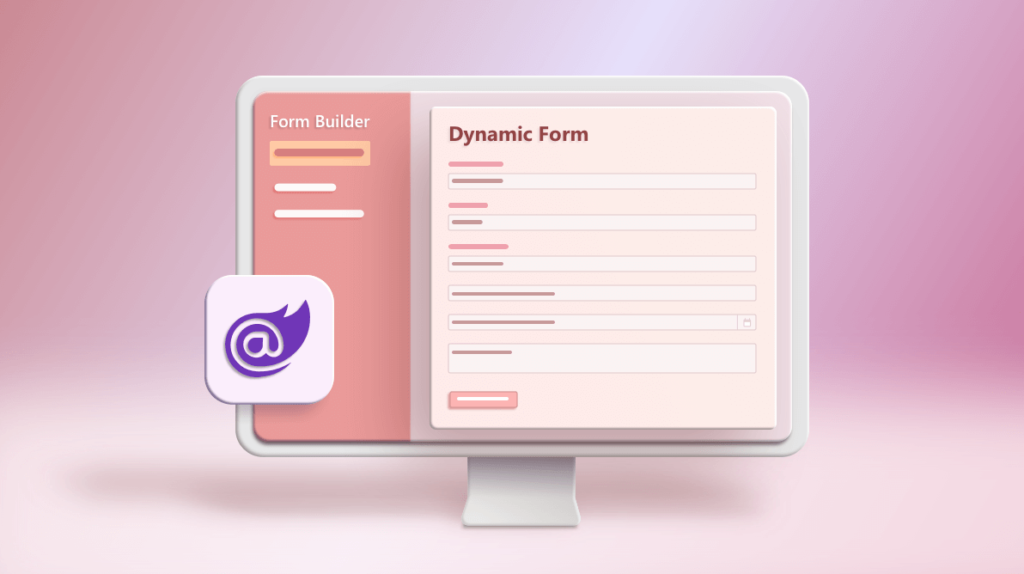
Form Validation One of the most important features of a web application is form validation. MudBlazor offers built-in form validation functionality that allows developers to ensure that user inputs meet certain criteria. The library provides several validation rules such as required, email, URL, range, and more. Developers can also create custom validation rules by implementing the IValidator interface. MudBlazor provides visual feedback to users when validation fails, making it easy for them to correct their inputs.
Theming MudBlazor’s theming feature allows developers to customize the appearance of components to fit their application’s branding. The library provides a default theme, but developers can override it by creating a custom theme. The theme can be customized by setting the colors, fonts, and sizes of different components. MudBlazor’s theming feature is based on CSS variables, making it easy for developers to apply their styles consistently throughout the application.
Charts MudBlazor’s chart components allow developers to visualize data in a variety of formats, such as pie charts, bar charts, and line charts. The library provides several chart types, including DoughnutChart, BarChart, LineChart, and more. Developers can customize the appearance of charts by setting colors, labels, and other properties. MudBlazor’s chart components are based on Chart.js, a popular open-source charting library.
Toasts MudBlazor’s toast component allows developers to display notifications or messages to users. The toast component is highly customizable, allowing developers to set the position, duration, and appearance of the notification. Developers can also set the type of the notification, such as success, warning, or error, to provide additional context.
In conclusion, MudBlazor offers several advanced features that can help developers create powerful and responsive user interfaces. From form validation to theming, localization, charts, and toasts, MudBlazor provides a rich set of tools to build modern and efficient web applications.
SignalR is a real-time web communication library that allows server-side code to send asynchronous notifications to client-side web applications, and it can be used with Blazor to create interactive and responsive web applications. Here’s an overview of how you can use SignalR with Blazor.
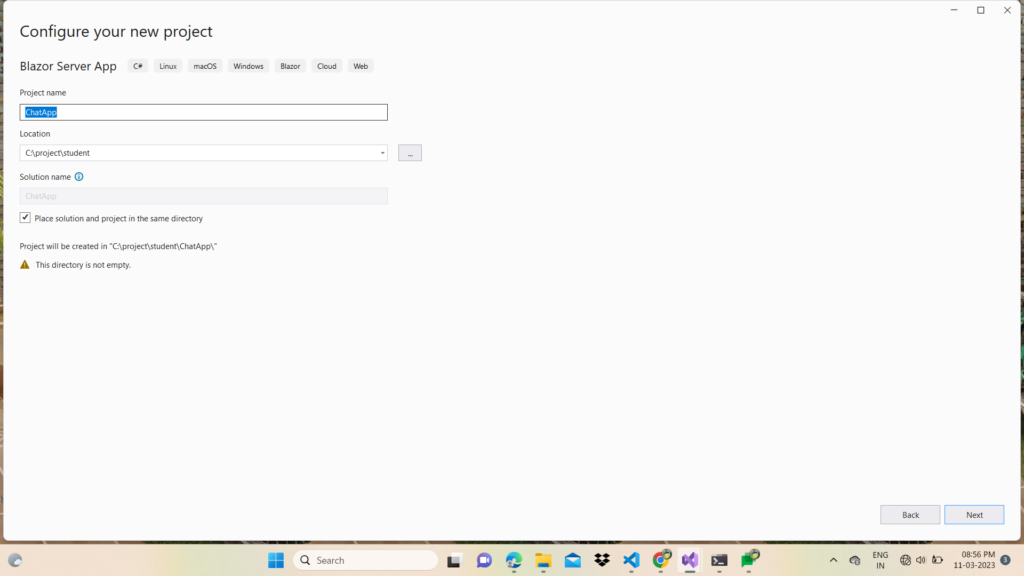
Create your app
Start Vs and select Create a new Project
2. Create a new project And Search Blazor Server App in search box
3.Choose a name of the app
4.Configure your new project
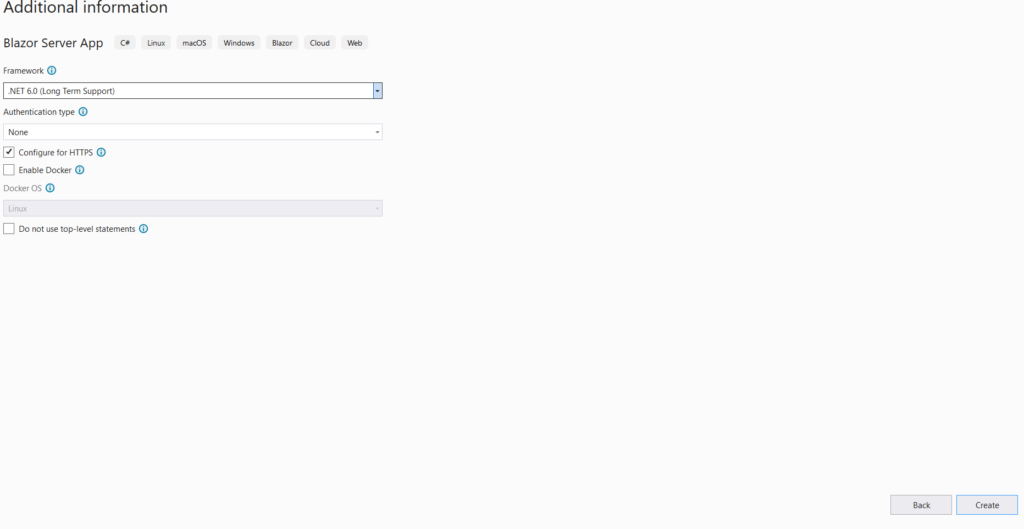
5. Select .net 6 in the Framework and click Create button
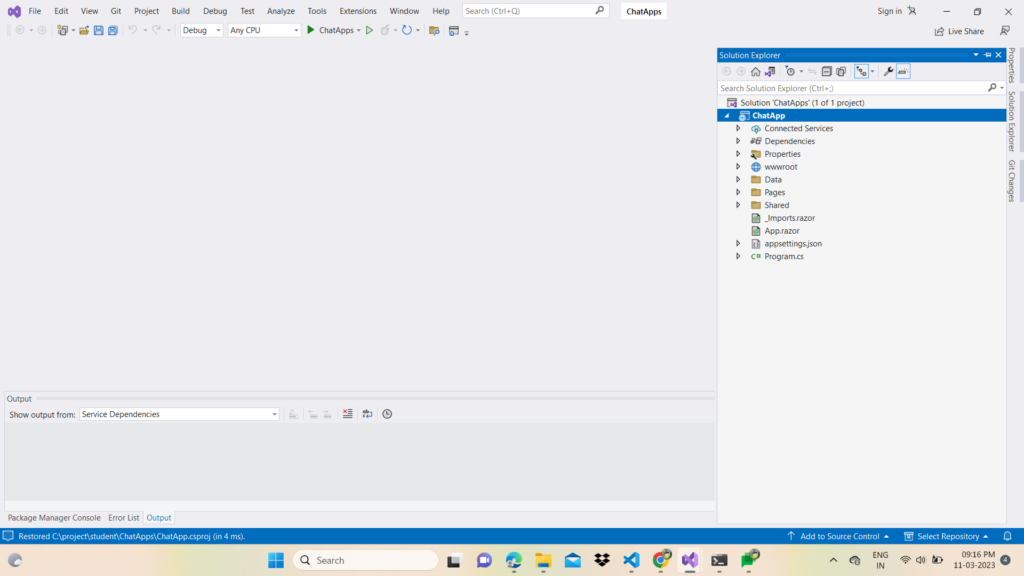
Project is Created Successfully
In Solution Explorer, right-click the ChatApp project and select Manage NuGet Packages.
In the Manage NuGet Packages dialog, confirm that the Package source is set to nuget.org.
With Browse selected, type Microsoft.AspNetCore.SignalR.Client in the search box.
In the search results, select the Microsoft.AspNetCore.SignalR.Client package. Set the version to match the shared framework of the app. Select Install.
If the Preview Changes dialog appears, select OK.
If the License Acceptance dialog appears, select I Accept if you agree with the license terms.
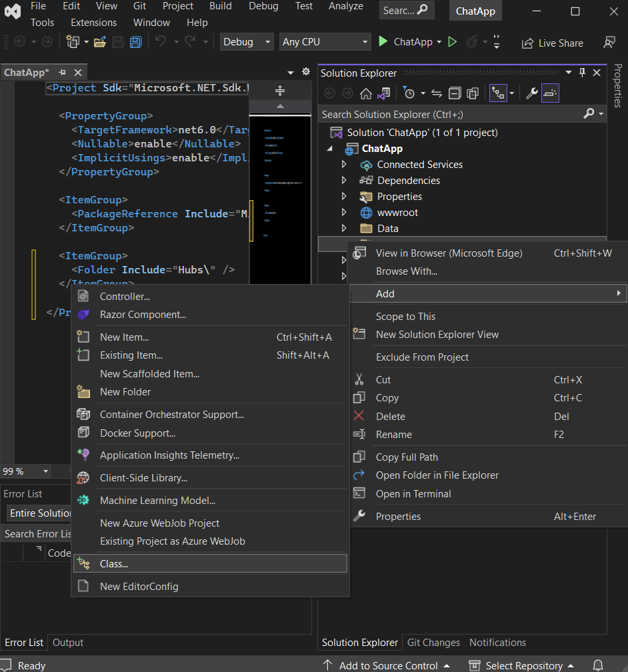
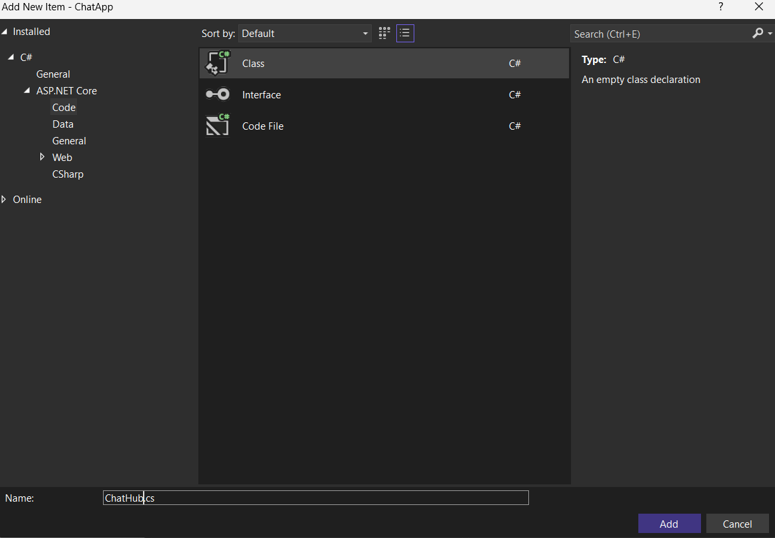
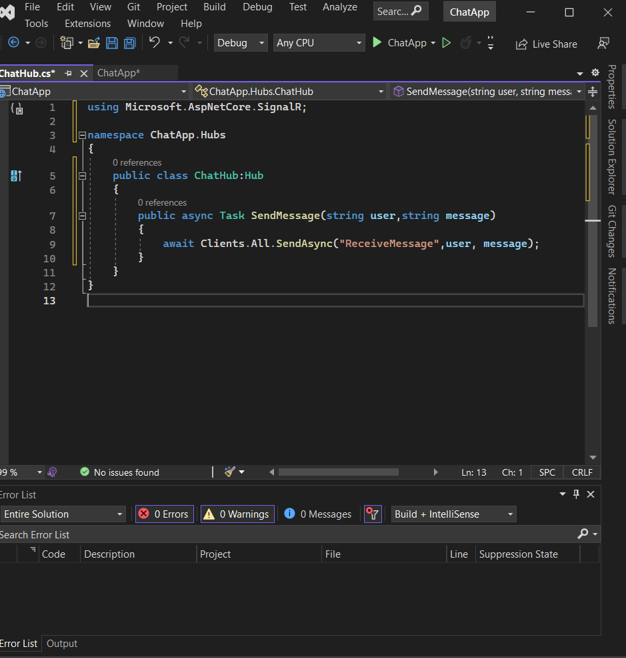
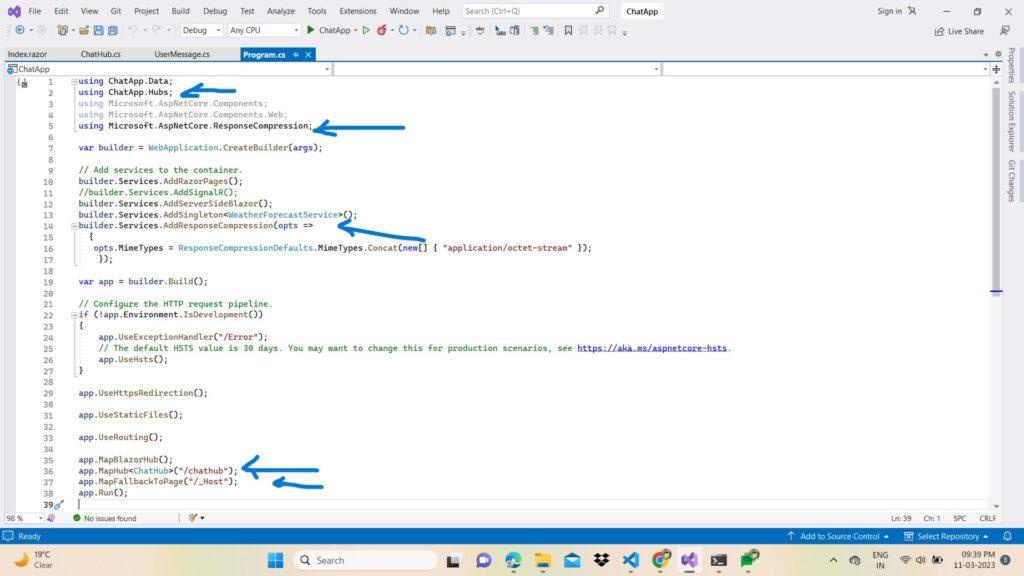
Add a SignalR hub
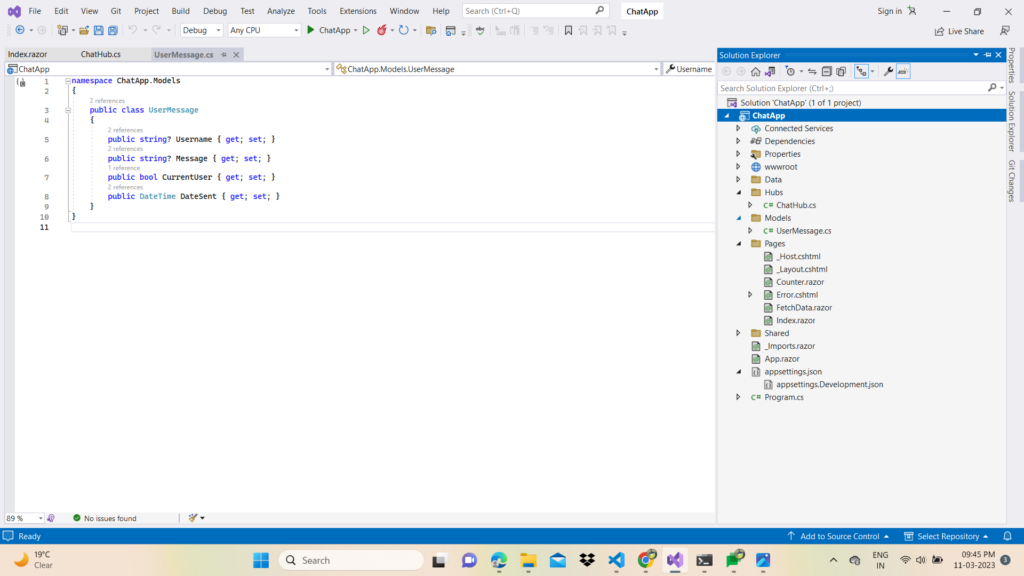
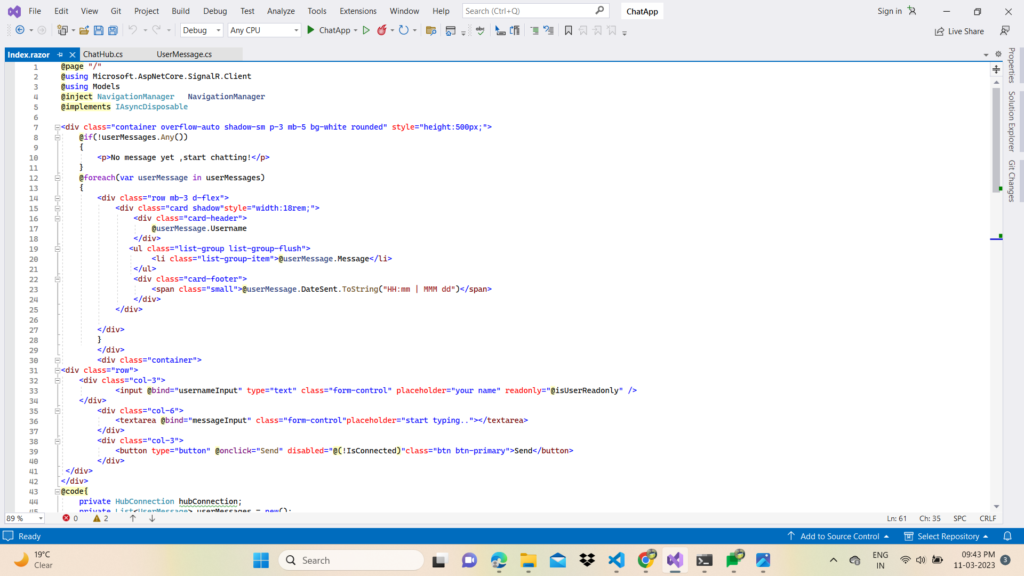
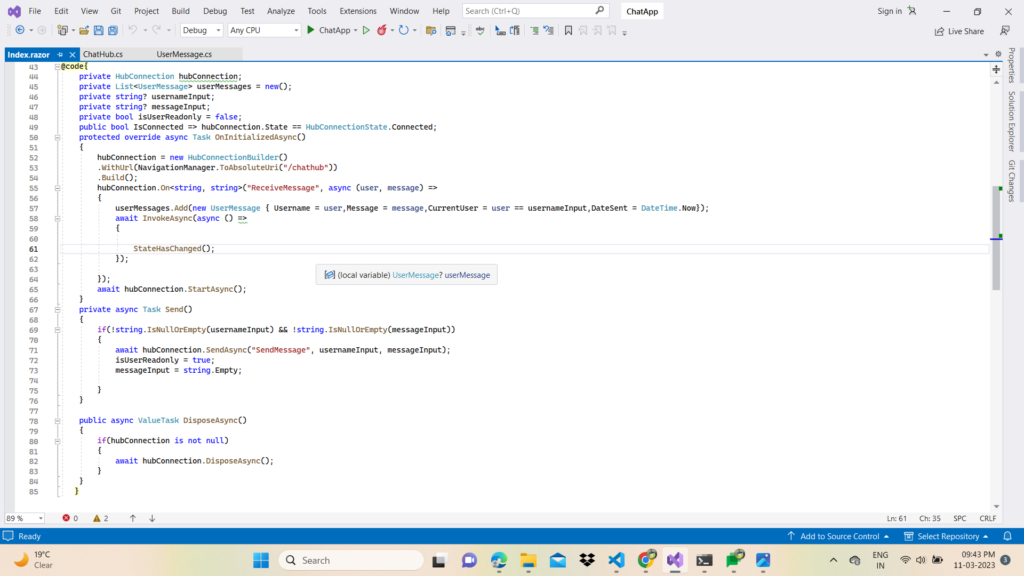
Create a Hubs folder and add the following ChatHub class
In web development, layouts play a crucial role in creating a consistent user experience across all the pages of a website. A layout is the structural and visual framework of a web page that helps to organize and display its content. Dynamic layouts take this a step further by allowing the layout to adapt and change based on user interactions or other conditions. In this blog post, we’ll explore dynamic layouts and how they are implemented in Blazor, a web framework for building interactive client-side web UIs using .NET.
What is a Dynamic Layout?
A dynamic layout is a layout that can change based on certain conditions or user interactions. This can include changes to the structure or visual presentation of the layout. Dynamic layouts are used to create more interactive and personalized user experiences. For example, a dynamic layout can change based on the user’s device type, screen size, or other preferences.
Dynamic Layouts in Blazor
Blazor is a web framework that allows developers to build interactive client-side web UIs using .NET. Blazor supports dynamic layouts through its component model. Components in Blazor are reusable pieces of UI that can be composed together to form a complete web page. Components can be created with dynamic layouts that change based on user interactions or other conditions.
Blazor provides two types of components: Razor components and Blazor components. Razor components are built using the Razor syntax, which is a markup syntax for creating HTML templates. Razor components can contain C# code that is executed at runtime. Blazor components are built using the Blazor component model, which provides a more advanced set of features for building dynamic UIs.
Blazor components can contain dynamic layouts by using conditional logic to control the display of UI elements. For example, a Blazor component can show or hide different sections of a layout based on user interactions or other conditions. Blazor components can also dynamically change the style or layout of UI elements based on user interactions or other conditions.
To create a dynamic layout in Blazor, you can use a combination of Razor syntax and C# code. Here’s an example of a Blazor component that uses dynamic layouts to display different content based on user interactions:
In this example, the component contains an @if statement that checks the value of a boolean variable called showDetails. If showDetails is true, the component displays a section with details about the item. The ToggleDetails method is called when the user clicks the “Show Details” button, which toggles the value of showDetails.
Dynamic layouts in Blazor offer a lot of flexibility for building interactive and personalized user interfaces. Here are some additional features and techniques you can use to create dynamic layouts in Blazor:
Conditional CSS classes: You can apply different CSS classes to elements based on conditions in your Blazor component. This allows you to dynamically change the style of UI elements based on user interactions or other conditions. For example:
In this example, the highlighted CSS class is applied to the div element only if the isHighlighted variable is true.
Templated components: Blazor allows you to create components with templated content that can be customized at runtime. This is useful for creating reusable components that can be used in different contexts with different layouts.
For example:
<Counter>
<p>Current count: @currentCount</p>
</Counter>
In this example, the Counter component has a template that includes a p element with the current count displayed. This allows the Counter component to be used in different contexts with different templates.
Event handling: Blazor components can handle user interactions through events such as onclick, onkeyup, or onsubmit. You can use these events to trigger changes to the layout or other components.
In this example, the IncrementCount method is called when the user clicks the button, which increments the count variable and updates the UI.
Dynamic data binding: Blazor components support dynamic data binding, which allows you to bind UI elements to properties or variables in your component. This enables the UI to update automatically when the underlying data changes. For example:
<input type=”text” @bind-value=”@username” />
<p>Hello, @username</p>
@code {
private string username;
}
In this example, the @bind-value directive binds the value of the input element to the username variable. When the user types into the input field, the username variable is updated automatically, and the greeting in the p element is updated accordingly.
In summary, dynamic layouts in Blazor provide a lot of flexibility for creating interactive and personalized web UIs. By using a combination of conditional logic, templated components, event handling, and dynamic data binding, you can create complex and dynamic UIs that adapt to user interactions and other conditions.
Conclusion
Dynamic layouts are a powerful tool for creating more interactive and personalized user experiences on the web. In Blazor, dynamic layouts can be created using a combination of Razor syntax and C# code in the form of components. By using dynamic layouts, developers can create more flexible and adaptable web pages that provide a better user experience for their audience.
A lambda expression is a short block of code which takes in parameters and returns a value. Lambda expressions are similar to methods, but they do not need a name and they can be implemented right in the body of a method. Lambda expressions are any expression that uses the operator =>, which we read aloud as “goes to”.
For example – num => num * 7
Here, num is an input parameter and num * 7 is a return value. The lambda expression does not execute on its own. Instead, we use it inside other methods or variables.
The Lambda Expressions can be of two types:
Statement Lambda: Consists of the input and a set of statements to be executed.
Syntax:- input => { statements };
Note: Does not return any value implicitly
Expression Lambda: Consists of the input and the expression.
Syntax:- input => expression;
Note: Returns the evaluated value implicitly
Lambda Expression in asp. net:-
C# 3.0 introduced the lambda expression. It is also works like an anonymous method. The difference that in Lambda expressions you don’t need to specify the type of the value that you input thus making it more flexible to use. It means lambda expression simplifies the anonymous function or you can say that lambda expression is a shorthand for an anonymous function. The => is the lambda operator which is used in all lambda expressions. The Lambda expression is divided into two parts, the left side is the input and the right is the expression.
Use of Lambda Expression
Some of the uses of the lambda expression are:
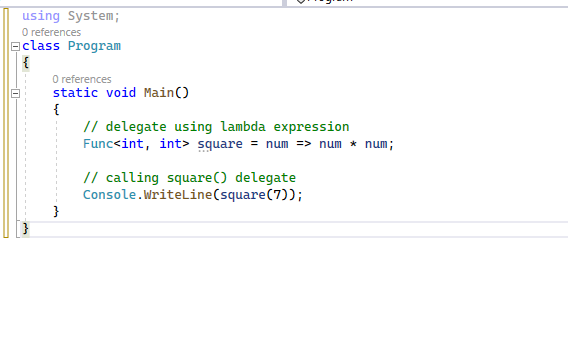
Writing Easy and Simple Delegate Code Using lambda expressions, we can write much easier and simpler code. Let’s see programs with and without using a lambda expression in a delegate.
Program Without Using Lambda Expression
In the above program, we have defined a delegate square of Func type that points to the Square() method.
Program With Using Lambda Expression
Here, we don’t need to define a separate method. We have replaced the pointer to the square() method with the lambda expression.
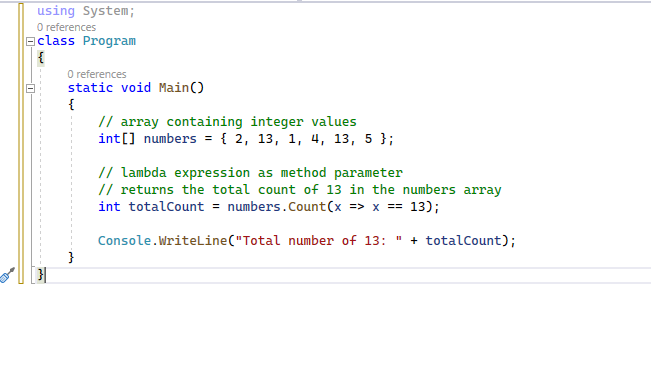
Passing Parameter in Method We can pass a lambda expression as a parameter in a method call.
Let’s take a built-in Count() method of C# array and pass a lambda expression as its parameter.
In the above example, we have passed the lambda expression x => x == 13 as a method parameter.
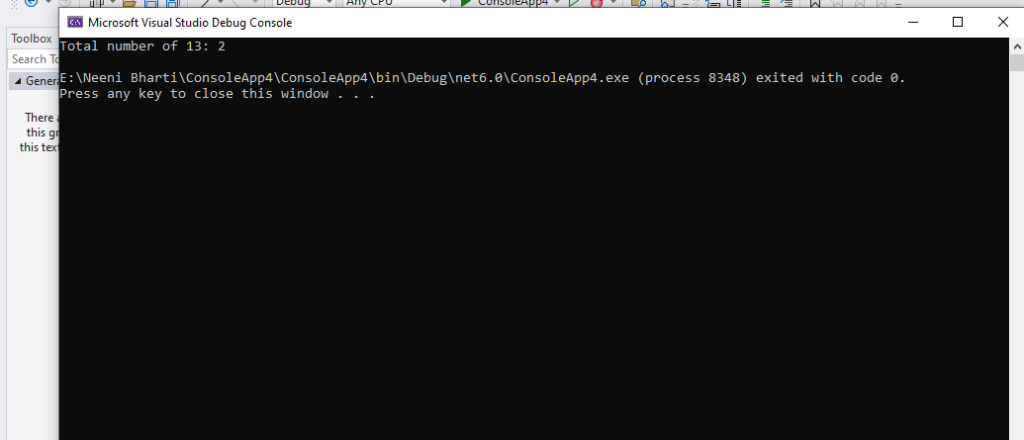
Output-
The Count() method checks each element of the numbers array and counts the total number of 13 in the array.
Lambda Expression in Blazor-
Blazor is a web framework developed by Microsoft that allows developers to build web applications using C# and .NET instead of JavaScript. In ASP.NET, Blazor is typically used to build web applications with server-side rendering. Here are some examples of how lambda expressions can be used in Blazor in ASP.NET:
Event handlers: In Blazor, you can use lambda expressions to define event handlers for components. For example: To handle an event in Blazor, you can use a lambda expression to define a method that will be called when the event occurs. Here’s an example of how to handle the “onclick” event of a button:
In the above code, the lambda expression () => HandleClick() defines a method that takes no parameters and calls the HandleClick() method when the button is clicked.
Data binding: In Blazor, you can use lambda expressions for data binding to components. For example: you can bind a string variable to a component’s text property using a lambda expression:
Here, the lambda expression @(() => MyProperty) is used to bind the value of an input element to the MyProperty property.
Are you tired of writing web applications in JavaScript? Are you a .NET developer looking for a way to create web applications using C#?
Look now further than Blazor! What it is ? and why so popular!
Blazor is a UI framework, it allows developers to design and develop interactive rich UI components with C#, HTML, CSS, plus it is open source and free. So technically now you can create web pages directly in C# instead of JavaScript.
Blazor web application is nothing but a collection of web pagesor to be precise razor pages, then each razor page will host bunch of blazor components and get this, this blazor web application could run on both server or on client. Isn’t that cool?
In traditional architecture, server is designed with high level languages such as Java, C# and client is dominated by dynamic programming language such as javascript, now with blazor you can design both your server and client application in C#.
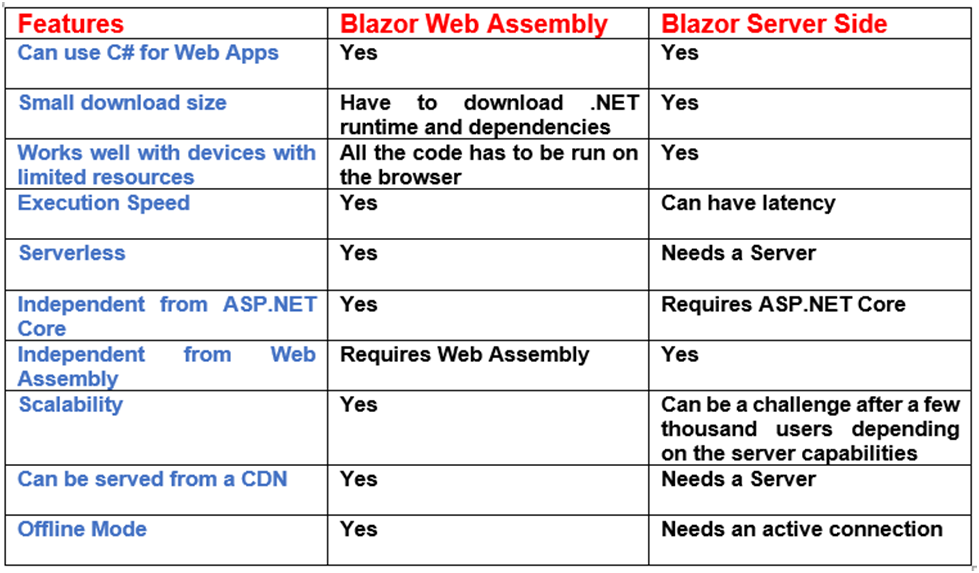
ASP.NET Core Blazor Hosting Models (Blazor WebAssembly and Blazor Server)
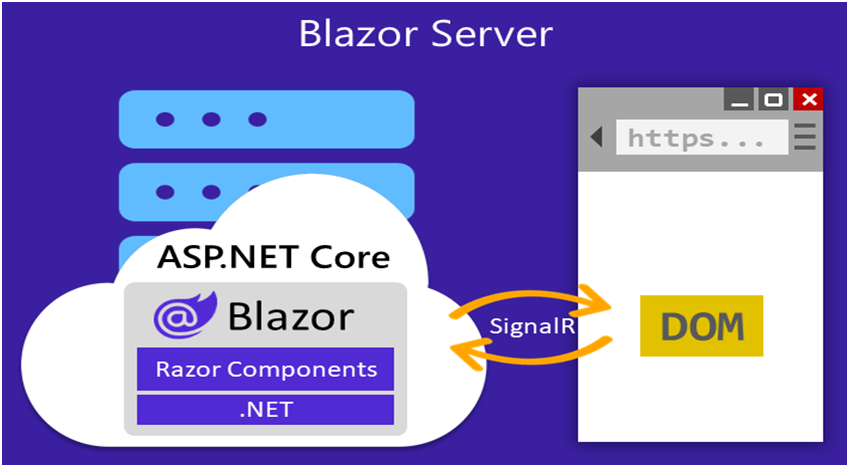
What is Blazor Server(Server side hosting model)?
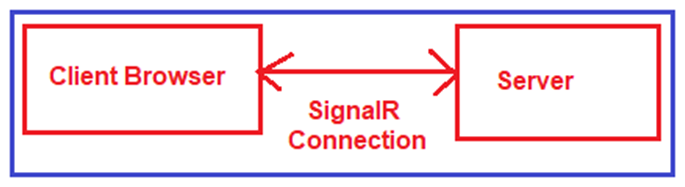
With Blazor Server Hosting Model, the Blazor applications run on the server and the user interacts with the server through a SignalR connection. With SignalR we handle real-time communication that means with SignalR the client does not need to download the .NET Runtime, simply interact with the application remotely. As we don’t download the .NET Runtime in Blazor Server App to run the application, which makes the application serves on the server-side load faster for the user.
You might have played online games, those games run on a client machine or on a client browser but the data is coming from the server. So if you kill 3 enemies the counter is stored on the server, the moment you kill the 4th enemy counter increases to 4, that communication between server and client is so fast the user can hardly notice any lag. And this is enabled by SignalR in the blazor server app. So for every user interaction on browser signalR sends UI components and data from server to browser and then browser simply renders those changes.
In Blazor server app, UI components (razor components) are stored on the server. Every UI updates, event calls are handled by SignalR which sends the updated data/component to the browser on demand. In order to run app smoothly browser need to have consistent connection with server. The browser has script, blazor.server.js which establishes the SignalR connection with the server.
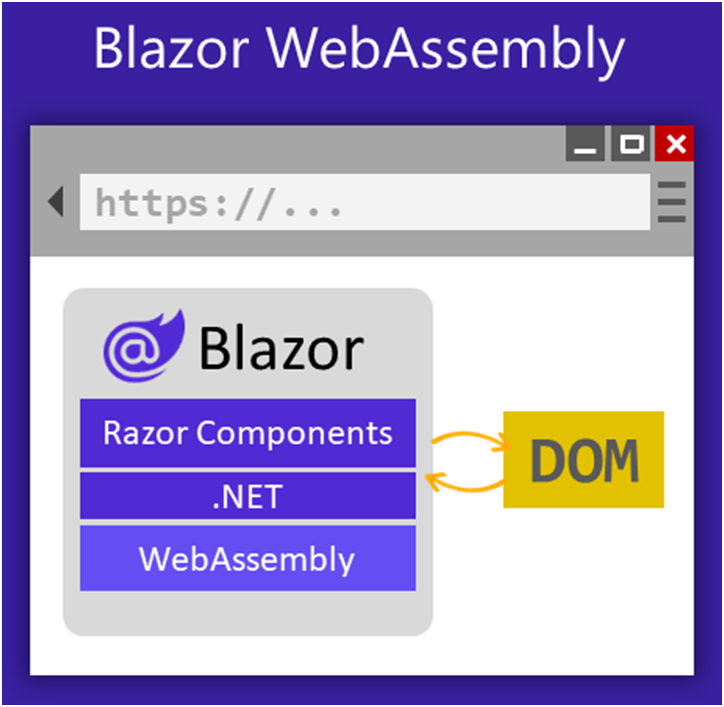
Blazor Web assembly(client side hosting model)?
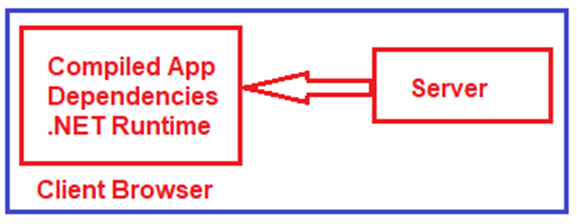
In Blazor WebAssembly Hosting Model, the application directly runs in the browser with the help of WebAssembly. So, the things which are required to run a .Net application such as the compiled application code, its dependencies, and the most important .NET runtime are downloaded to the client browser by WebAssembly from the server as shown in the below image.
Can work offline: As there is no server dependency, the client can work without being dependent on the server. so it doesn’t matter if you lose the connection with the server.
If you want an application that is supported by search engines, or has server-side support within the application, Blazor Server is your choice.
But, if you want an arguably quicker application that works offline, then you will be looking at Blazor WebAssembly.
Build your first Blazor app
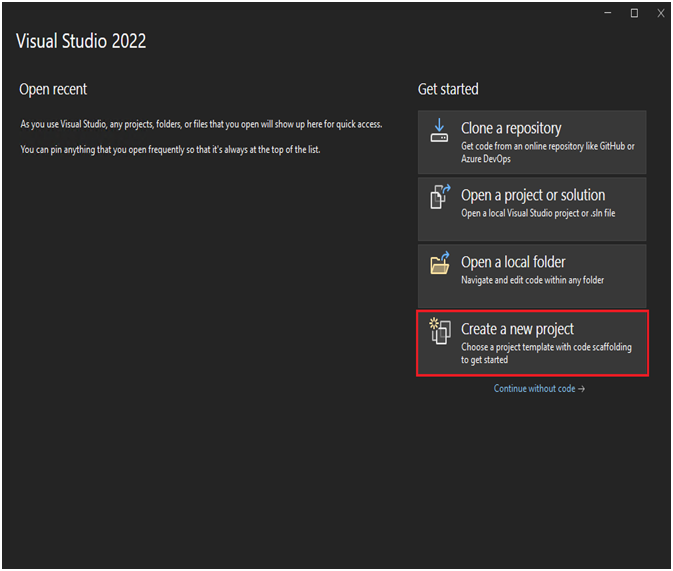
Start Visual Studio and select Create a new project.
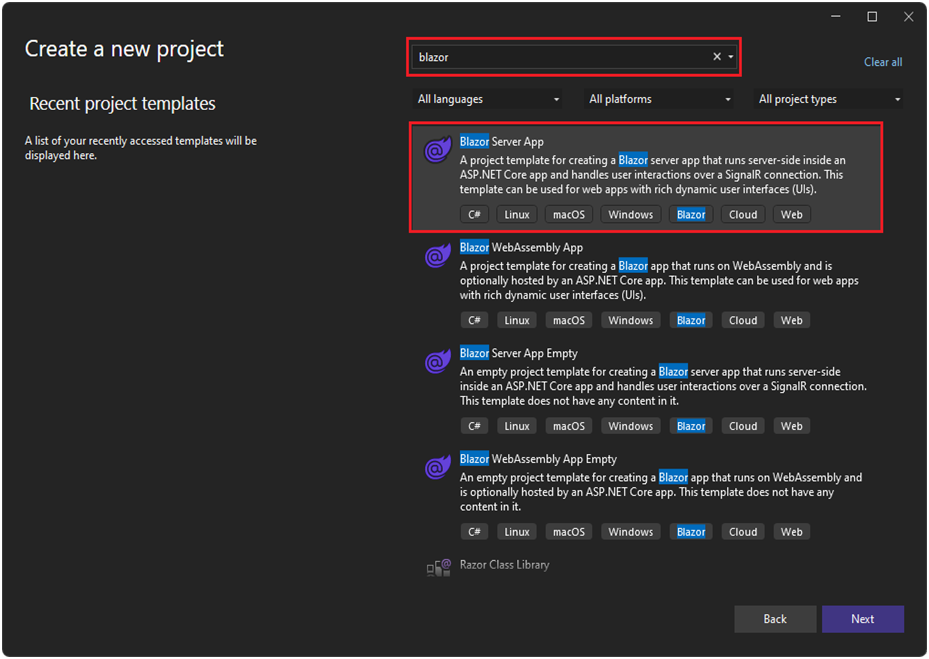
2. In the Create a new project window, type Blazor on the search box and hit Enter.
3. Select the Blazor Server App template and select Next.
3. In the Configure your new project window, enter BlazorApp as the project name and select Next.
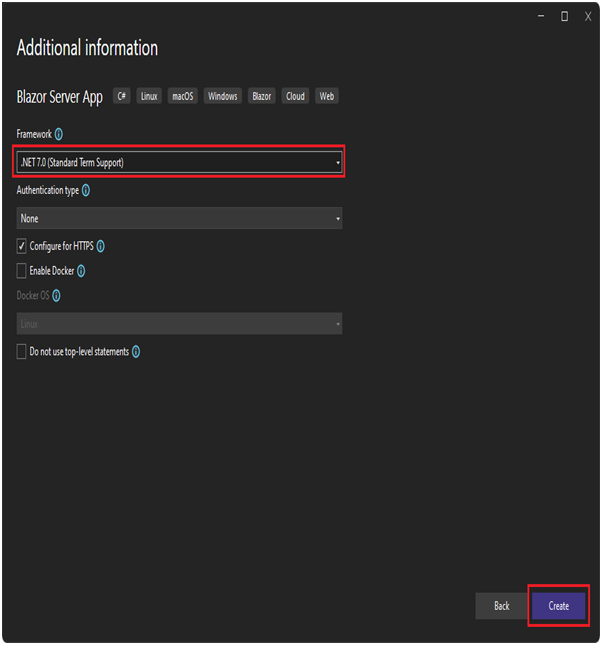
4.In the Additional information window, select .NET 7.0 (Standard Term Support) in the Framework drop-down if not already selected and click the Create button.
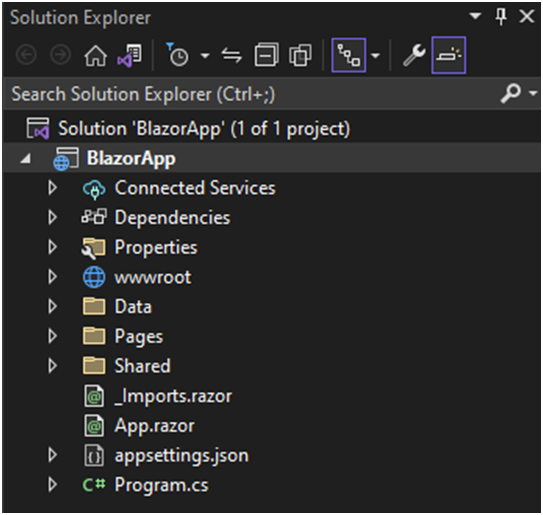
Your project is created and loaded in Visual Studio. Take a look at the contents of your project using Solution Explorer.
Several files were created to give you a simple Blazor app that is ready to run.
Program.cs is the entry point for the app that starts the server and where you configure the app services and middleware.
App.razor is the root component for the app.
The Pages directory contains some example web pages for the app.
This folder contains the _Host razor page and the routable components that make up the Blazor app. The components have the .razor extension.
Index component (Index.razor) – Rendered when we navigate to the root application URL.
Counter component (Counter.razor) – Rendered when we navigate to the path /counter.
FetchData component (FetchData.razor) – Rendered when we navigate to the path /fetchdata.
Error component (Error.razor) – Rendered when an unhandled exception occurs in the blazor app.
BlazorApp.csproj defines the app project and its dependencies and can be viewed by double-clicking the BlazorApp project node in the Solution Explorer.
The launchSettings.json file inside the Properties directory defines different profile settings for the local development environment. A port number is automatically assigned at project creation and saved on this file.
MainLayout component (MainLayout.razor)
The application’s main layout component
NavMenu component (NavMenu.razor)
Implements the navigation menu on the sidebar. The NavLink component renders navigation links to other Razor components like the index, counter, and fetchdata components. This NavLink component is intelligent enough to highlight the navigation menu item if its component is currently displayed.
_Imports.razor
This is like _ViewImports.cshtml file in an asp.net core MVC project. This file contains the common namespaces so we do not have to include them in every razor component.
The data folder (Blazor Server)
Contains code files related to the sample WeatherForecast service
appsettings.json (Blazor Server)
Just like an asp.net core MVC project, a Blazor project also uses this file to store the configuration settings.
Run your app
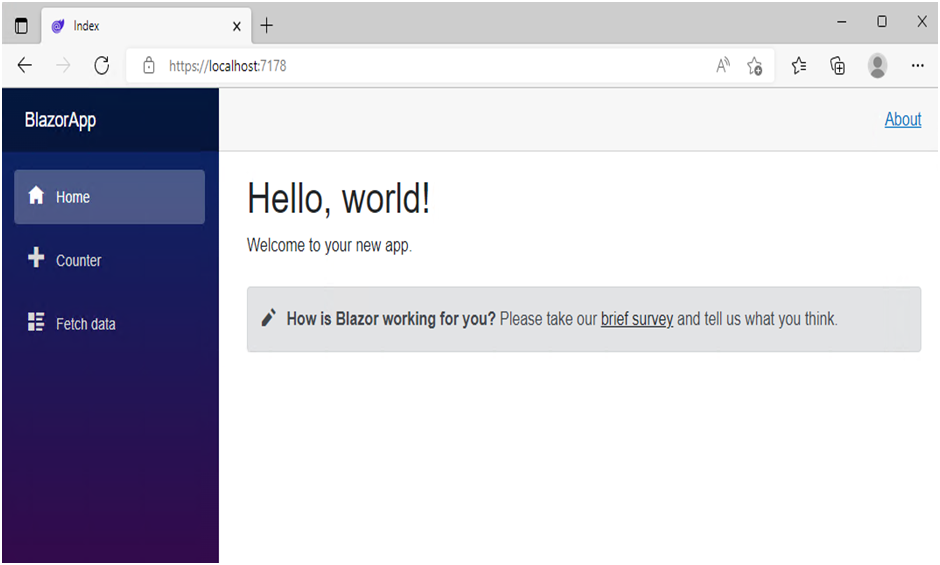
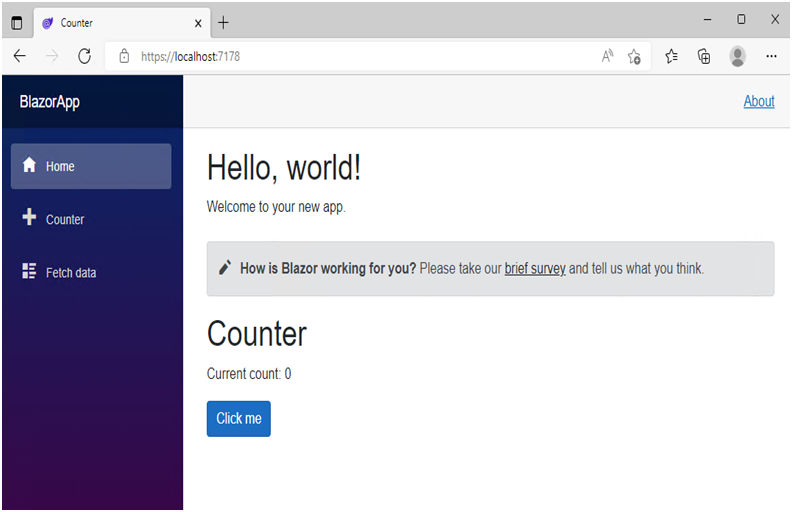
Click on the Start Debugging button (green arrow) in the Debug Toolbar in Visual Studio to run your app. Wait for the app to launch in the browser. Once you get to the following page, you have successfully run your first Blazor app.
The displayed page is defined by the Index.razor file located inside the Pages directory. This is what its contents look like:
Pages/Index.razor

@page "/"

<PageTitle>Index</PageTitle>

<h1>Hello, world!</h1>

Welcome to your new app.

<SurveyPrompt Title="How is Blazor working for you?" />
It already contains the code that sets it as the homepage and displays the text Hello, world! and Welcome to your new app. It also includes a SurveyPrompt component that renders a link to the Blazor feedback survey.
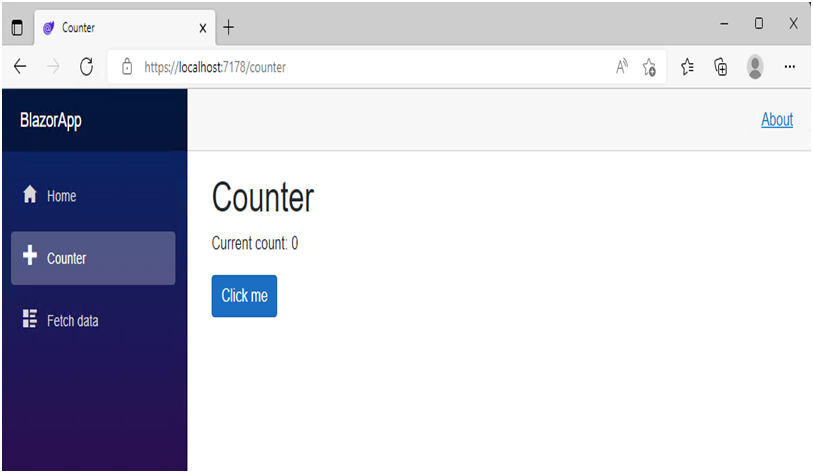
Try the counter
In the running app, navigate to the Counter page by clicking the Counter tab in the sidebar on the left. The following page should then be displayed:
Select the Click me button to increment the count without a page refresh. Incrementing a counter in a webpage normally requires writing JavaScript, but with Blazor you can use C#.
You can find the implementation of the Counter component at Counter.razor file located inside the Pages directory.
A request for /counter in the browser, as specified by the @page directive at the top, causes the Counter component to render its content.
Each time the Click me button is selected:
The onclick event is fired.
The IncrementCount method is called.
The currentCount is incremented.
The component is rendered to show the updated count.
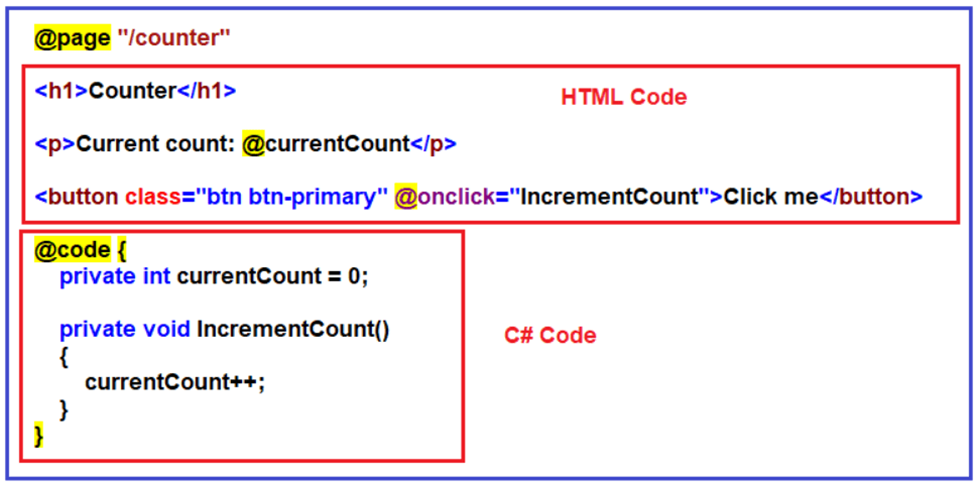
Add a component
Razor component is a combination of two things i.e. HTML code and C# code. For example, please have a look at the following Counter.razor file i.e. the Counter Component.
Each of the .razor files defines a UI component that can be reused.
Open the Index.razor file in Visual Studio. The Index.razor file already exists, and it was created when you created the project. It’s located in the Pages folder inside the BlazorApp directory that was created earlier.
Add a Counter component to the app’s homepage by adding a <Counter /> element at the end of the Index.razor file.
Pages/Index.razorCopy

@page "/"

<PageTitle>Index</PageTitle>

<h1>Hello, world!</h1>

Welcome to your new app.

<SurveyPrompt Title="How is Blazor working for you?" />

<Counter />
Click the Hot Reload button to apply the change to the running app. The Counter component will then show up on the home page.
Modify a component
Component parameters are specified using attributes or child content, which allow you to set properties on the child component. Define a parameter on the Counter component for specifying how much it increments with every button click:
Add a public property for IncrementAmount with a [Parameter] attribute.
Change the IncrementCount method to use the IncrementAmount when incrementing the value of currentCount.
The following code shows how to achieve that. The highlighted lines show the changes.
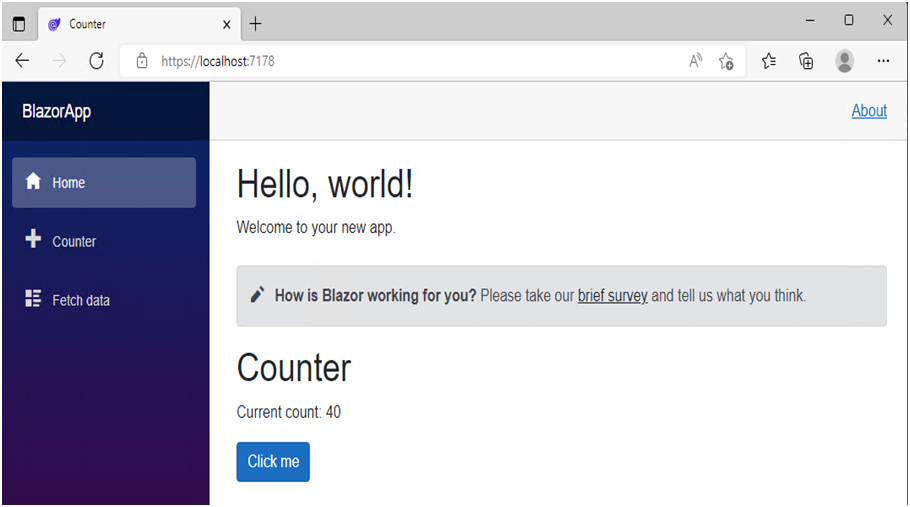
In Index.razor, update the <Counter> element to add an IncrementAmount attribute that changes the increment amount to ten as shown by the highlighted line in the following code:
Pages/Index.razorCopy

@page "/"

<h1>Hello, world!</h1>

Welcome to your new app.

<SurveyPrompt Title="How is Blazor working for you?" />

<Counter IncrementAmount="10" />
Apply the change to the app by clicking the Hot Reload button. The Index component now has its own counter that increments by ten each time the Click me button is selected, as shown in the following image. The Counter component (Counter.razor) at /counter continues to increment by one.
As a working Human resource professional, I realized that Soft skills have become a must-have quality in today’s corporate world and to-die-for skills for business leaders, human resource personnel, and individuals looking for professional development or employment.
Soft skills are termed as behavioral skills, and they represent all the skills that human beings possess and apply in a professional setting. Soft skills are also known as power skills, common skills, or core skills, are attributes that are applicable to all professions. These skills are often related to your ability to interact effectively with others.
Soft Skill Definition: What are they?
These are non-technical skills that influence how you work, interact with colleagues, manage your work, and approach problem solving. Some top-tier soft skills include listening skills, communication skills and interpersonal skills, among others.
When we hire a candidate, for example, a HR manager or Recruitment officer prefers candidates with soft skills. Employers recognize the importance of soft skills in the workplace, as they believe that having these skills can make an individual more successful and valuable. Simply being proficient in technical skills is not enough if one cannot effectively work in a team or manage time well.
Why are soft skills important?
While hard skills are important to employers, in a world where learning these quantifiable skills can be as simple as watching a quick video, soft skills have come into focus. While everyone applying to a job may know how to code or how to write, soft skills are what can help set you apart.
Soft skills make it easier to form relationships, create trust and dependability, and lead teams. Showing employers that you have mastered the right soft skills shows that you can handle whatever they throw at you, even if it’s a hard skill you don’t yet know.
List of essential soft skills you must have:
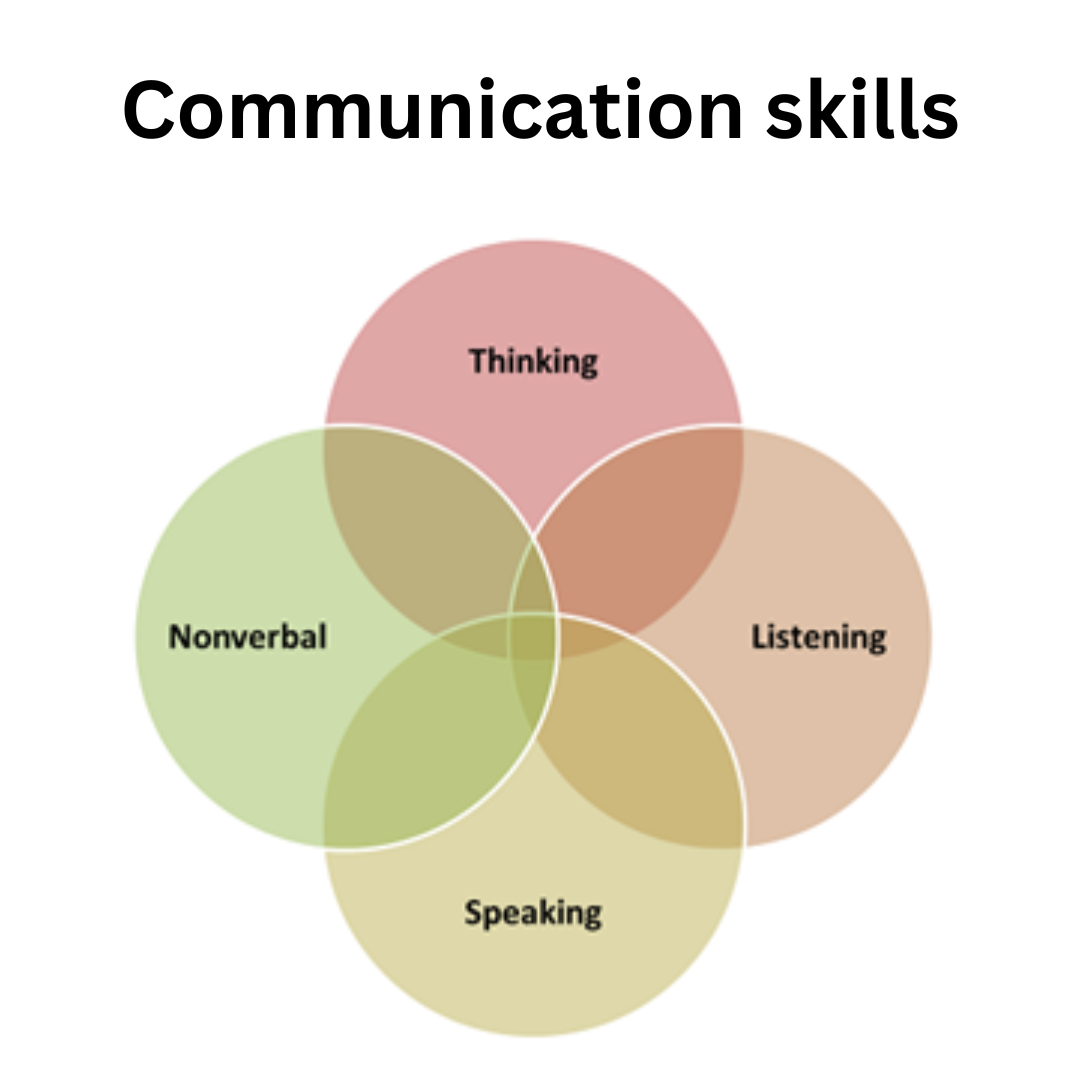
Communication
The ability to convey or share ideas and feelings effectively and it’s among the top soft skills employers require across all fields. Alongside this is the necessary development of active listening – a technique where you focus on what the other person is saying rather than just waiting for your turn to speak.
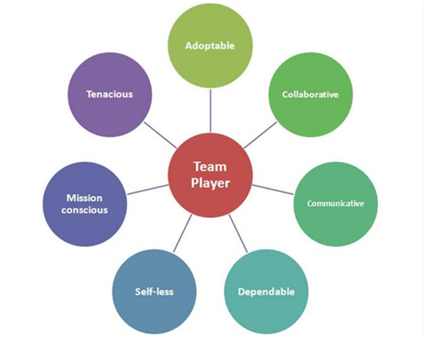
Teamwork
Teamwork will never cease to be a must-have soft skill. Employers want to see their employees excellent at teamwork to create a better operating work environment. The quality of work improves when people use their individual strengths and skills together in collaboration.
Adaptability
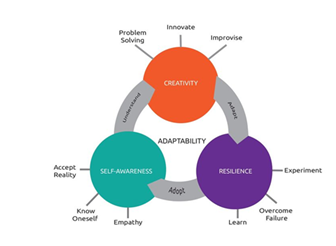
Adaptability shows how well you can embrace change and adjusts to it. Being flexible is an important soft skill. The workplace is always changing – there are constantly shifting trends. Employers will feel more comfortable if they have employees that can adapt to this change and are proactive in learning how to deal with it. Remain positive if there is a change and accept it rather than resist it. An employee that can work in this way is very valuable.
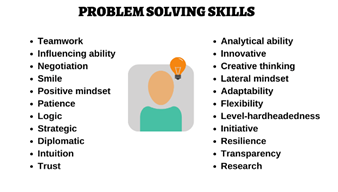
Problem solving
Finding effective solutions for work-related problems is a huge asset, as employers want to see you solving issues and keeping the organization moving forward. Being able to analytically and creatively solve problems will come in handy no matter your job. That is why creative problem-solvers are always in high demand.
Critical thinking
The ability to think critically has become a hot topic for employers. Critical thinking is inextricably connected to both problem solving and decision making. It always has a goal – usually, to solve a problem or come to a decision.
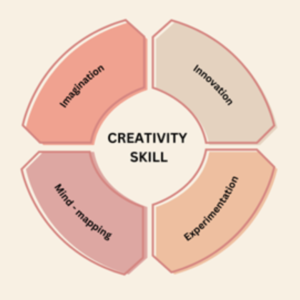
Creativity
Creativity comes in different forms, but the end result in a professional environment is usually an innovative solution for the organization. We’re used to linking creativity with fields like art, or design, but creativity is a broad term that involves several sub-skills from questioning to experimenting. As such, any professional can make just as much use of creative skills as artists.
Time Management
The essence of time management in corporate culture is immense. Time management involves the ability to use your time wisely to work as efficiently as possible. Besides, every time you perform a task on time, you enhance your growth chances. It would not be wrong to say that time management is one of the ladders to success.
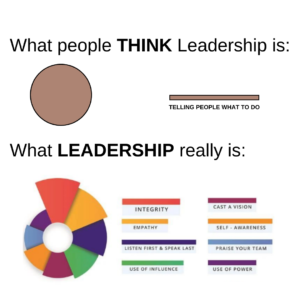
Leadership
Effective leadership means getting the best out of the people around you and bringing diverse skills and personalities together in pursuit of a common goal. Employers prefer to hire applicants who show they have leadership potential for 2 reasons:
1. Employees with leadership skills show more initiative and are more likely to invest themselves in helping the company grow.
2. The company can eventually promote employees with strong leadership roles to better management positions.
Work Ethics
Workplace ethics are an incredibly important part of forming a successful organization with satisfied and loyal team members. Work ethic relates to valuing work and putting in the effort to yield results. It’s a soft skill that employers in literally every job you’ll ever apply for will appreciate.
Digital literacy
Being digital Literate means knowing how to use technology to create, find, use in a productive manner to communicate. Employers are looking for people who can pick up any digital tool quickly like a new task. With digital literacy skills, you’re telling an employer it doesn’t matter if you’ve used a specific tool before because you can learn quickly.
Conclusion:
Soft skills are universally needed in today’s workforce for any job profile. Learn to cultivate yours and display them for employers to see – and you’ll keep yourself ahead of the pack. Think of your soft skills as accessories to your hard, job-related skills. They alone cannot qualify you for a job, but when paired with solid credentials they can make you a much more attractive candidate. Soft skills help you to strive for excellence in your workplace, as they help you to work more effectively and efficiently, thus, yielding excellent results. These skills are a prerequisite for building a healthy productive environment. These skills not only boost your personality but also accelerate your career development process.
MVC stands for Model-View-Controller, it’s a software architectural pattern that separates an application into three main components: Model, View and Controller. The Model represents the data and business logic of the application, the View is responsible for rendering the data into a user interface and the Controller handles user interactions and updates the Model accordingly.
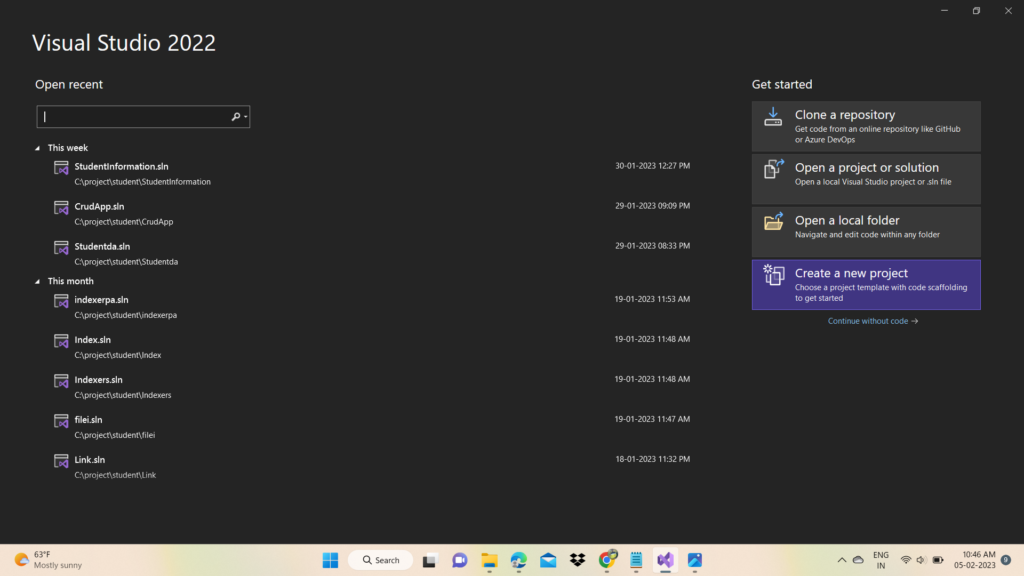
Step-1 Open Visual Studio and click on Create New Project
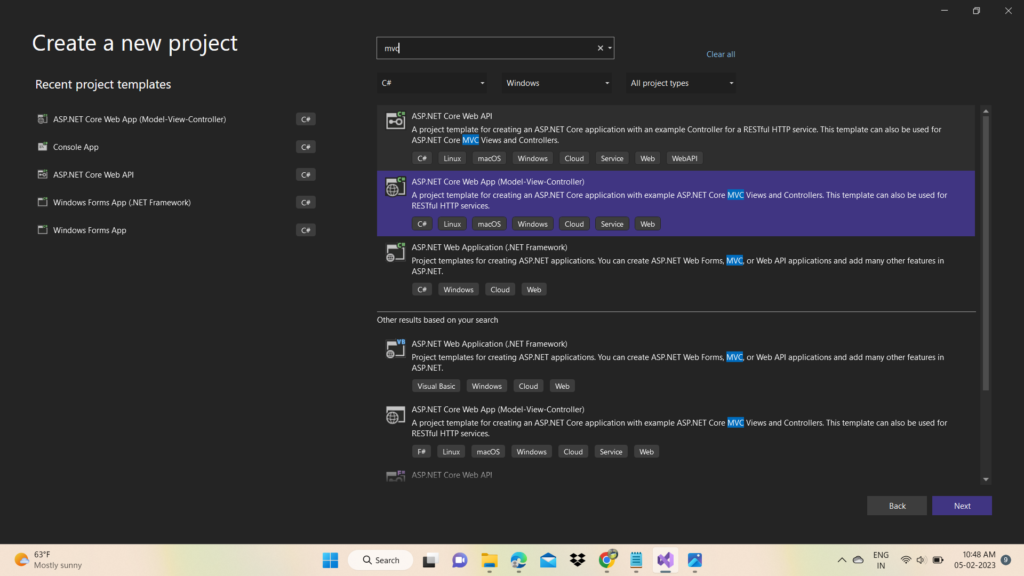
Step-2 Select ASP.NET Core Web App (Model-View-Controller) and click next button
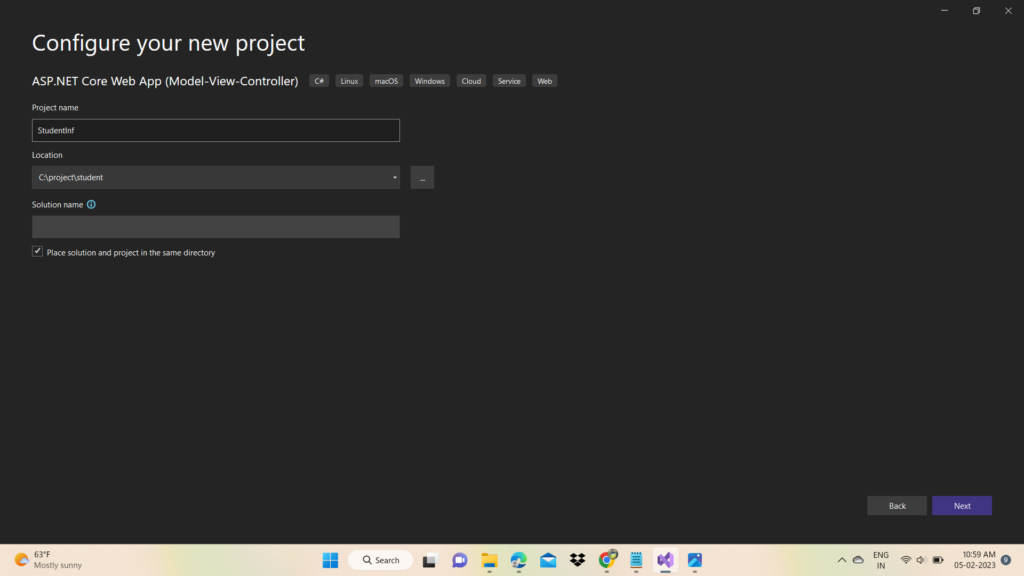
Step-3 Enter the project name and click on next button
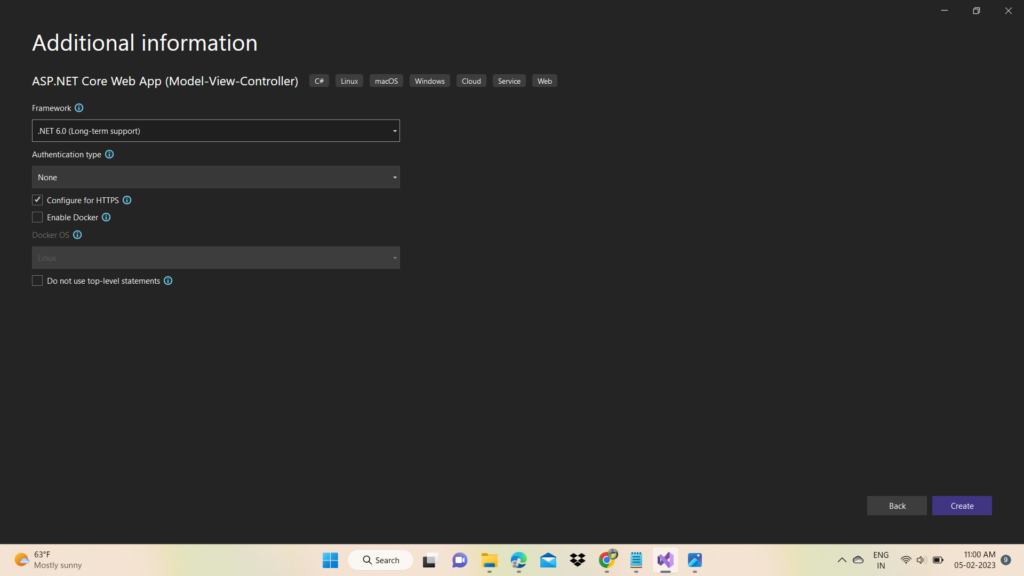
Step-4 Select .Net 6.0 , authentication type None and click on create button
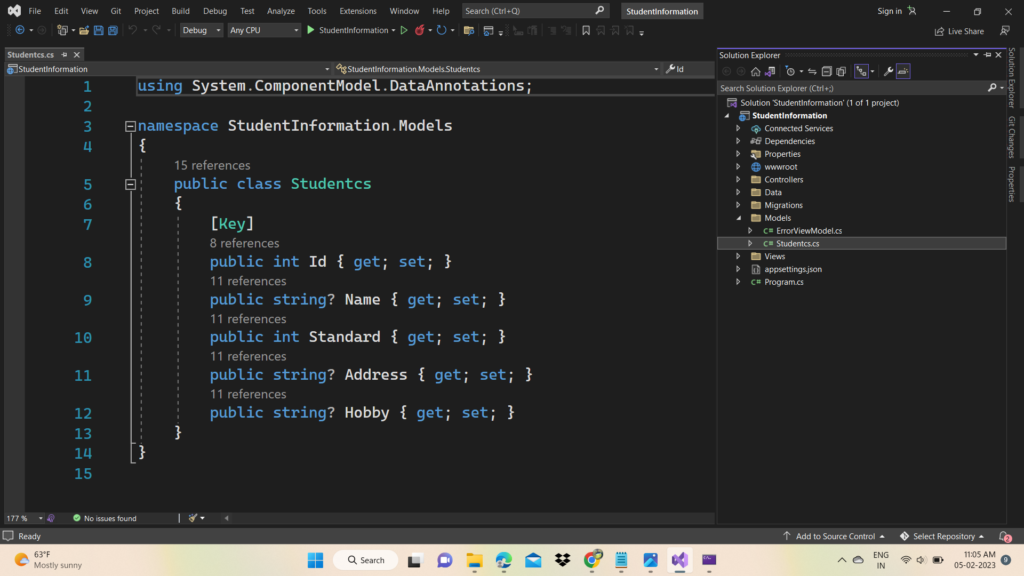
Step-5 Open Models folder and create a Employee class
Enter the following code in the student class
Step-6 Install the following packages according to your .NET Core version
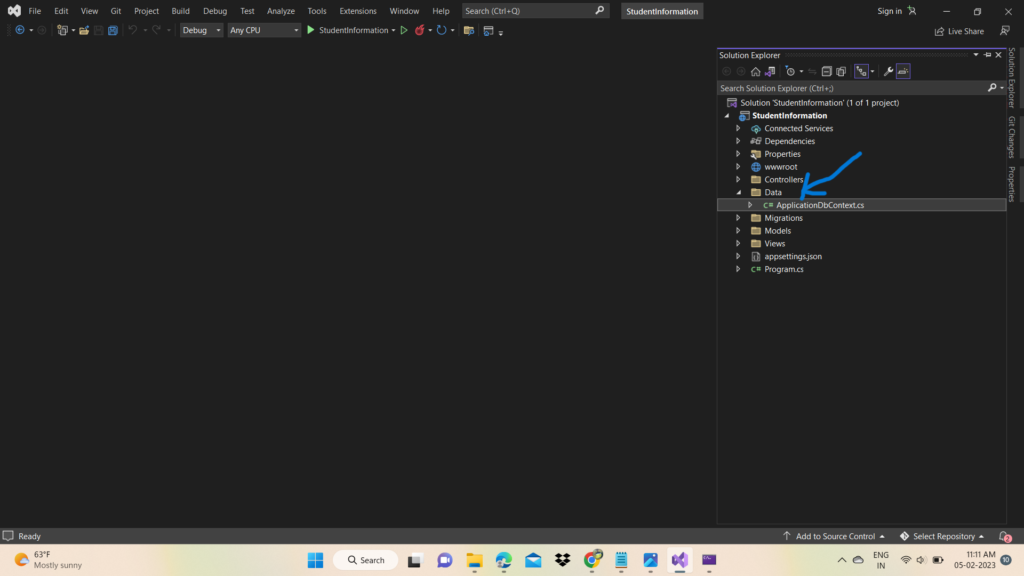
Step-7 Create a subclass ApplicationDbContext of DBContext Class to link the database with data model class
A. Create one folder and name it Data
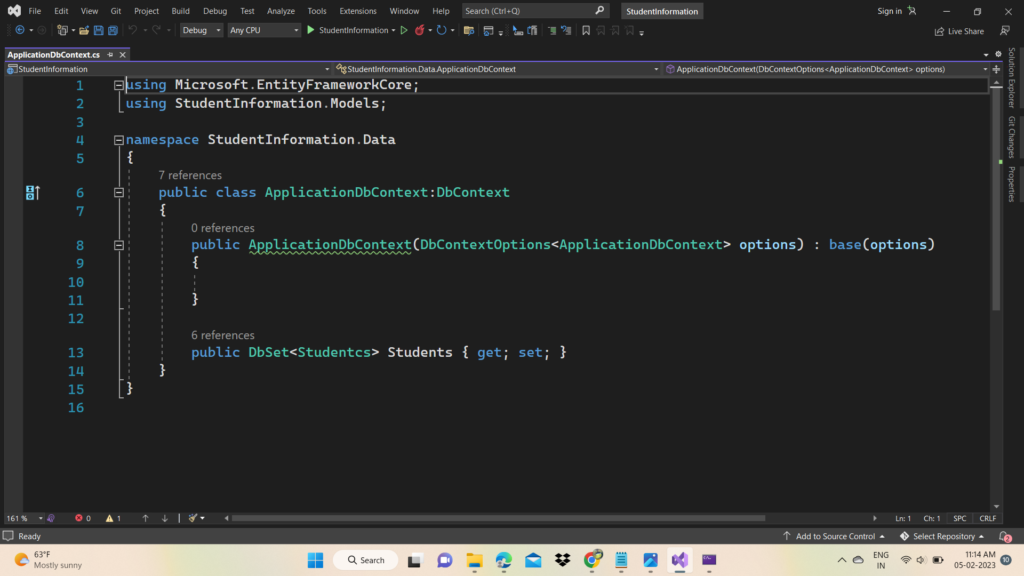
B. Create ApplicaitonDbContext class and enter the following code
In the above code we are passing parameter DbContextOptions<ApplicationDbContext> using constructor, Using this we are passing context configuration from AddDbContext to DbContext
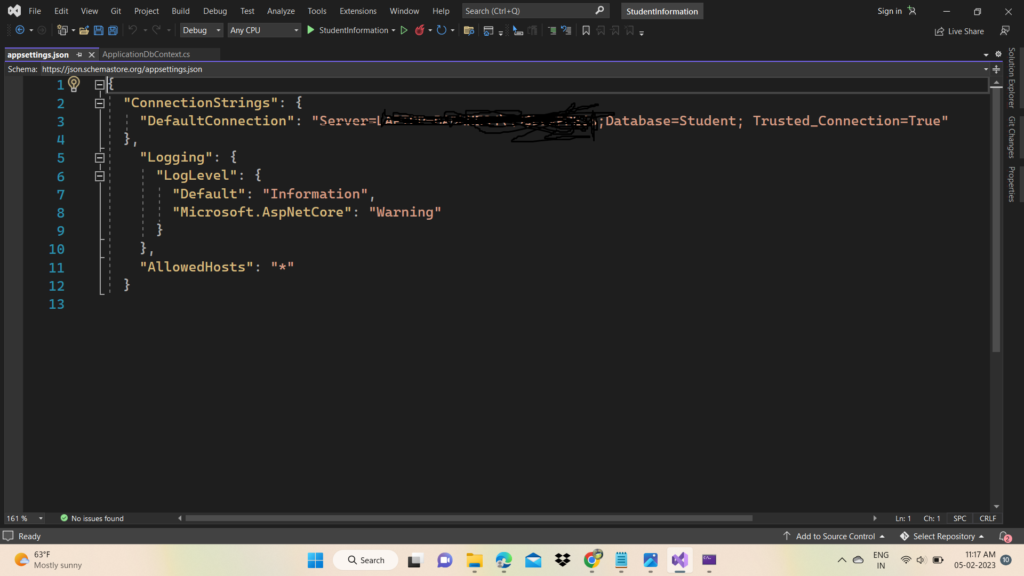
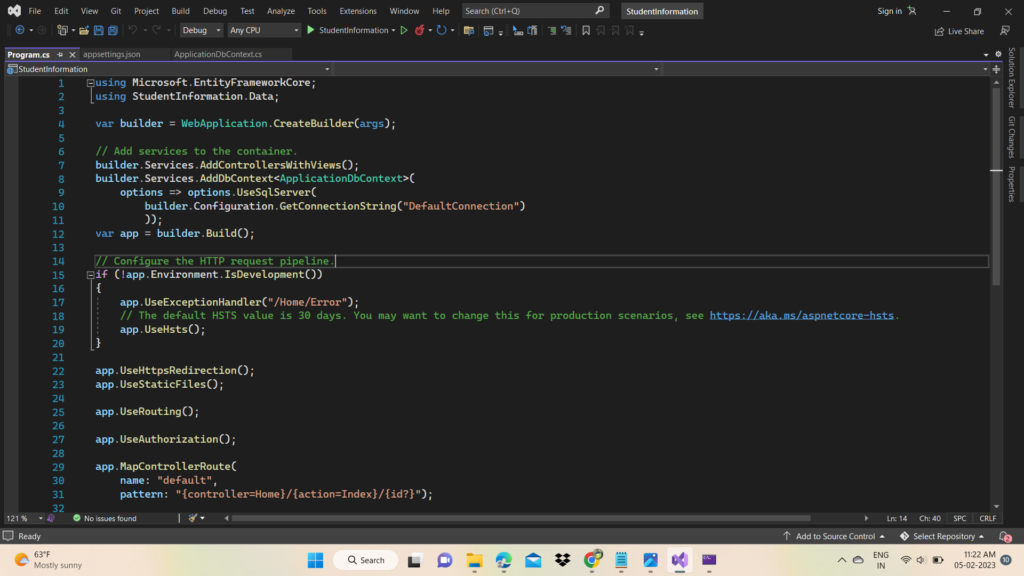
Step-8 Open appsettings.json and configure the connection string
Step-9 Open the program.cs file and add the required services
A. Register ApplicationDbContext subclass as scoped service in application service provider / dependency injection container.
B. Enter the following lines of code to register the ApplicaitonDbContext
Program.cs
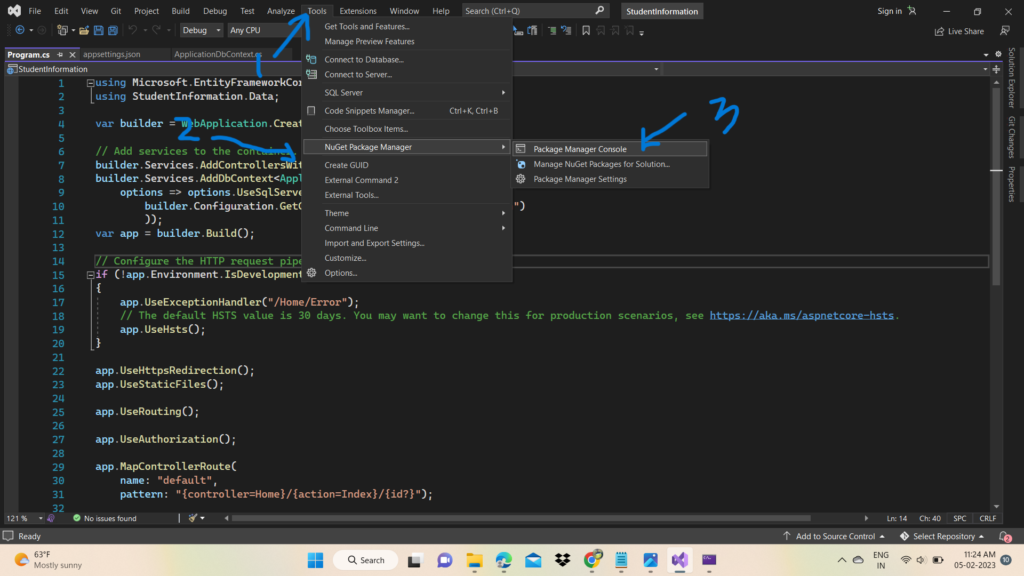
Step-10 Run the migration
A. Open the package manager console
Type the following command to run the migration
add-migration ‘initial’
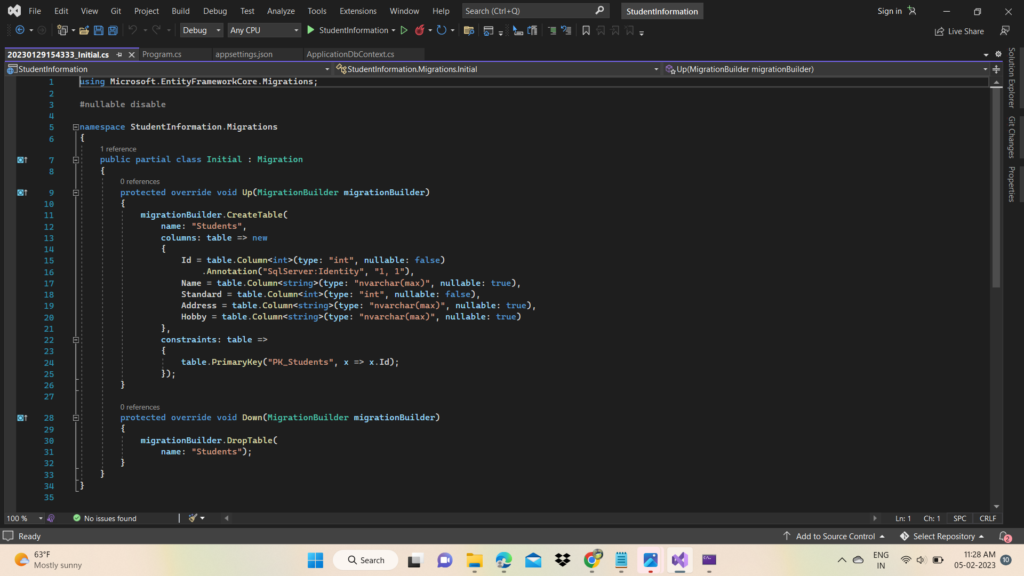
Migration file
Step-11 Run the following update command to update the database as per this migration file
update-database
Step-12 Add Employee Controller
A. Right click on Employee folder
B. Click on add
C. Click on controller
D. Select MVC Controller Empty and click on Add button
E. Enter the Controller name and press add button
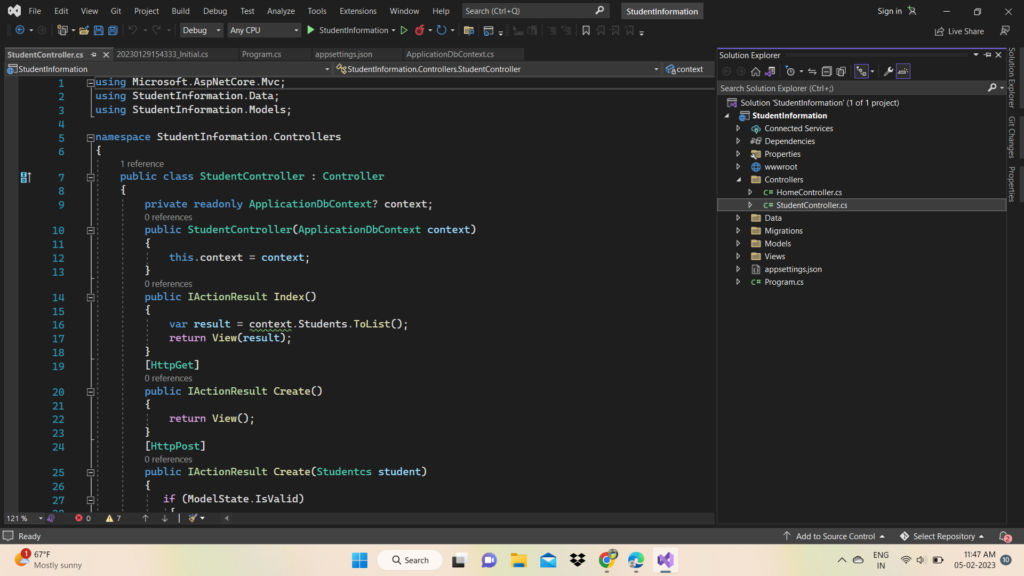
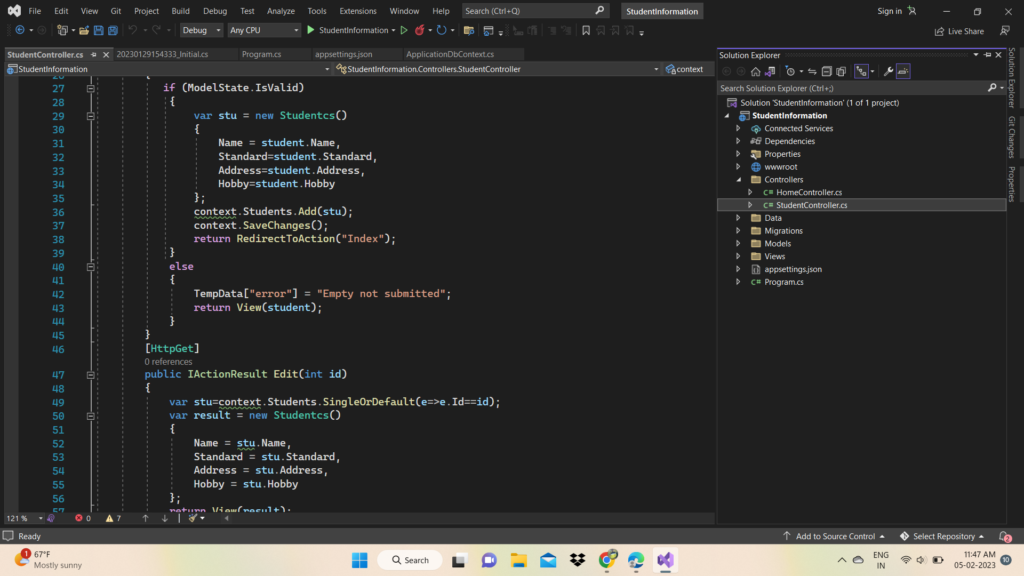
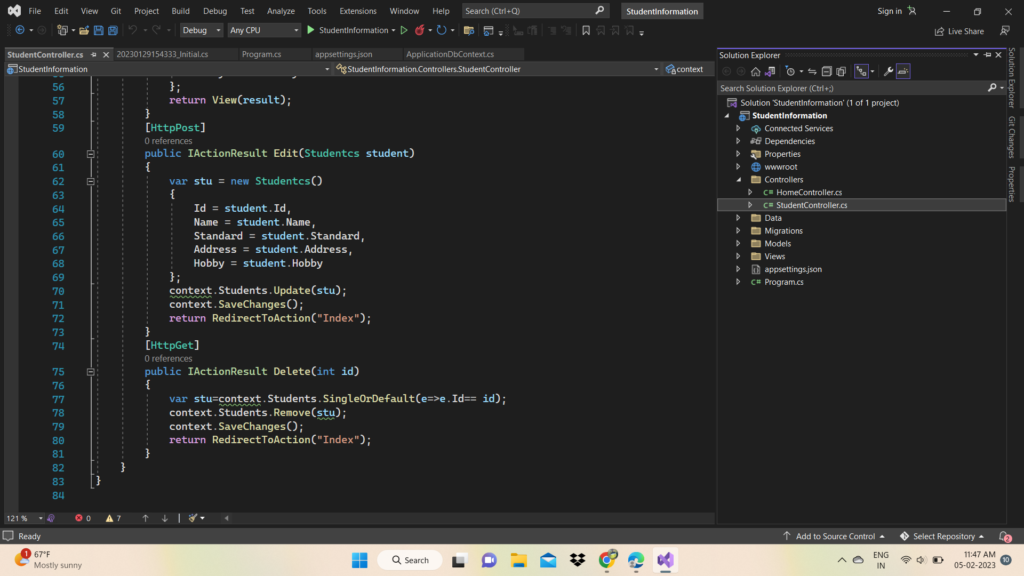
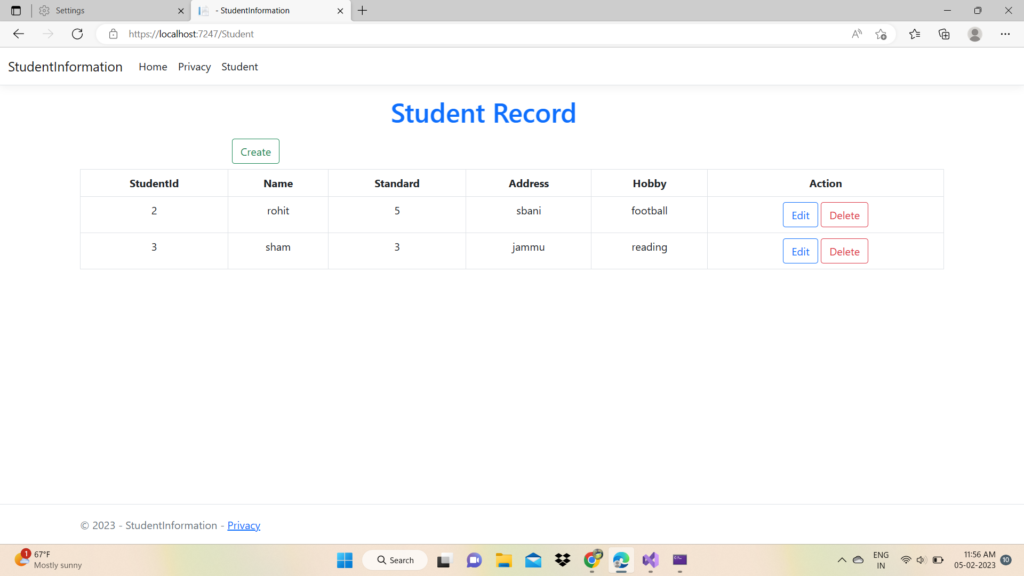
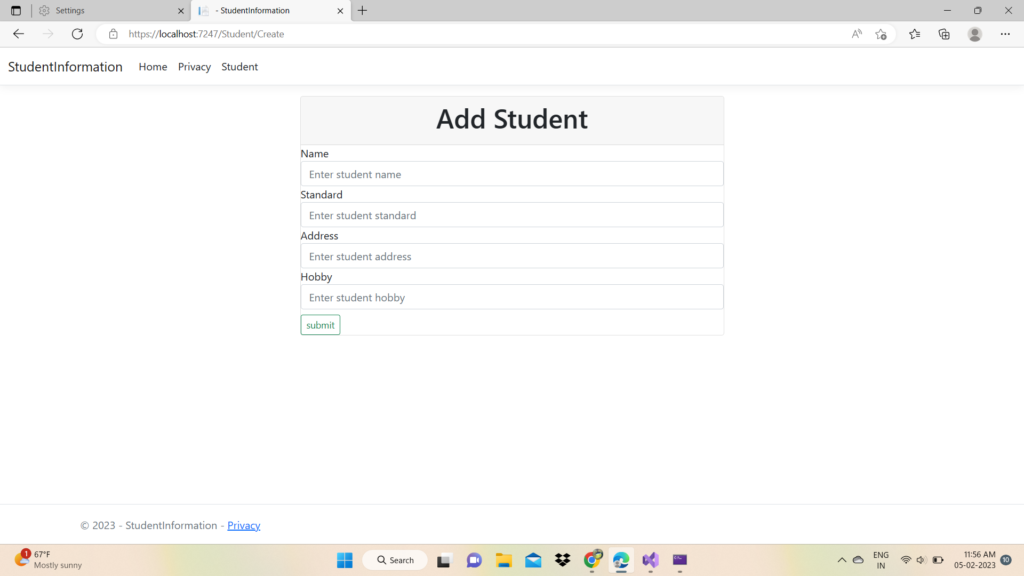
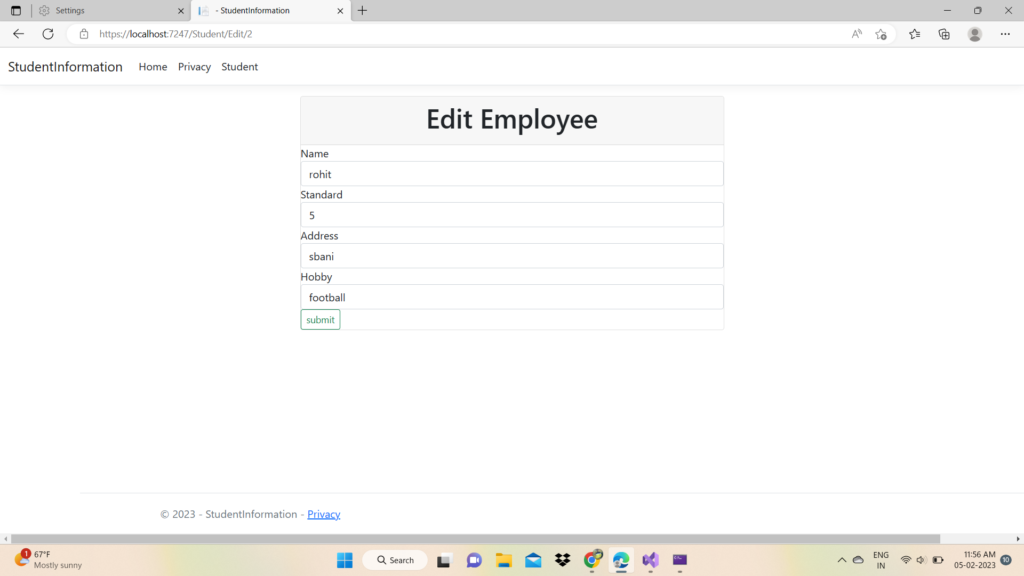
Step-13 Paste the following code in your StudentControler.cs file
Step-14 Add view files
Create one Student folder under View folder and create the following files
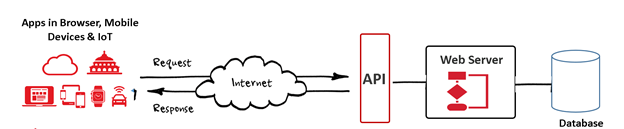
Api is short for Application Programming Interface. It is used in computer programs to communicate with other applications and/or services. It acts as a bridge between different softwares and devices. Each time we use an app like Facebook or Instagram, send an instant message or check the weather on our phone, we use nothing but an API.
Everything from sharing photos to shopping online, booking a cab, a flight or a hotel, playing games is all done via APIs. It is API because the technology is innovating at a faster than the predicted rate.
If we look at the below diagram, which is a basic information flow diagram depicting the position of an Application Programming Interface in the whole schema of system integration.
Importance of API is –
When we search for nearby restaurants on any browser, it lays out their locations on Google Maps instead of creating separate maps. Thus, via the Google Map API, the browser passes the information it wants – restaurant addresses, rating, timings, and a lot more – to an internal Google Maps function that then returns a Map object with restaurant pins in it at the proper locations. It allows programmers to create apps without having to learn how to code.
Take some examples –
So let’s take Instagram for example. When you open up Instagram, there’s this bar at the top of the screen where you can search through different hashtags or accounts. There’s also another bar at the bottom which has these buttons like “Follow”, “Like” etc. These are all links to third
Why Should You Use APIs?
It is easy to understand that APIs can allow different computer programs to share or request features, services, and other content. Suppose you think that why different businesses are using APIs comes down to the range of benefits of APIs to consumers and providers. The API consumers can request access to different server resources or automate different tasks internally.
Advantages of API –
The key advantages of APIs to consumers include improved operations, increased innovation, and improved customer satisfaction. It is easy to unlock business opportunities and increase business revenue.
Rest API? –
REST stands for Representational State Transfer. So, REST means using HTTP (HyperText Transport Protocol) to transfer resources such as HTML documents, images, audio files, A REST API is a web service (a server) which accepts requests from client applications using HTTP (HyperText Transfer Protocol). The clients use a common protocol such as XML or JSON to send data to the server. The server processes the request, generates a response and sends it back to the client.
Methods of Rest Api –
GET –
The GET method is used to retrieve resources from a server. Example – HTTP GET ‘http://www.apidomain.com/users/123’
POST –
POST method is used to create a new resource into the collection of resources on a server. Example – HTTP POST ‘http://www.apidomain.com/users’
PUT –
PUT is used to update the existing resource on the server and it updates the full resource. Example – HTTP PUT ‘http://www.apidomain.com/users/123’
PATCH –
PATCH is used to update the existing resource on the server and it updates a portion of the resource. Example – HTTP PATCH ‘http://www.apidomain.com/users/123’
DELETE –
DELETE Method is used to delete the resources from a server. It deletes resource identified by the Request-URI.
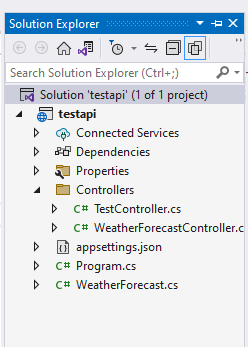
Creating a Web API Project –
We need the following tools installed on our computer:
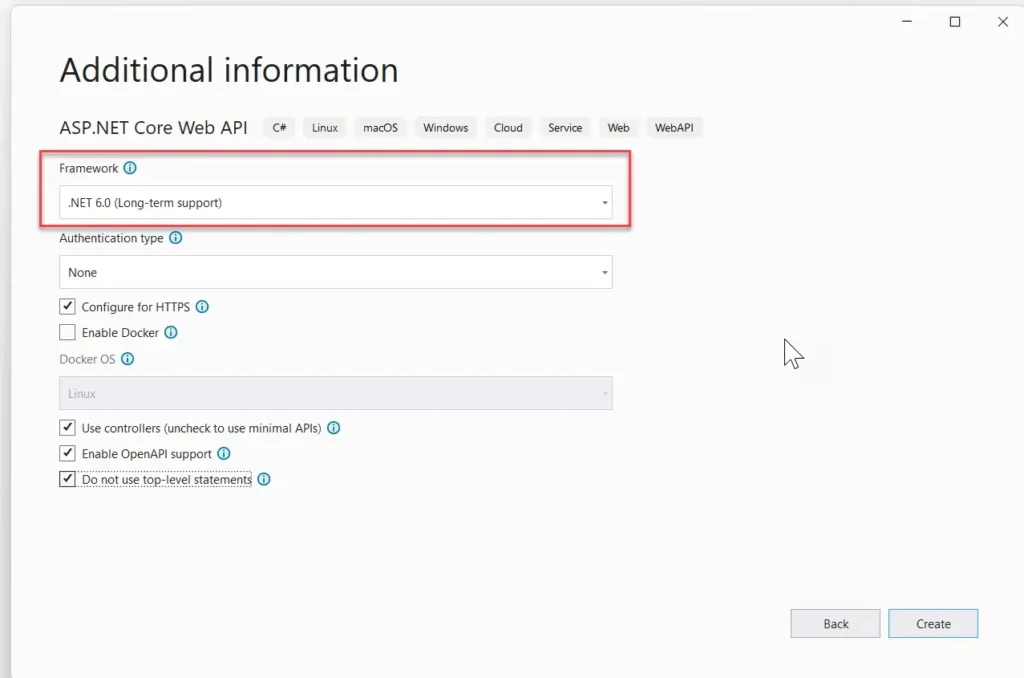
Open Visual Studio 2022 and select Create a new project and then select ASP.NET Core Web API:
and give a name to your project in the following screen and then click Next.
In the next screen, select .NET 6.0 as the framework and click Create:
At this point we have a starter project as follows:
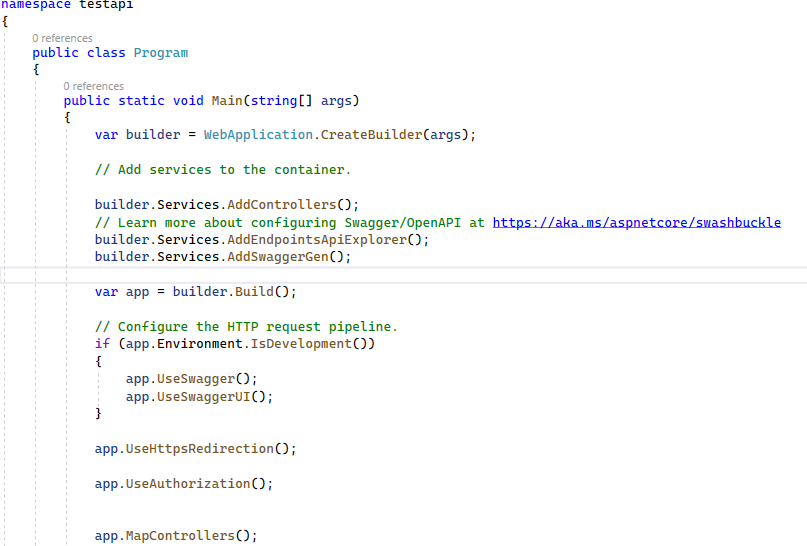
In the Program.cs we see that Swagger support is added automatically to our project:
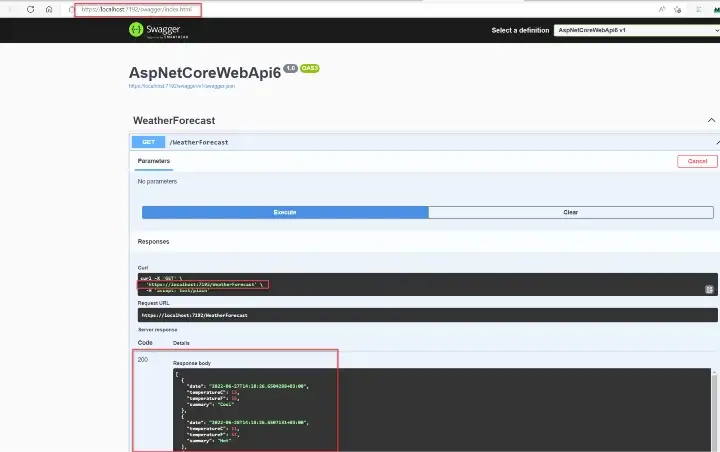
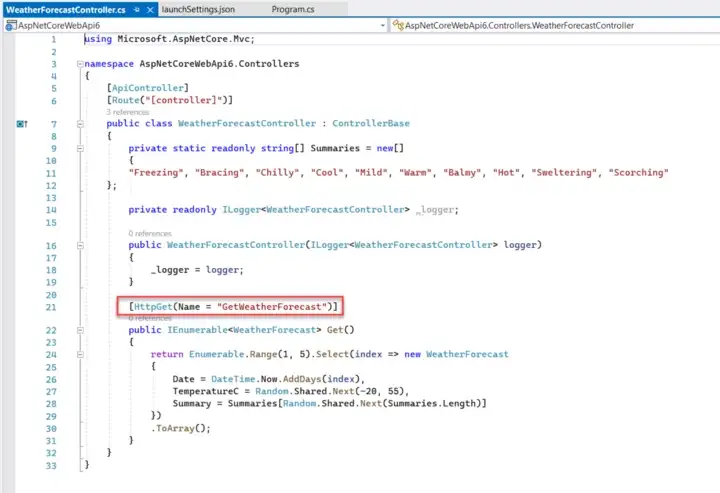
Now, let’s run (Ctlr+F5) the project to see the default output. When the browser opens and the Swagger UI is shown, select the GET method in the WeatherForecast part and then select Try It Out and Execute:
Also, you can use the curl URL shown in the Swagger UI for this method and see the result of the URL in the browser:
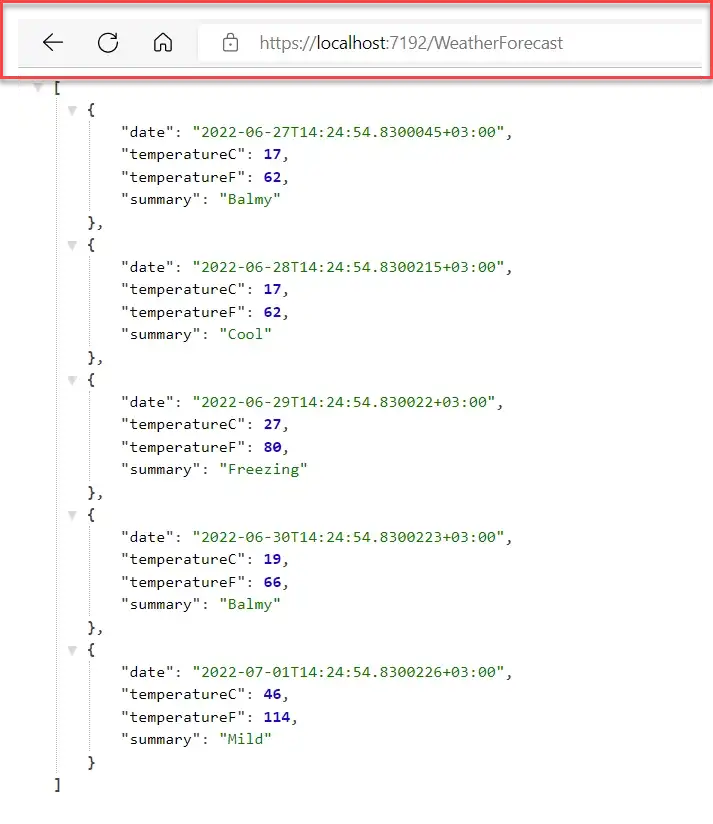
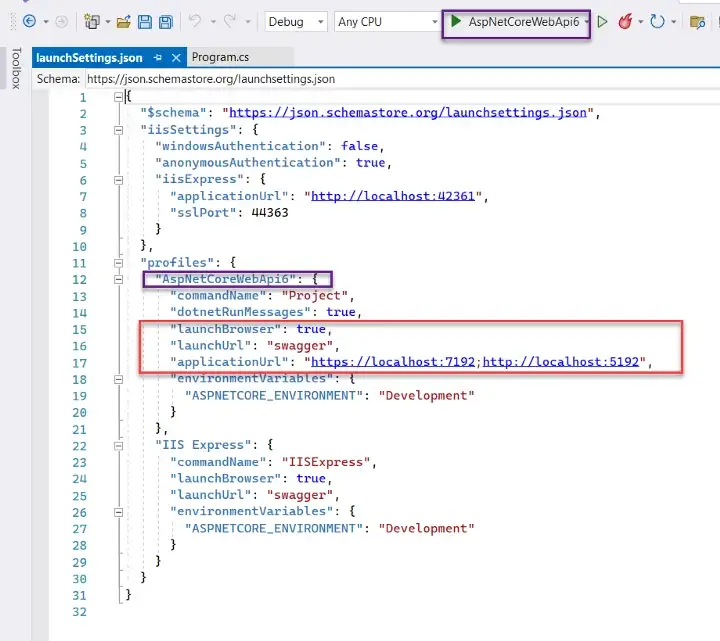
When we run the application, the default URL comes from the launchSettings.json:
And the result values come from the GET method of the WeatherForecastController:
As you see, values here are hard coded and randomness is added to generate different values.
In our Web API, we will create our own records in an SQL server database and will be able to view, update and delete them through REST API endpoints.
SQL Server is an application software for Relational Database Management System (RDBMS), from Microsoft back in 1988, We can used it for creating, maintaining, managing, and implementing relational databases.
It is actually a backend application that allows us to store and process data.
It is called the relational database management system due to its nature to store the data in tables where the tables store the data about the same entity.
HOW DOES SQL SERVER MAKES WORK SO EASY?
Being based on open source it is very easy to access and the vast majority of programmers working in web development have used Microsoft SQL Server in some of their projects.
It supports various business intelligence operations, analytics operations, and transaction processing.
Download SQL Server 2019 Developer Edition!!!!
Step 1
Download installation media .
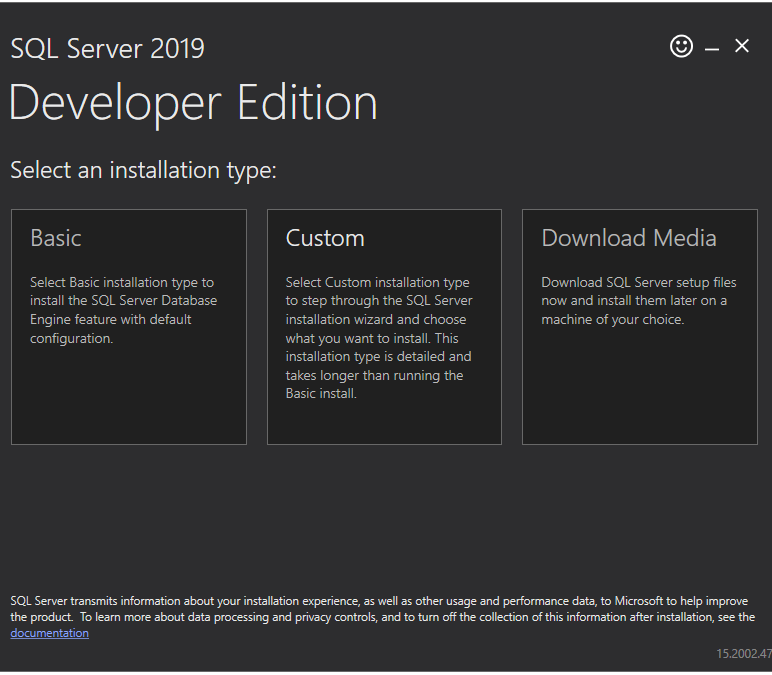
Step 2
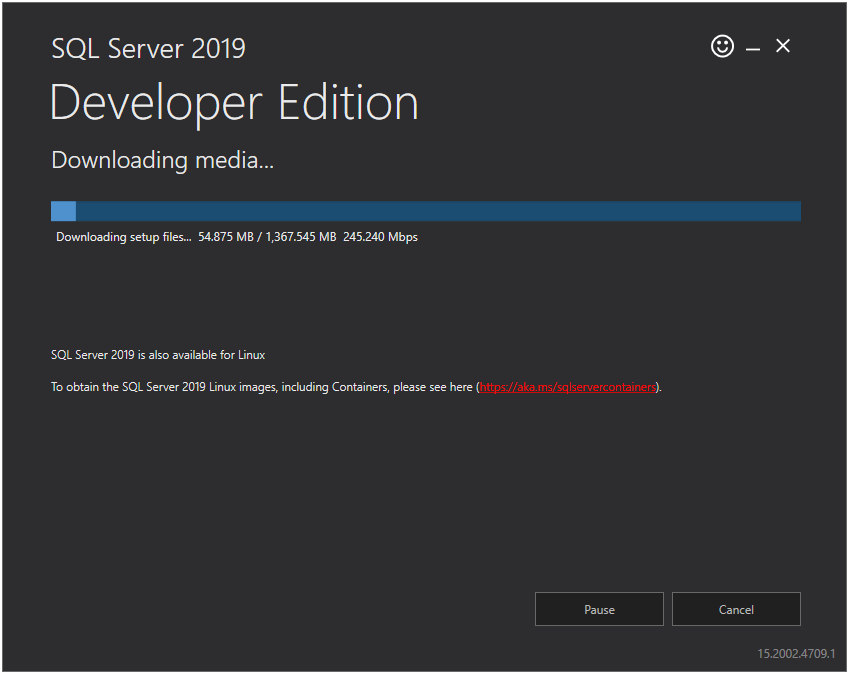
Run the downloaded file and you will see the below screen. Now select the third option – Download Media.
Step 3
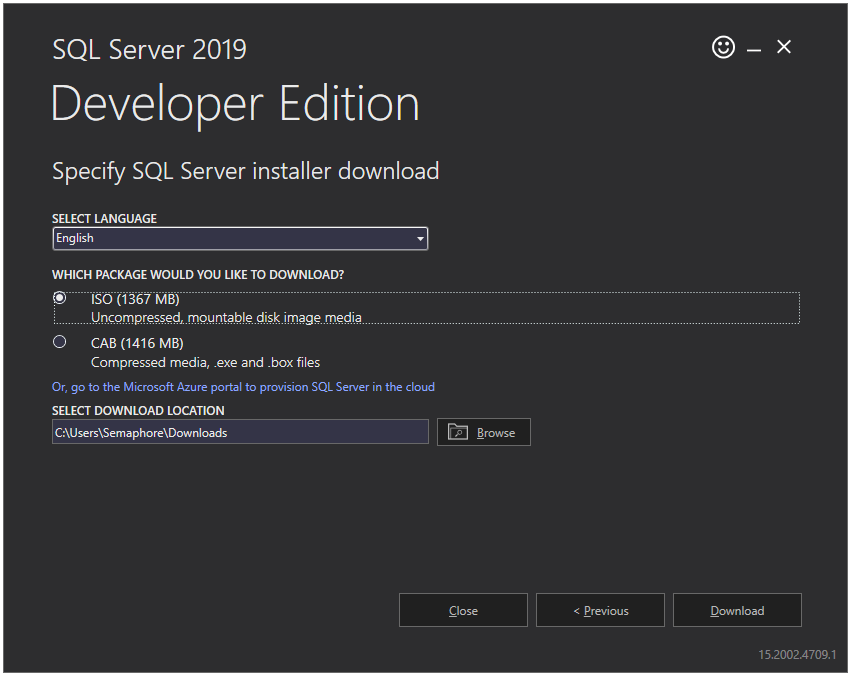
Now you will see the below screen. Please select the language you prefer and select the ISO radio button to download the ISO file. In addition, select the download location of your choice. I will go with the default location. Now press the Download button.
Step 4
Now it will start downloading SQL Server installation media. It will take some time based on your internet connection speed.
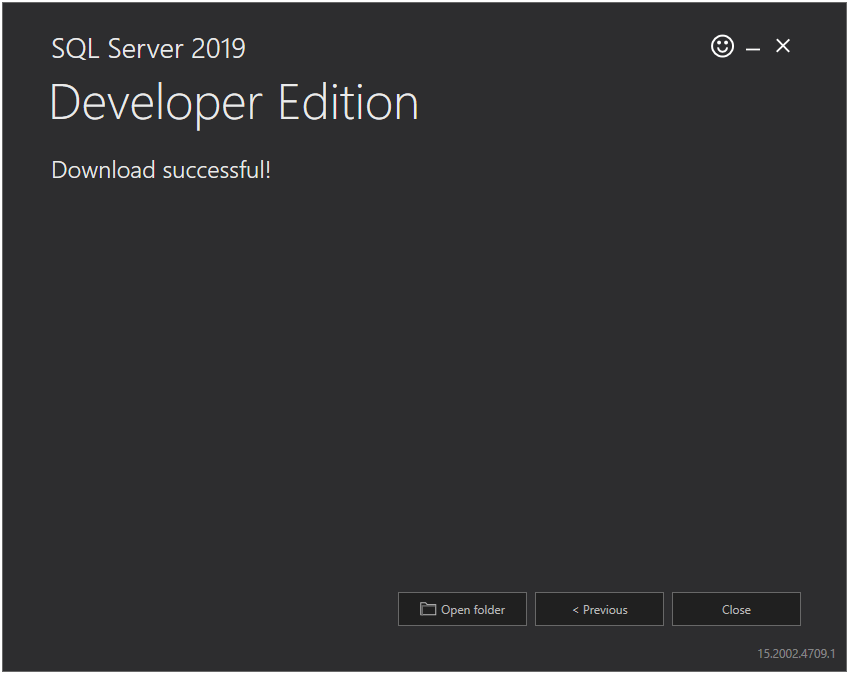
Step 5 After successful download of installation media, you will see the below screen. Click the Close button.
Install SQL Server 2019 Developer Edition!!!
Now that we have installation media, we can start the installation of the SQL Server. Let’s see how to install SQL Server step by step.
Step 1
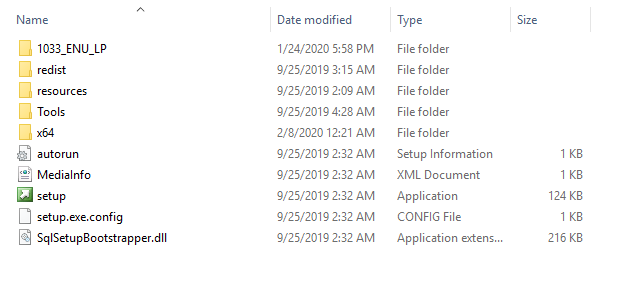
Run install media file (ISO file) downloaded in above section by double-clicking on it. It will extract/mount all the contents in a new temporary drive.
Step 2
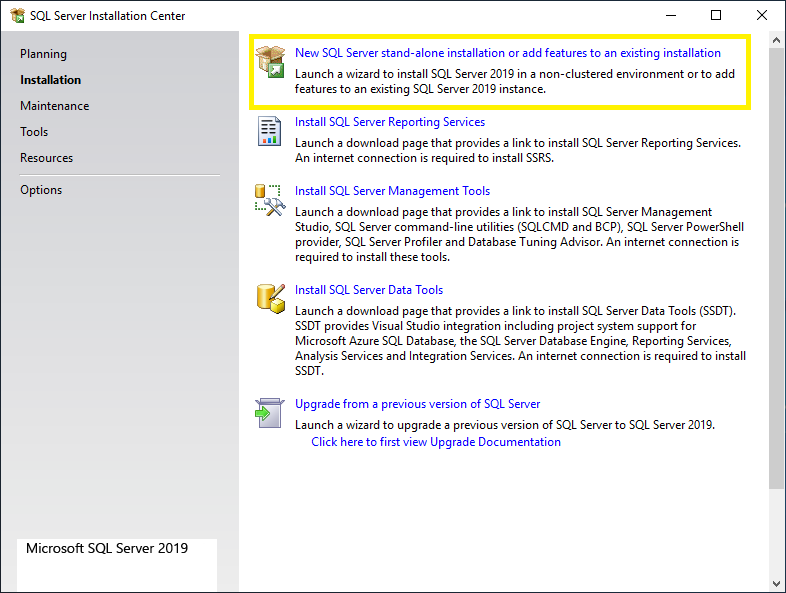
Once extraction is completed, double click on the setup.exe file and you will see the below screen. Click on the Installation option in the left panel and then click on New SQL Server stand-alone installation or add features to an existing installation option from the right panel.
Step 3
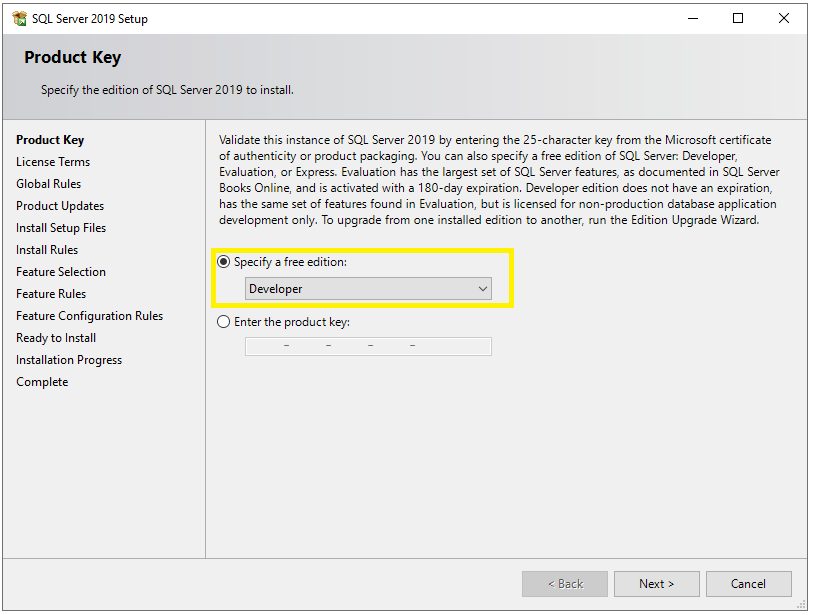
Now you will see the Product Key window. Select the Developer option from the dropdown and click on the Next button.
Step 4
Now you will see the License Terms window. Just select the checkbox and click on the Next button.
Step 5
Now you will see the Microsoft Update window. It is not compulsory to check for the latest updates but it is recommended. So, select the checkbox and click the Next button.
Step 6
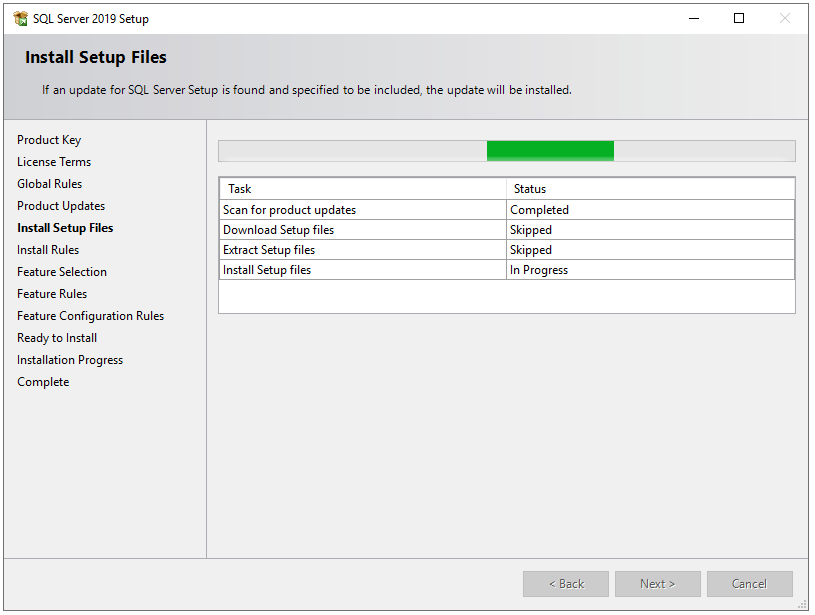
Now it will check for updates and install them if any.
Step 7
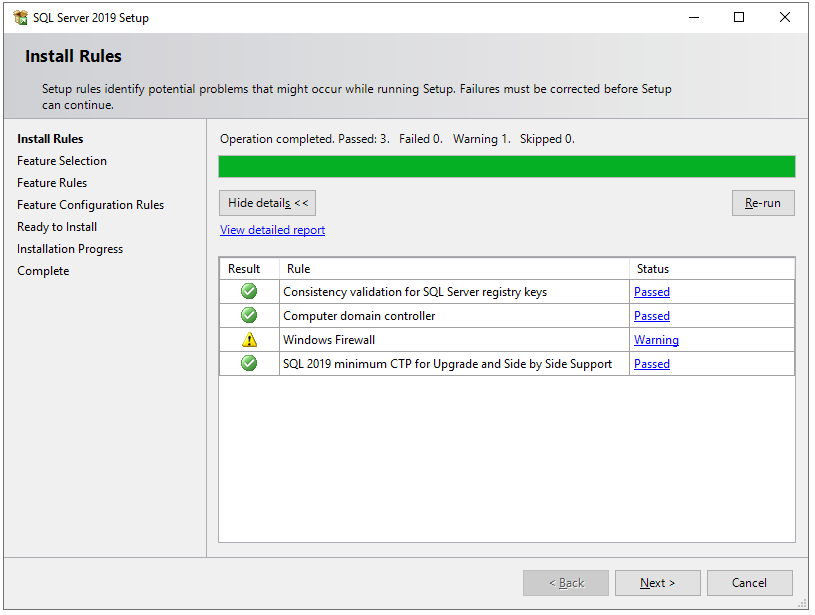
After that, it will check some rules or prerequisites for the installation of SQL Server. Once all the rules passed, click on the Next button.
Step 8
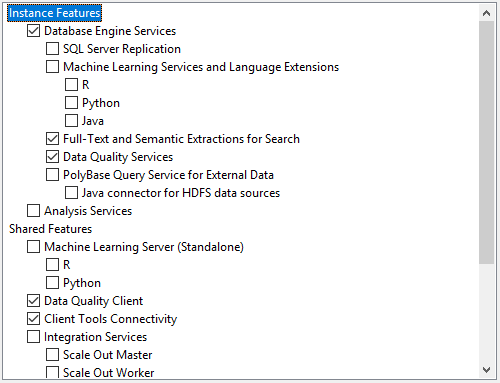
On the Feature Selection window, select features as shown in the below screenshot. You can also change the location for SQL Server instance installation but I will go with the default location. After feature selection please click the Next button.
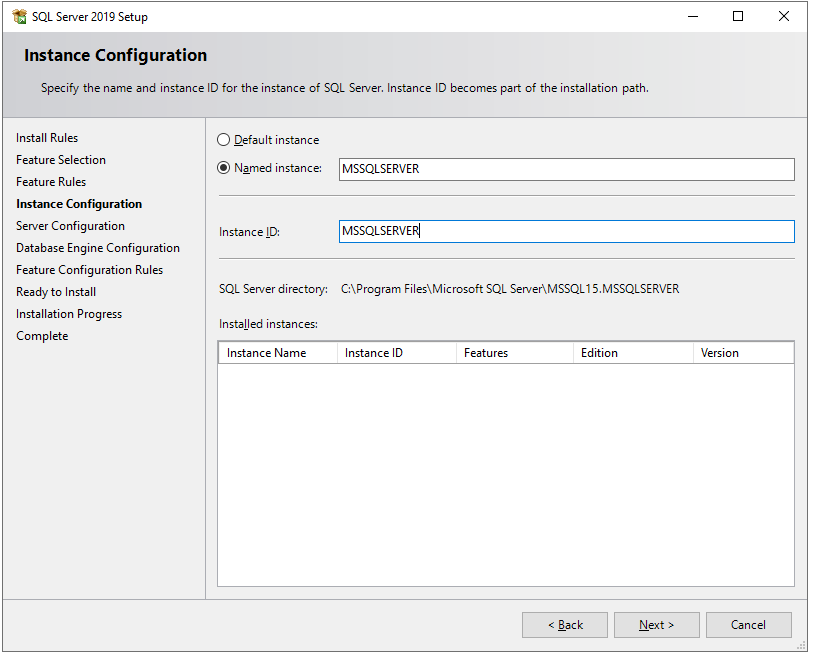
Step 9
It will check some feature rules/prerequisites and then you will see the Instance Configuration screen. Here you can choose between Default Instance and Named Instance. Here I will go with Named Instance.
Note
Default Instance
When SQL Server is installed in the default instance, it does not require a client to specify the name of the instance to make a connection. The client only has to know the server name. For example, UPASNA-PC.
Named Instance
A named instance is identified by the network name of the computer plus the instance you specify during the installation. The client must specify both the server name and the instance name when connecting. For example, UPASNA-PC/MSSQLSERVER.
Step 10
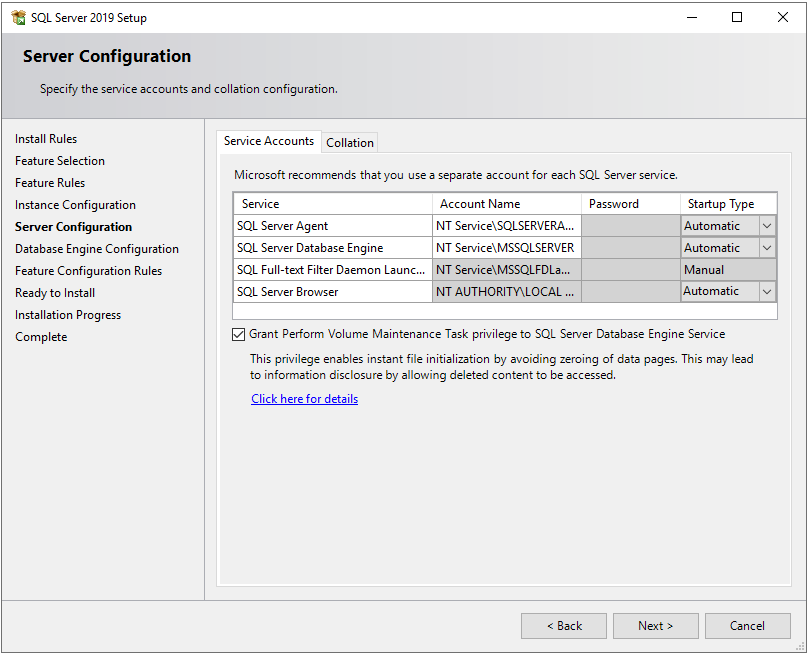
Next, you will see the Server Configuration window. In Service Accounts tab, select Automatic in Startup Type for SQL Server Agent, SQL Server Database Engine, and SQL Server Browser services.
Step 11
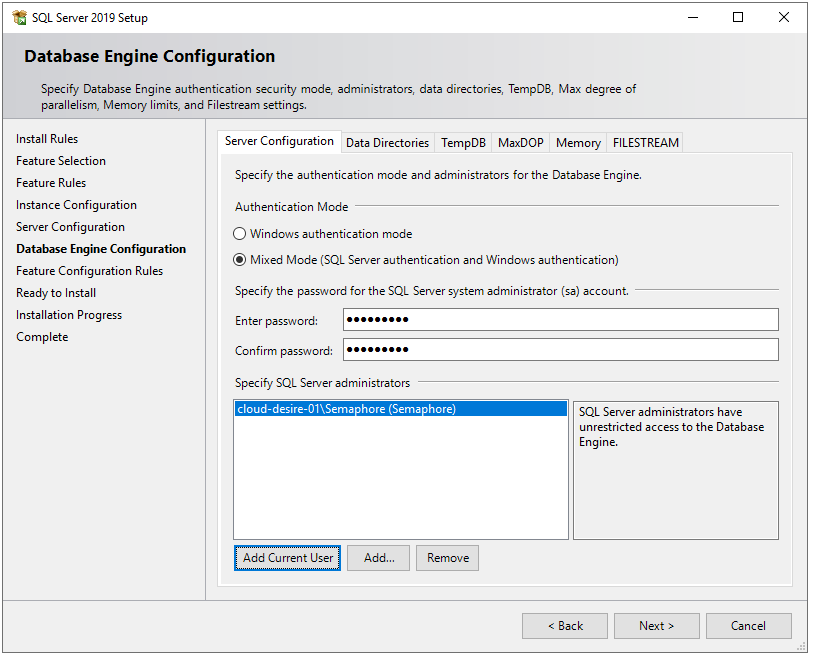
Next, you will see the Database Engine Configuration window. In the Server Configuration tab, choose Mixed Mode in the authentication mode section and enter a strong password. In Specify SQL Server administrators section, your current windows user should already be added automatically. If not, click on Add Current User button.
Step 12
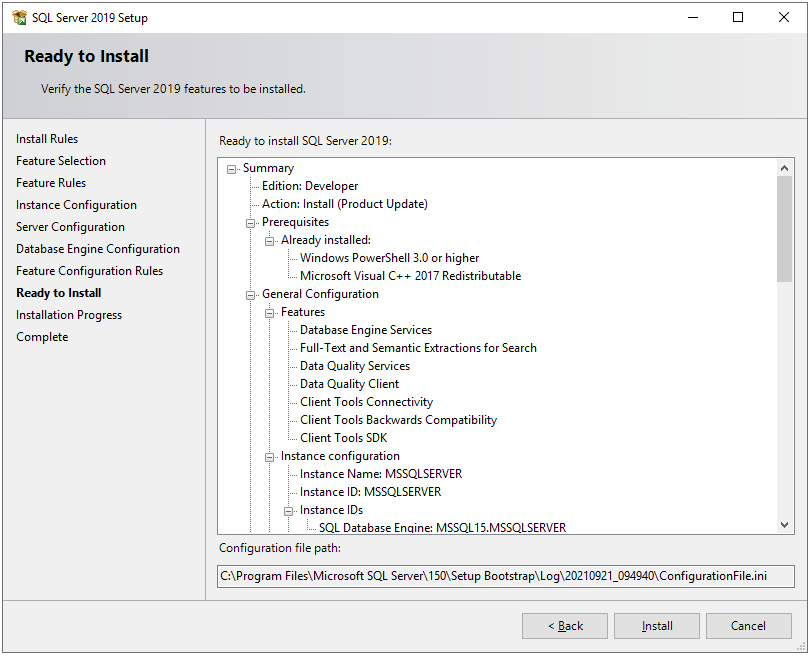
Next, the setup will check some feature configuration rules, and then the Ready to Install window will appear. This window shows the summary of all the features and configurations which we have done in the above steps. Once review the summary and click on the Install button.
Step 13
Now, the installation will start and it may take some time based on our configurations.
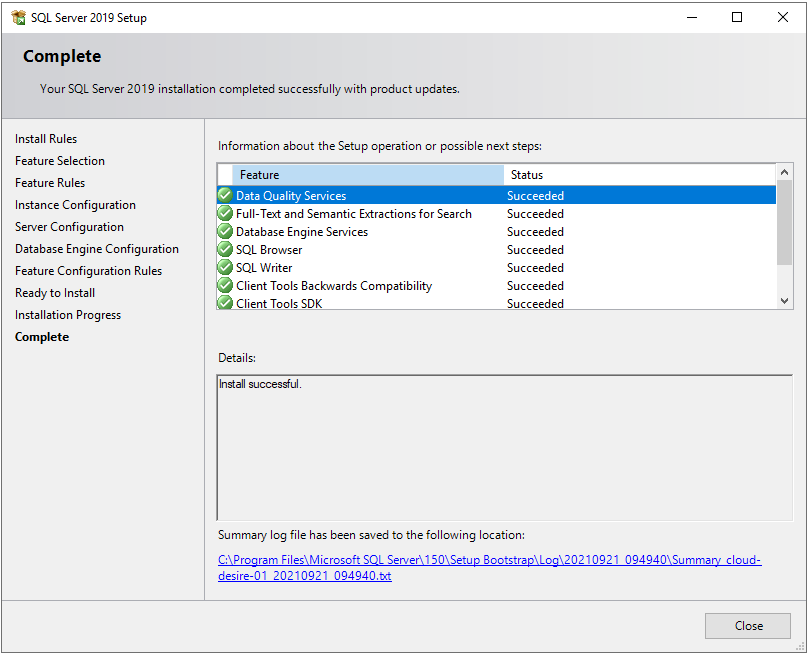
Step 14
After installation, it will show you the list of features and their installation status. If any error occurred, it will show here.
Next, you can install SQL Server Management Studio to connect SQL Server and query SQL databases. Please follow below steps to install SQL Server Management Studio.
Install SQL Server Management Studio!!!!
Install SQL Server Management Studio
First, let us download SQL Server installation media from the official website.
Step 1
Download installation media.
Step 2
Below file will download.
Step 3
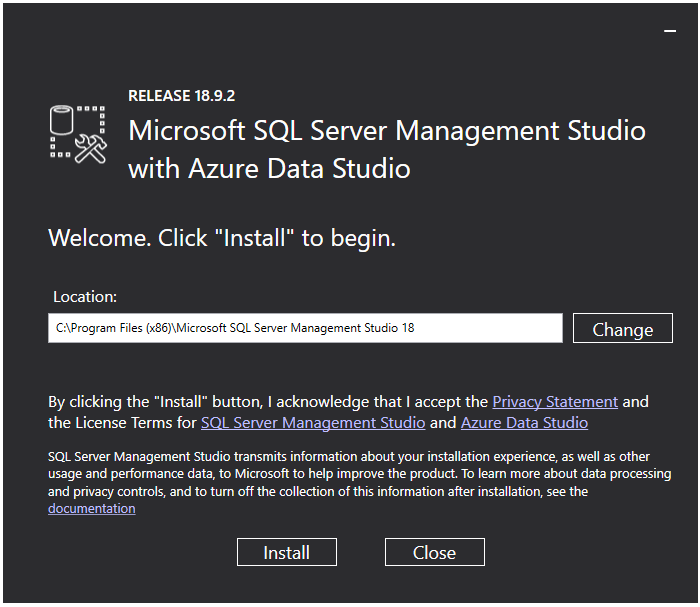
Run the downloaded file and you will see below screen. Just click on the Install button.
Step 4
It will start installing management studio. It will take some time.
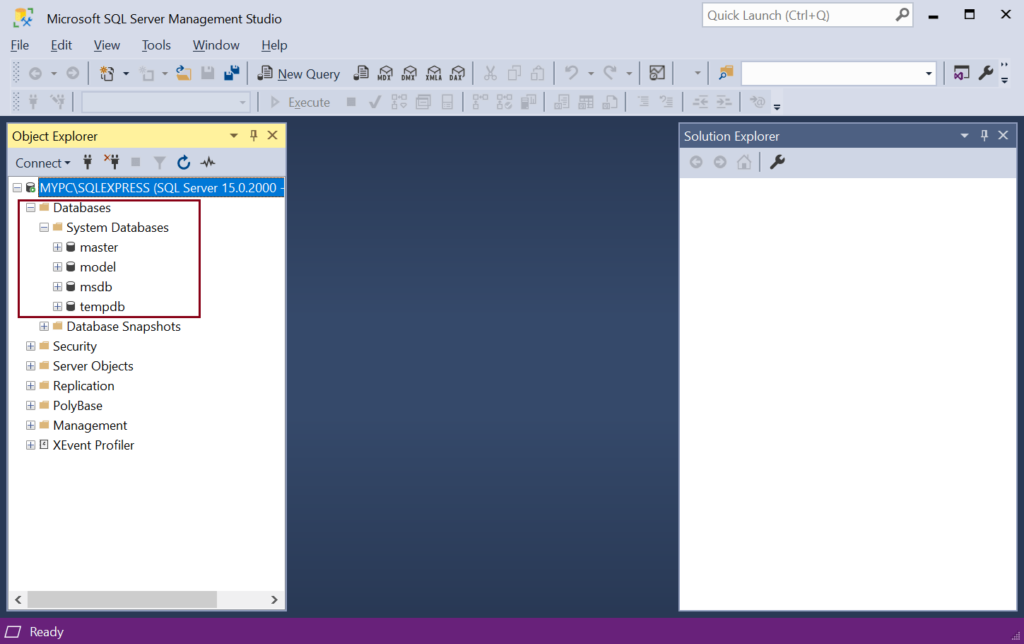
Step 5
Once installation finished, close the installation wizard and open start menu and search for SQL Server Management Studio. You will see below application. Now, click on it to open the application.
Step 6
Next, you will see below screen. In Connect to Server window, you can see the SQL instance name, which we have just installed. (Ref. Step 9). You can connect an instance with either Windows Authentication or SQL Authentication, which we have created in Step 11.
Step 7
Once you successfully authenticated, you can see Object Explorer in which you can find database list and other SQL objects.
So, hope you understand how to install and connect SQL Server using SQL Server Management Studio.
SSMS Components..
SQL Server Management Studio has the following components:
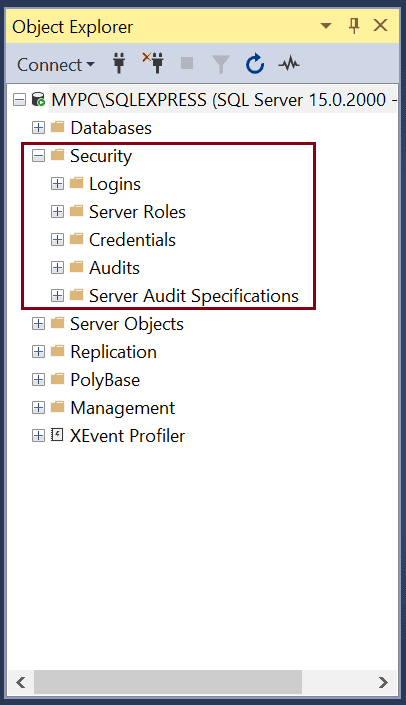
Object Explorer
Security
Server Objects
Query and Text Editor
Template Explorer
Solution Explorer
Visual Database Tools
Object Explorer
Object Explorer contains different components of one or more instances of SQL Server in a hierarchical manner. You can view and manage components such as Databases, Security, Server Objects, Replication, Management, etc.
Security
Managing security for your database server is extremely important. The Security node is below the Databases node in the Object Explorer. You can create Logins and assign Server roles for any database instance. In addition, you can assign role-based security to logins and users. The Server roles you create here have server-wide scope.
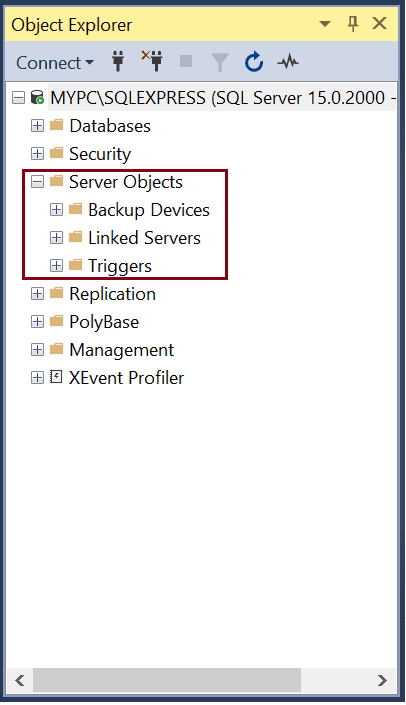
Server Objects
The Server Objects node in SSMS has four sub-nodes: Backup devices, Endpoint’s, Linked Servers, and Triggers. A linked server is a method by which a SQL Server can talk to another ODBC database with a T-SQL statement. SQL Server Endpoint’s are a point of entry into SQL Server. It is a database object that defines a way in which the SQL Server can communicate over the network. All objects under Server Objects have server-wide scope.
Replication
Replication is a set of technologies for copying and distributing data and database objects between databases and synchronizing databases. This is mainly used for maintaining consistency between databases.
Polybase
Polybase allows your SQL Server to query directly from other SQL Server, Oracle, MongoDB, Hadoop clusters, Teradata, Cosmos DB by installing client connection software using T-SQL separately. Polybase is used for data virtualization.
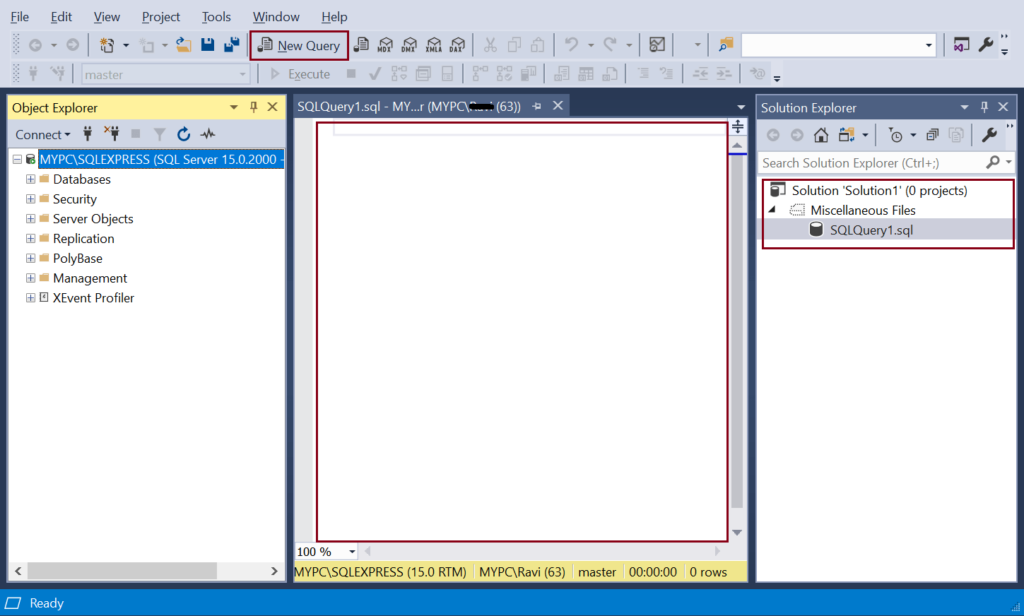
Query and Text Editor
Open a query editor by clicking on the New Query on the tool bar. Query editor lets you create, edit & execute Transact SQL (T-SQL) statements. It is equipped with IntelliSense support by auto-completing the script by suggesting variants. This makes writing & debugging code easier and faster.
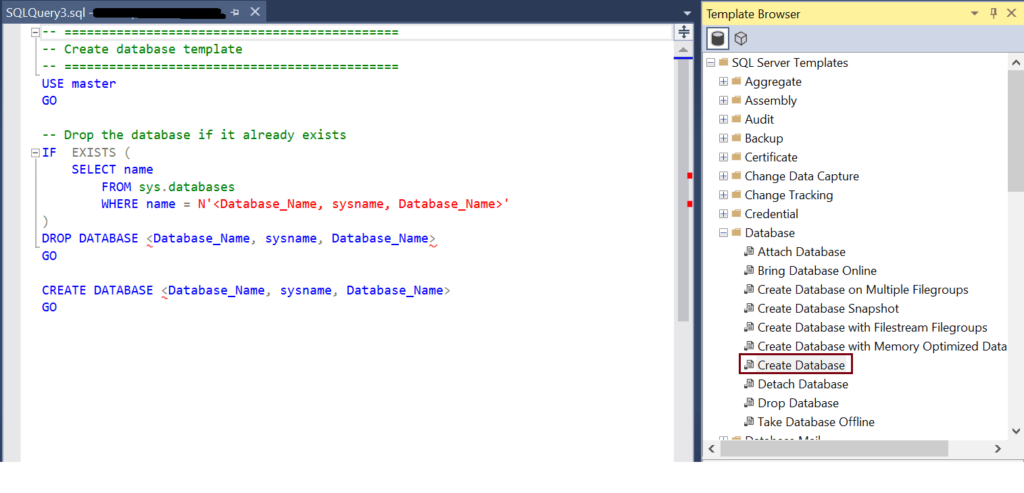
Template Explorer
Template explorer provides templates for creating various database objects. You can browse the available templates in Template Explorer and open it into a code editor window. You can also create your own custom templates.
Open Template Explorer from View menu -> Template Explorer. The following displays Create Database template.
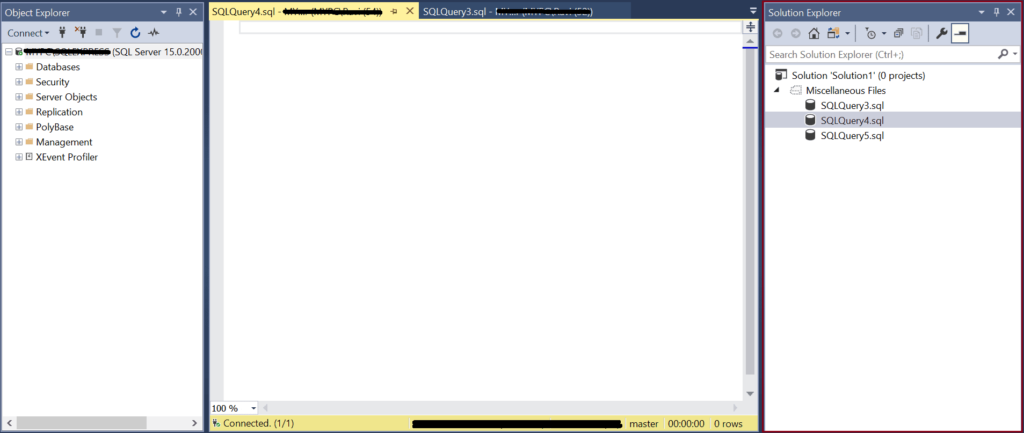
Solution Explorer
Solution explorer is used to manage administration items such as scripts and queries. Open it from View -> Solution Explorer menu.
Create Database in SQL Server 2019!!!!
In SQL Server, a database is made up of a collection of objects like tables, functions, stored procedures, views etc. Each instance of SQL Server can have one or more databases. SQL Server databases are stored in the file system as files.
Type of Database in SQL Server
There are two types of databases in SQL Server: System Database and User Database.
System databases are created automatically when SQL Server is installed. They are used by SSMS and other SQL Server APIs and tools, so it is not recommended to modify the system databases manually.
User-defined Databases are created by the database user using T-SQL or SSMS for your application data. A maximum of 32767 databases can be created in an SQL Server instance.
There are two ways to create a new user database in SQL Server:
Create Database Using T-SQL
Create Database Using SSMS
Create Database using SQL Server Management Studio….
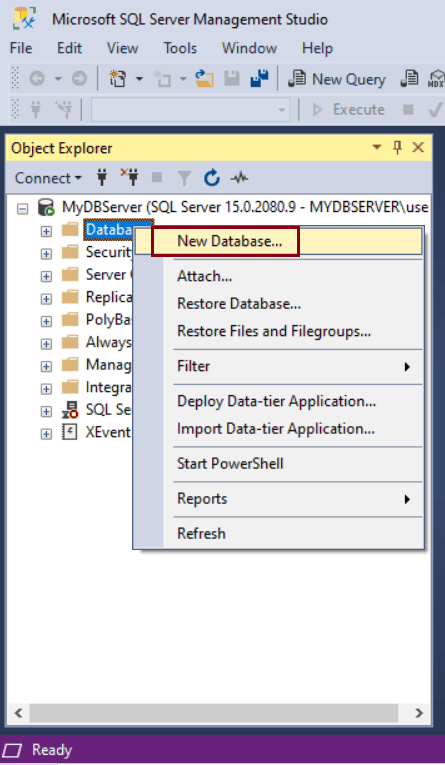
Open SSMS and in Object Explorer, connect to the SQL Server instance. Expand the database server instance where you want to create a database.
Right-click on Databases folder and click on New Database.. menu option.
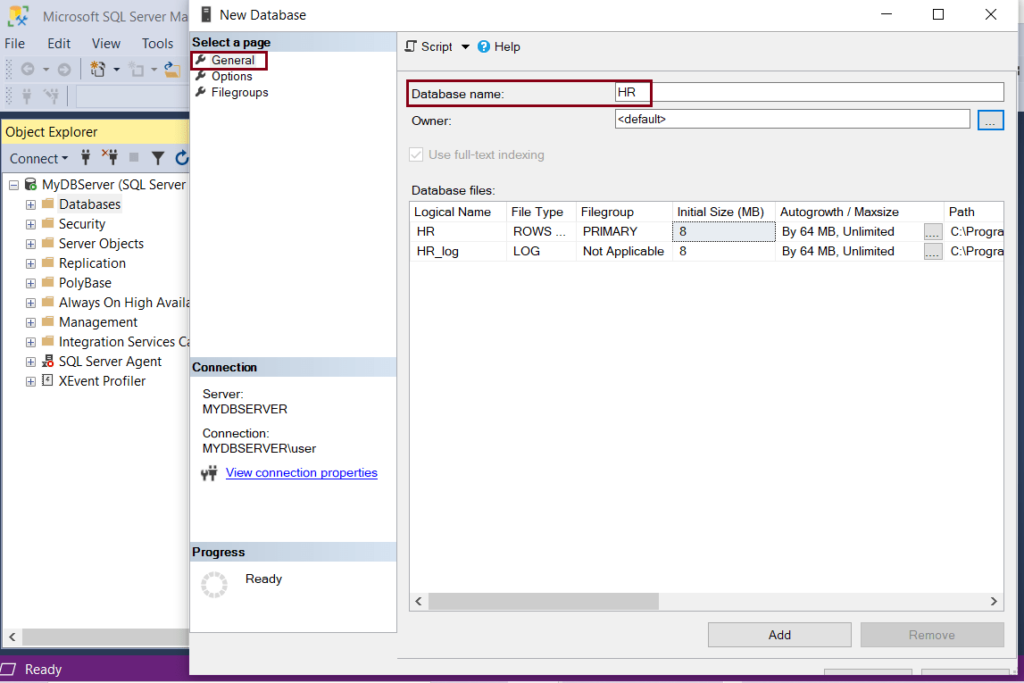
In New Database window, enter a name for the new database, as shown below. Let us enter the database name ‘HR’. Every SQL Server database has at-least a minimum of two operating system files: Data file and Log file.
Click Ok to create a new ‘HR’ database. This will be listed in the database folder, as shown below.
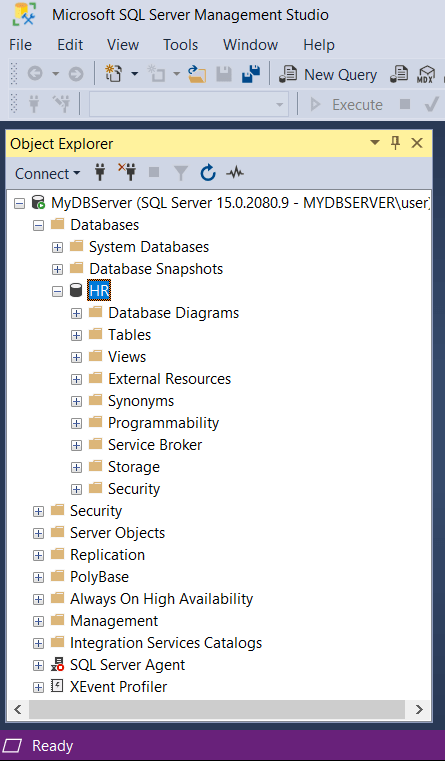
In the above figure, the new ‘HR’ database is created with the following folders:
Database Diagrams: It graphically shows the structure of the database. You can create a new database diagrams by right-clicking on the folder and selecting Create New Diagram
Tables: All the system and user defined tables associated with the database are available under this folder. Tables contain all the data in a database.
Views: All the System and used defined views are available under this folder. System views are views that contain internal information about the database.
External Resources: Any Service, computer, fileshare, etc that are not a part of the SQL Server installation are stored here. Contains 2 folders 1) External Data Sources 2) External File Formats
Programmability: The Programmability folder lists all the Stored Procedures, Functions, Database Triggers, Assemblies, Rules, Types, Defaults, Sequences of the database
Service Broker: All database Services are stored in this folder
Storage: Stores information on Partition Schemes, Partition Functions, Full Text Catalogs,
Security: Database Users, Roles, Schemas, Asymmetric Keys, Certificates, Symmetric Keys, Security policies are created & available in the Security folder of every database.
Create Table using SSMS..
You can design a new table using the table designer in SQL Server Management Studio.
To design a new table, open SSMS and connect to your sql server instance.
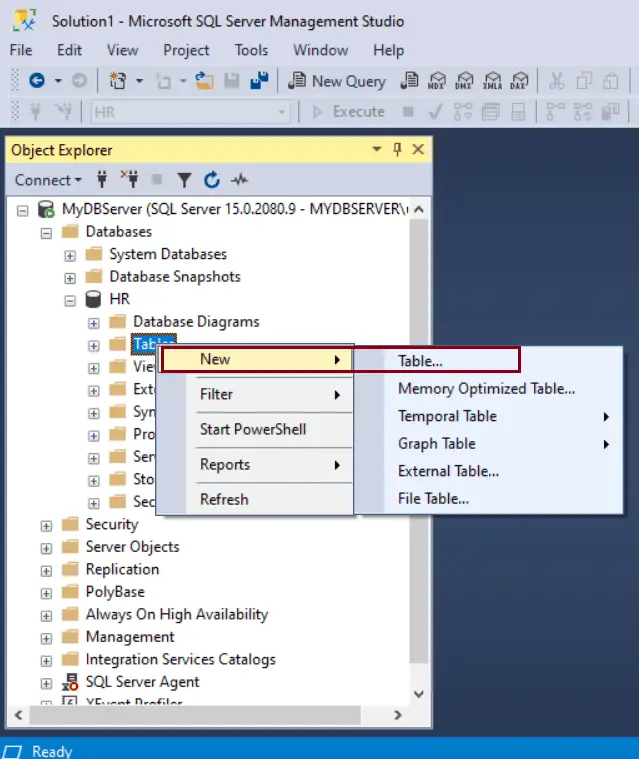
In Object Explorer, expand the HR database or the database where you want to create a new table.
Now, right-click on the Tables folder and select New Table, as shown below.
Create Table
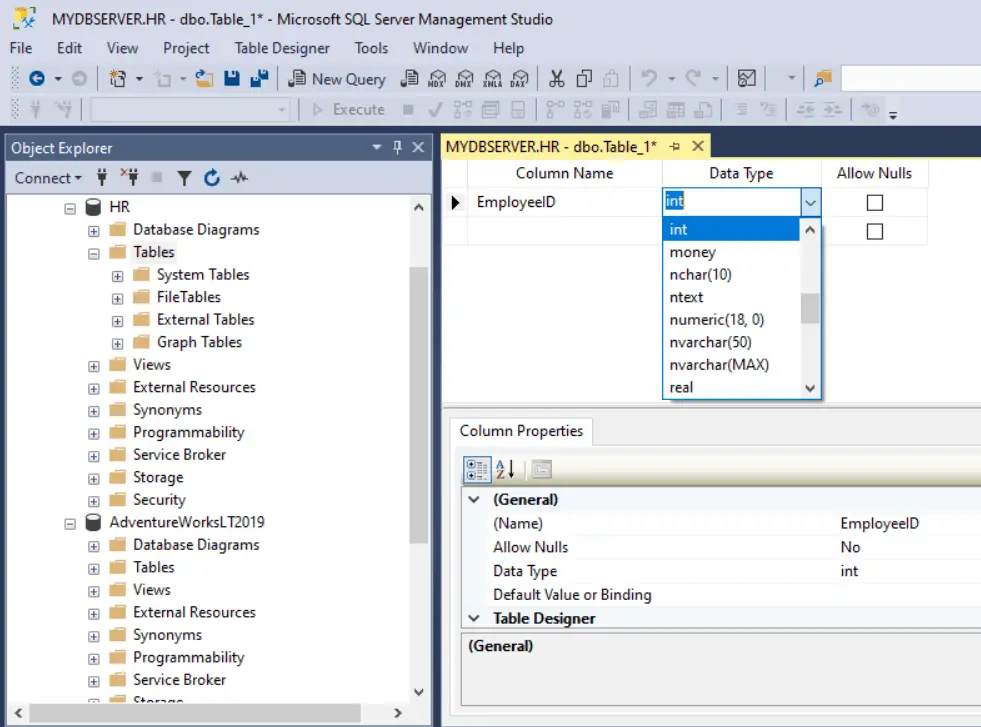
This will open a table designer where you can enter a name of a column, its data type, and check the checkbox if a column allows null, as shown below.
Create Table in SQL Server
Column Name: Type a unique column name.
Data type: Choose a data type for the column from the dropdown list. Choose the appropriate length for the string data types.
Allow Nulls: Choose whether to allow Nulls for each column by check the check-box.
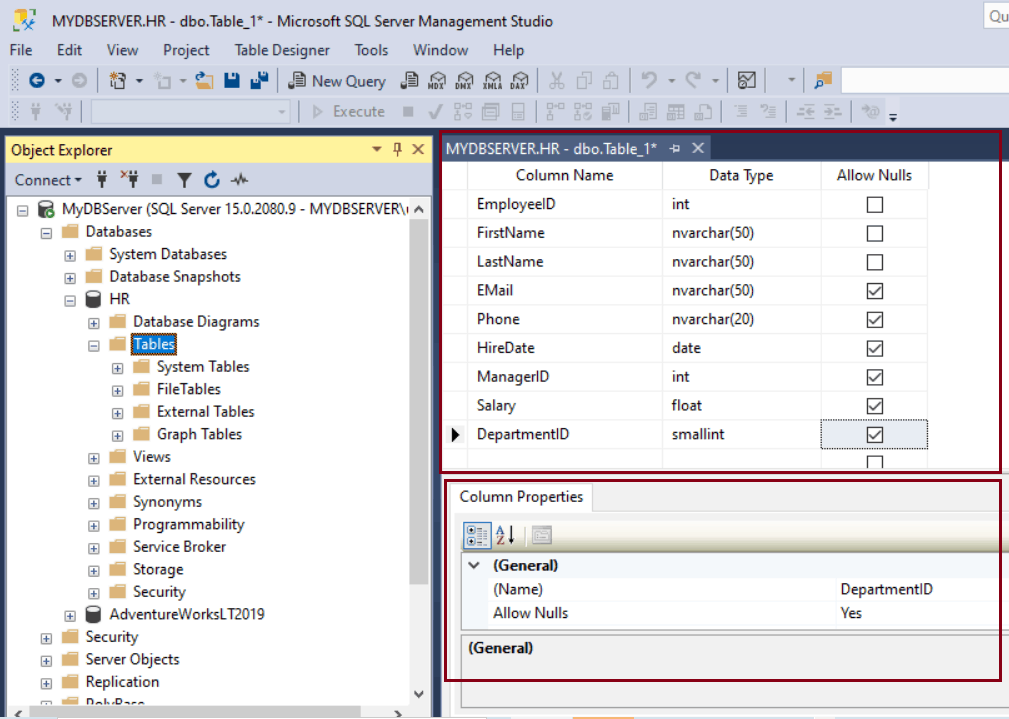
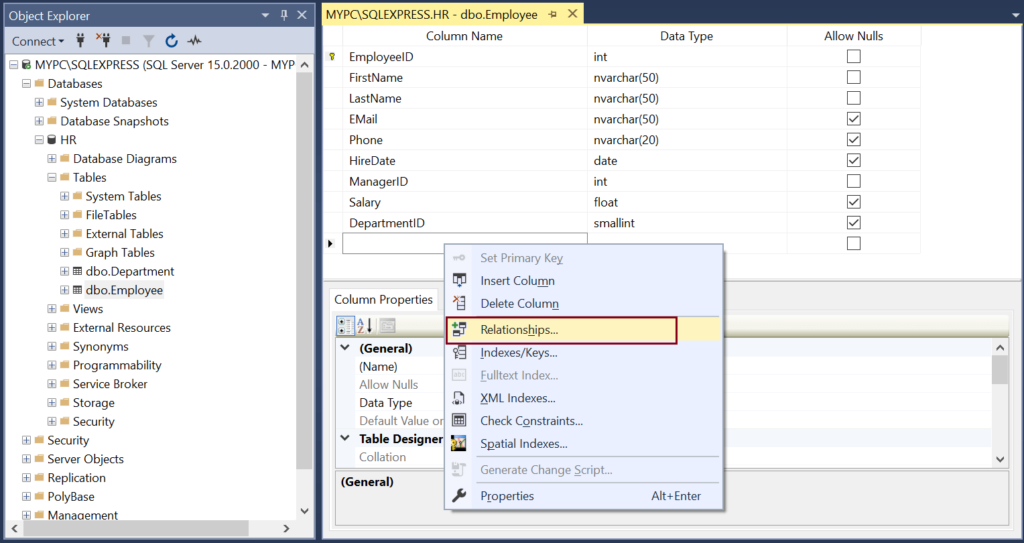
Enter columns info in a separate row for all the columns you want to take in your table. The followings are columns of the Employee table.
To set the properties for a column, such as identity specification, computed column specification, etc., select a column and set the property value in the Column Properties tab in the bottom pane.
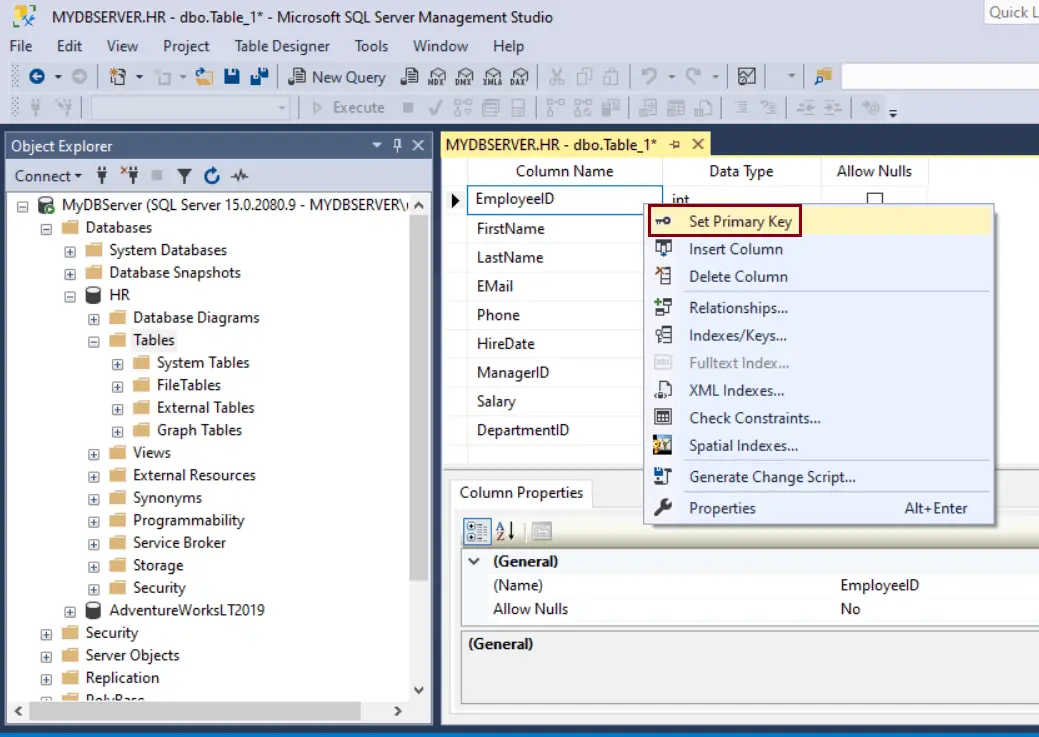
To specify a column as a primary key column, right-click on the column row and select Set Primary Key, as shown below.
Create Table in SQL Server
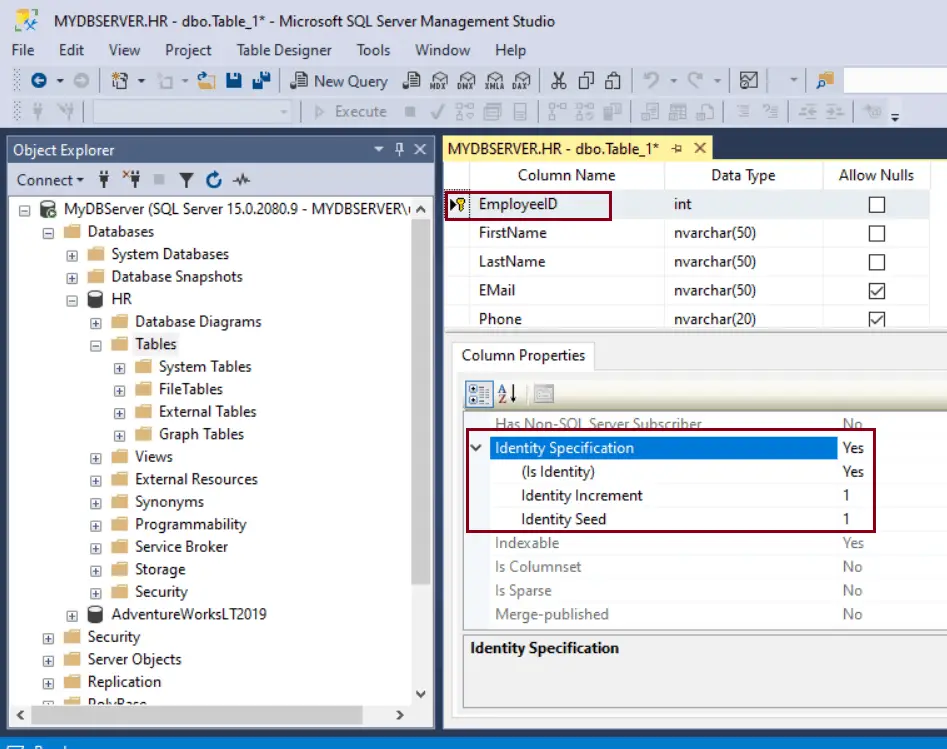
You can configure the primary key that will auto generate unique integers by setting it as identity column, as shown below.
Create Table in SQL Server
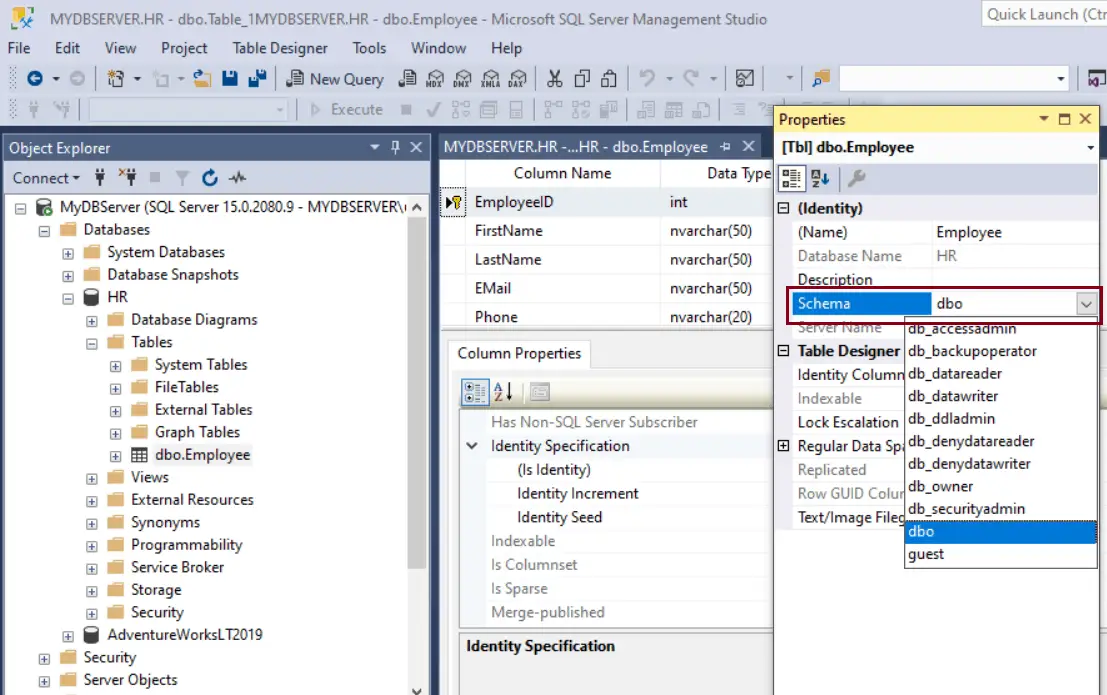
By default, the table is created in the dbo schema. To specify a different schema for the table, right-click in the Table-Designer pane and select properties. From the Schema drop-down list, select the appropriate schema.
Create Table in SQL Server
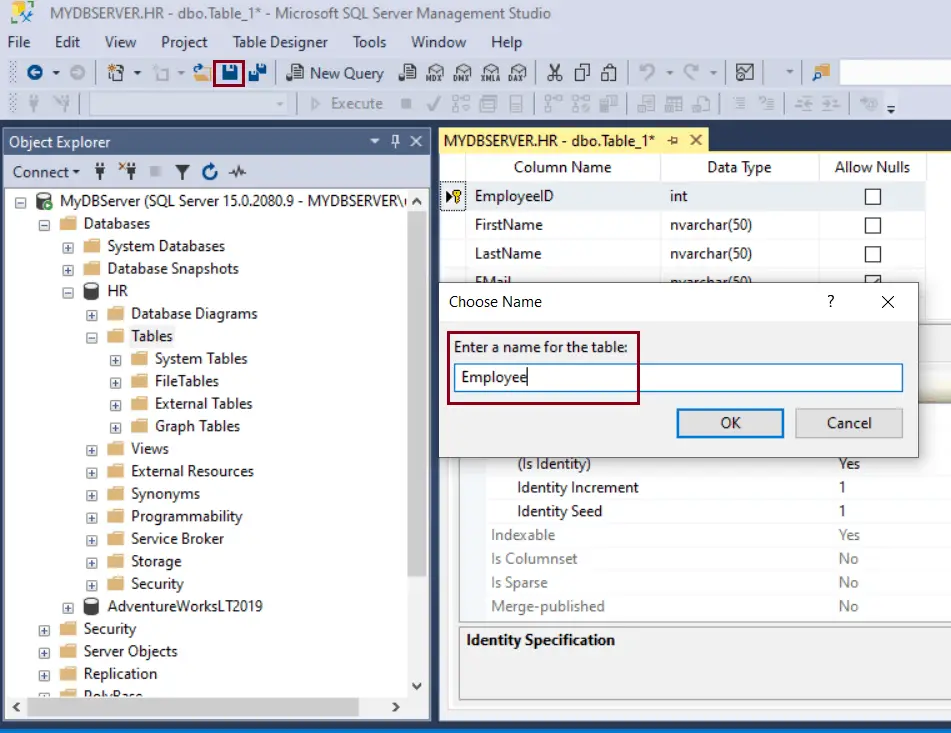
Now, from the file menu, choose Save to create this table. Enter Employee as a table name and click OK.
Create Table in SQL Server
To view the new table, refresh the Tables folder in the Object Explorer. The EMPLOYEE table is now available under the Tables node.
Add Columns Using SSMS:
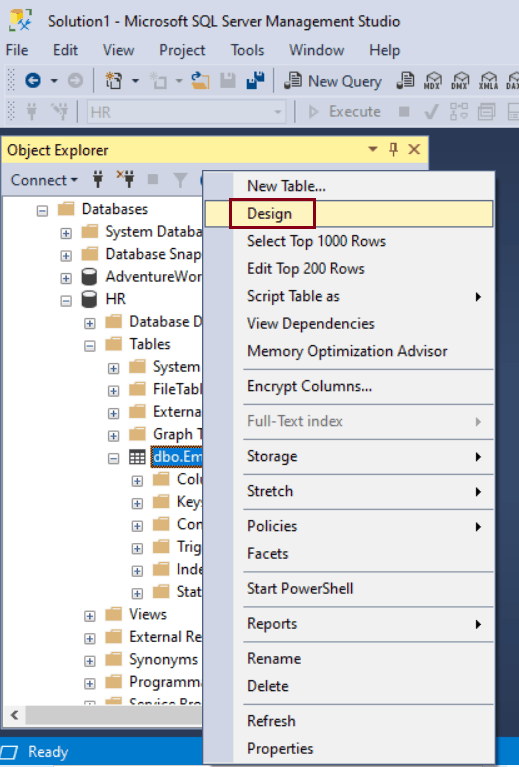
In Object explorer, right-click the table to which you want to add new columns and choose Design.
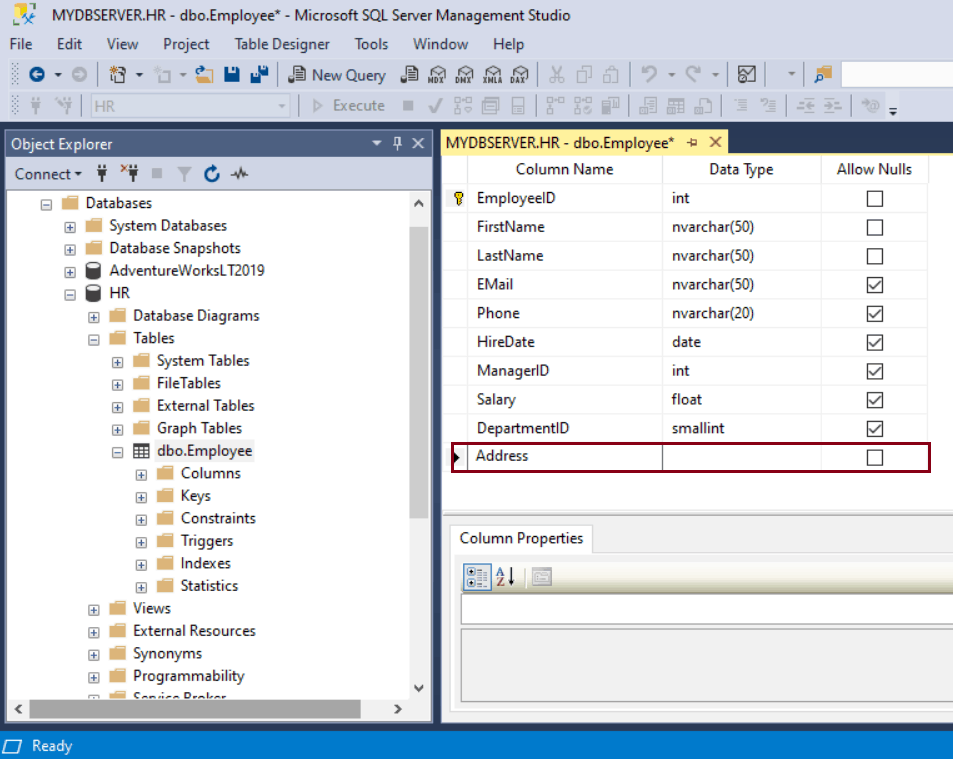
Click the first blank cell under the last column name column and enter the name of the column, as shown below.
In the next column, select the data type from the dropdown and the length if applicable.
In the last column of a row, check Allow Nulls checkbox if it is nullable. Now, save the table from file -> Save menu to save the modified table.
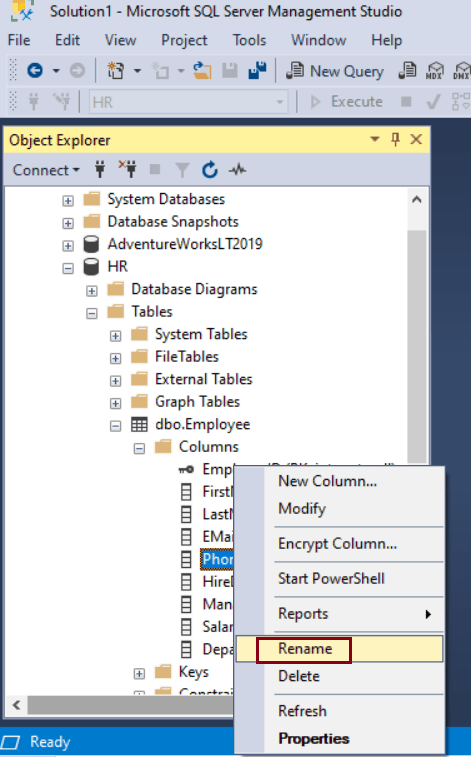
Rename Table and Columns Using SSMS:
Open SSMS and expand the database folder.
Select and right-click on a table or a column you want to rename and click Rename. Enter a new name by over writing on existing name.
Go to the file menu and click Save.
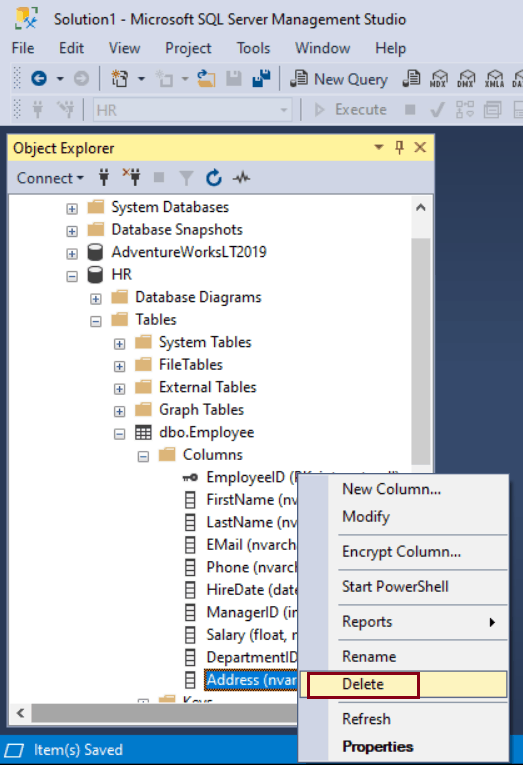
Delete Columns Using SSMS
Open SSMS and connect to the SQL Server instance. In Object explorer, expand the database and the Tables folder. Locate the table and expand the columns folder to display the column names.
Right-click on the column name which you want to delete and click delete.
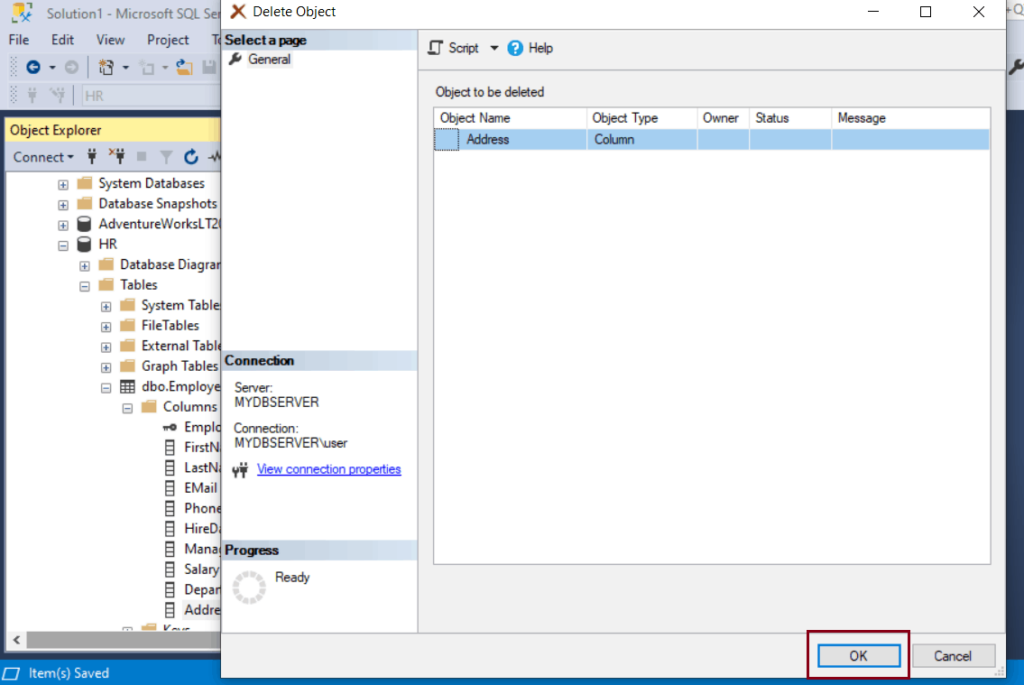
This will open “Delete Object” page, as shown below.
Click OK to delete a column.
Finally, save the changes from File menu -> Save.
Create a Foreign Key using SSMS..
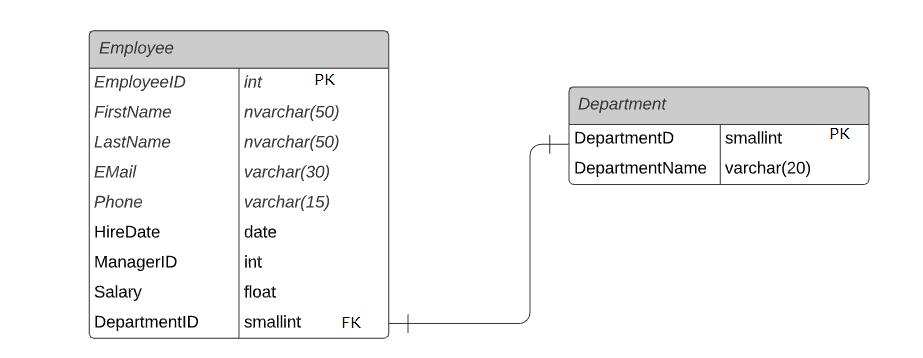
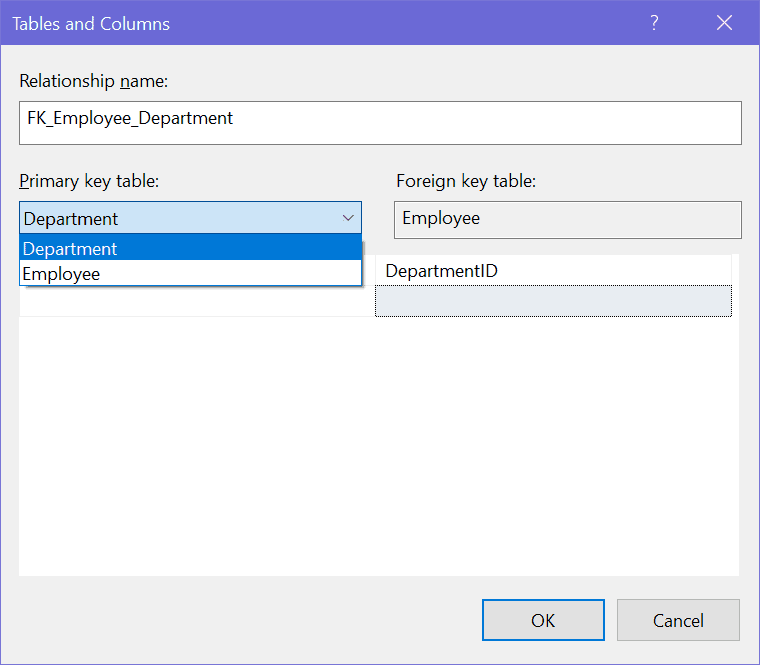
What is Foreign Key?
The foreign key establishes the relationship between the two tables and enforces referential integrity in the SQL Server. For example, the following Employee table has a foreign key column DepartmentID that links to a primary key column of the Department table.
Here, we will configure the DepartmentID column as a foreign key in the Employee table that points to the DepartmentID PK column of the Department table using SQL SERVER MANAGEMENT STUDIO.
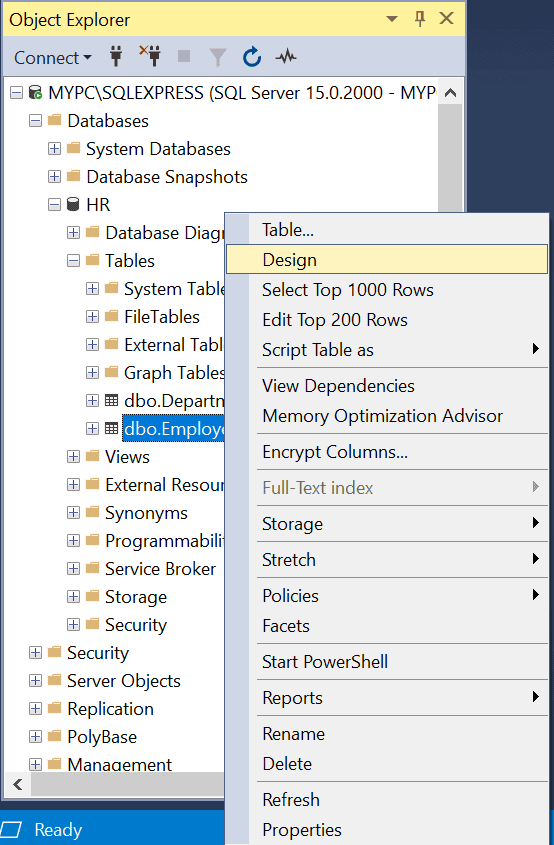
Open SSMS and expand the HR database. Right-click on the Employee table and click on the Design option, as shown below.
This will open the Employee table in the design mode.
Now, right-click anywhere on the table designer and select Relationships…, as shown below.
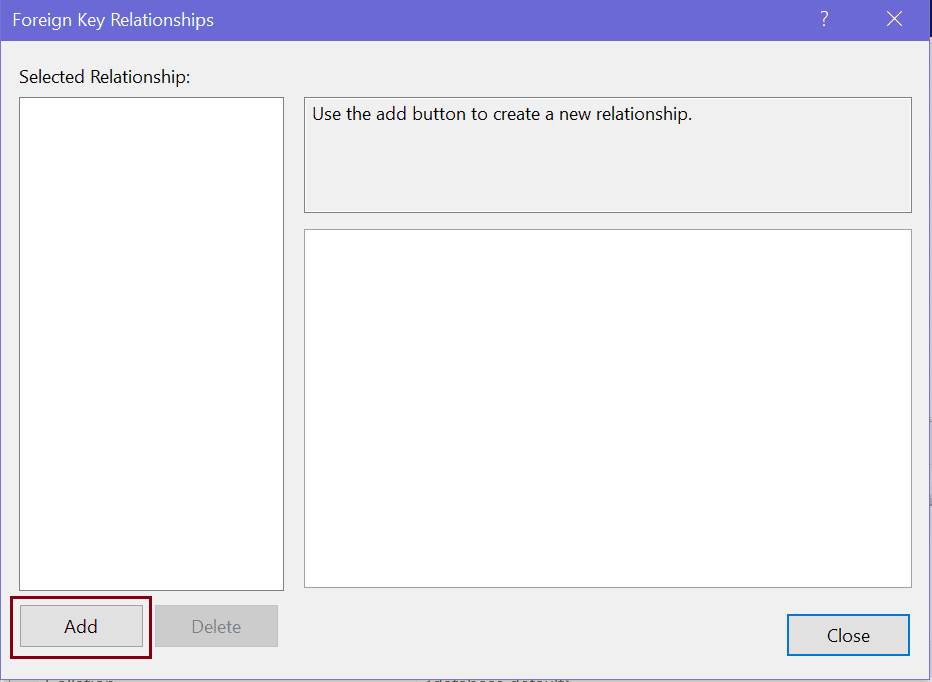
This will open the Foreign Key Relationships dialog box, as shown below.
Now, click on the Add button to configure a new foreign key, as shown below.
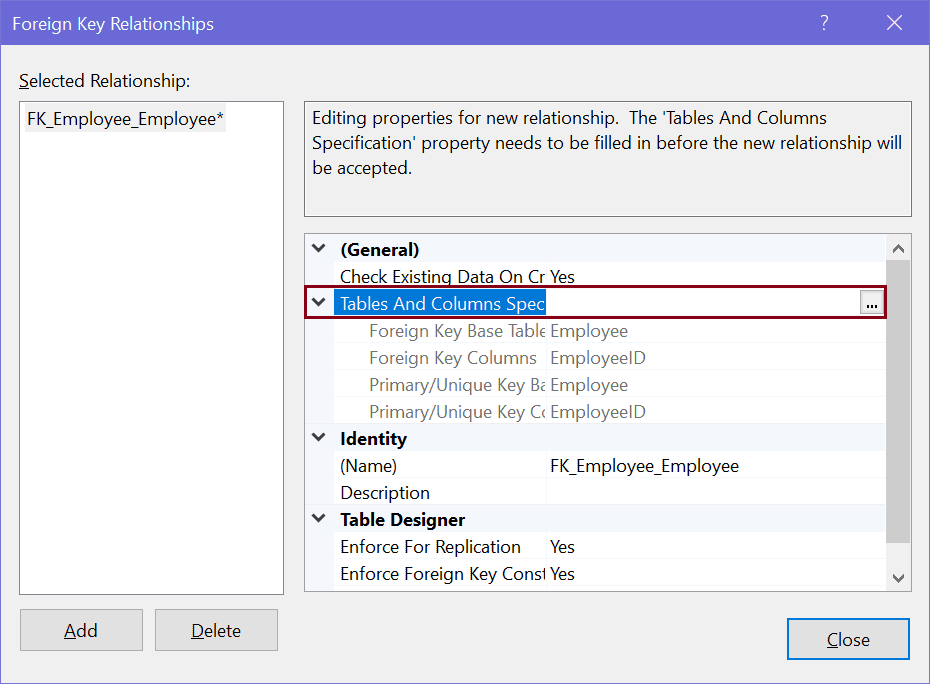
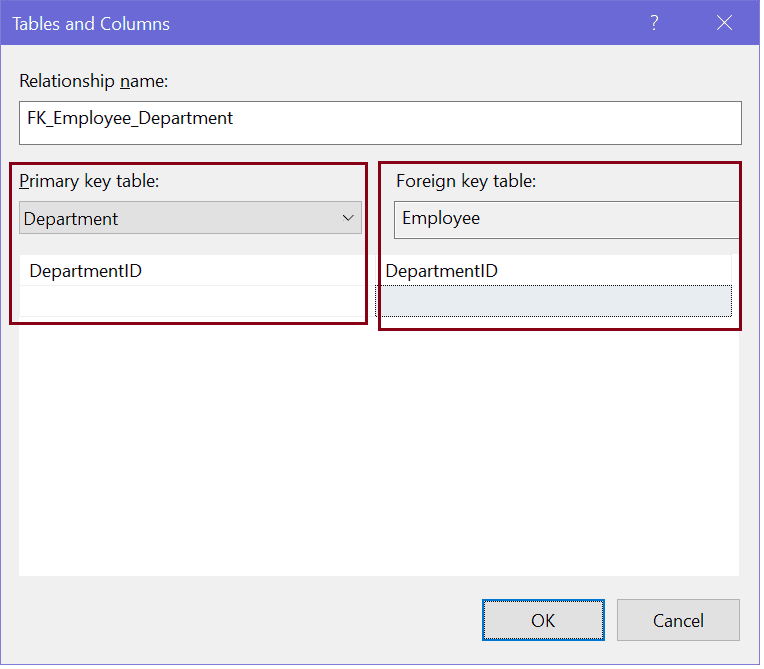
Now, to configure the primary key and foreign key relationship, click on the Tables and Column Specification […] button. This will open Tables and Columns dialog box where you can select primary key and foreign key relationship.
Here, we are configuring the DepartmentID column in the Employee table as a foreign key, which points to the primary key column DepartmentID of the Department table. So, select primary table and key in the left side and foreign key table and column in the right side, as shown below.
The following defines a foreign key DepartmentID in the Employee table.
Click OK to create the relationship and click on Close to close the dialog box.
Now, save your changes. This will create a one-to-many relationship between the Employee and Department table by setting a foreign key on the DepartmentID column in the Employee table, as shown below.
IF YOU FIND MY BLOG USEFUL,FOLLOW,SHARE AND COMMENT!
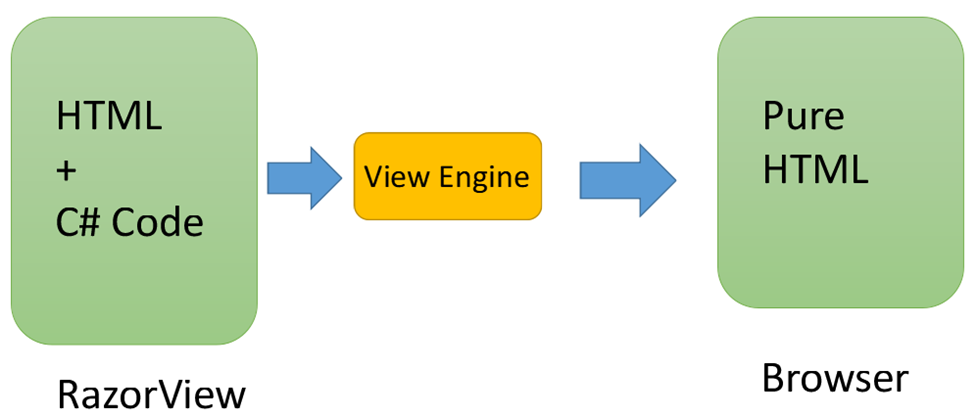
It’s a great tool for developers who want to create dynamic HTML pages with minimal coding. In this blog post, we’ll take a look at what razor syntax is, how it works, and how you can use it in your own projects.
Razor syntax is essentially a shorthand way of writing code. It allows developers to write HTML and C# code together in the same page without having to switch between different languages. This helps simplify the development process and makes coding more efficient. Razor syntax was first introduced in 2011 with the release of ASP.NET MVC 3. Since then, it has become one of the most popular templating engines for Web development.
Razor syntax uses the “@” symbol to denote code blocks within an HTML page. For example, if you wanted to display an image on your website using razor syntax, you would write something like this: @<img src=”image-url” /> This tells the server to display an image with the specified URL on the page when it renders it as HTML.
In addition to displaying content from variables and other sources, razor syntax can also be used for more complex tasks such as looping through data collections or making decisions based on conditions (if/else statements). This makes it possible for developers to create highly dynamic pages that can adapt easily depending on user input or other external factors.
How Can You Use Razor Syntax?
If you’re looking to get started with razor syntax, you’ll need a few things first—namely a web framework like ASP.NET MVC or ASP.NET Core and some knowledge of programming languages like C# or Visual Basic .NET (VB .NET). Once you have those two things taken care of, you can start writing your own razor syntax code.
Razor syntax is a powerful templating engine that enables developers to quickly create dynamic HTML pages with minimal coding effort required. It’s simple yet powerful design makes it ideal for projects of all sizes from small personal websites all the way up to large corporate applications – so no matter what type of project you’re working on, it’s worth considering giving razor syntax a try. With just some basic programming knowledge and experience under your belt, you’ll be able to write razor code confidently in no time at all!
Important points about Razor:
Intellisense: Razor syntax supports statement completion within visual studio.
Easy to Differentiate: Easily you differentiate server side code from html code.
Compact: Razor syntax is compact, enabling you to minimize the number of characters and keystrokes required to write code.
Creating a View Using Razor:
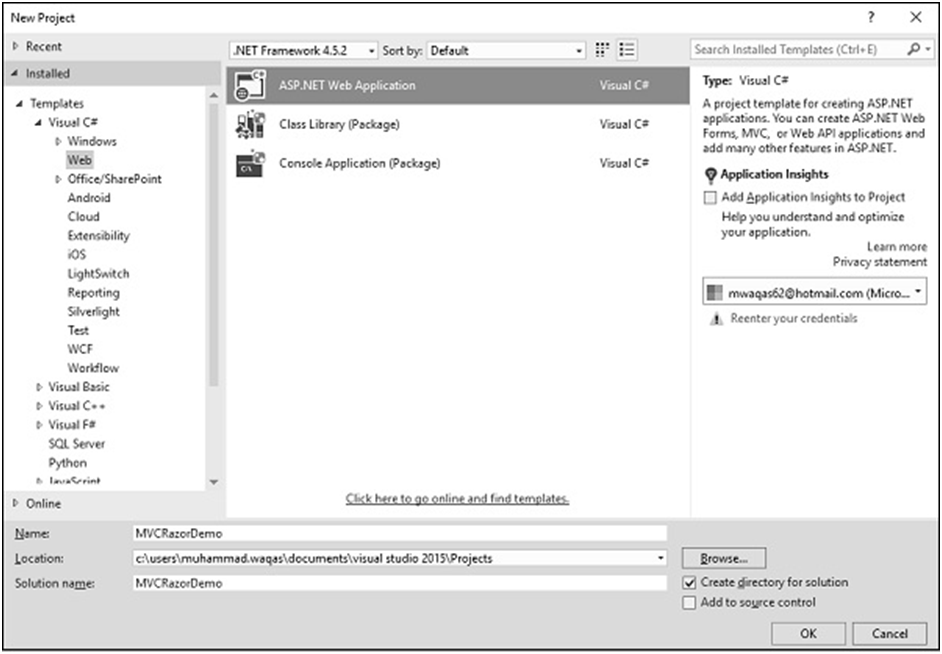
Let’s create a new ASP.Net MVC project.
Enter the name of project in the name field and click Ok.
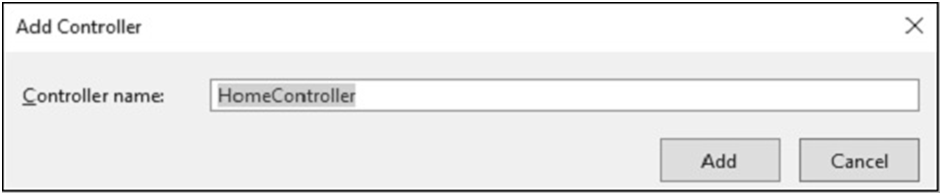
Select the MVC 5 Controller – Empty option and click Add button and then the Add Controller dialog will appear.
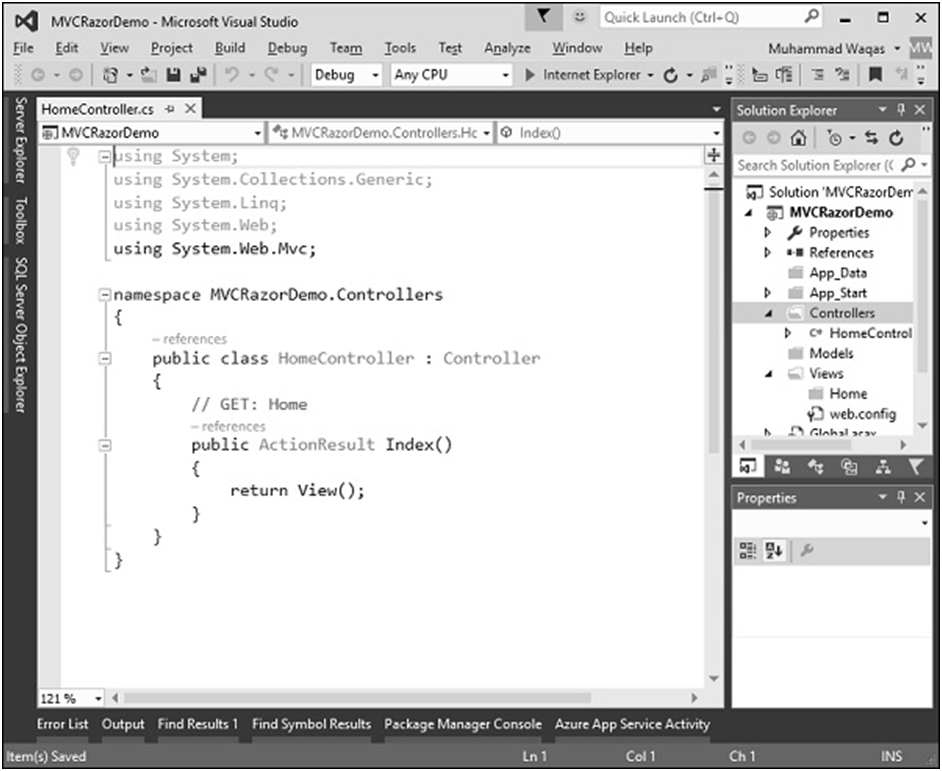
Set the name to HomeController and click ‘Add’ button. You will see a new C# file ‘HomeController.cs’ in the Controllers folder, which is open for editing in Visual Studio as well.
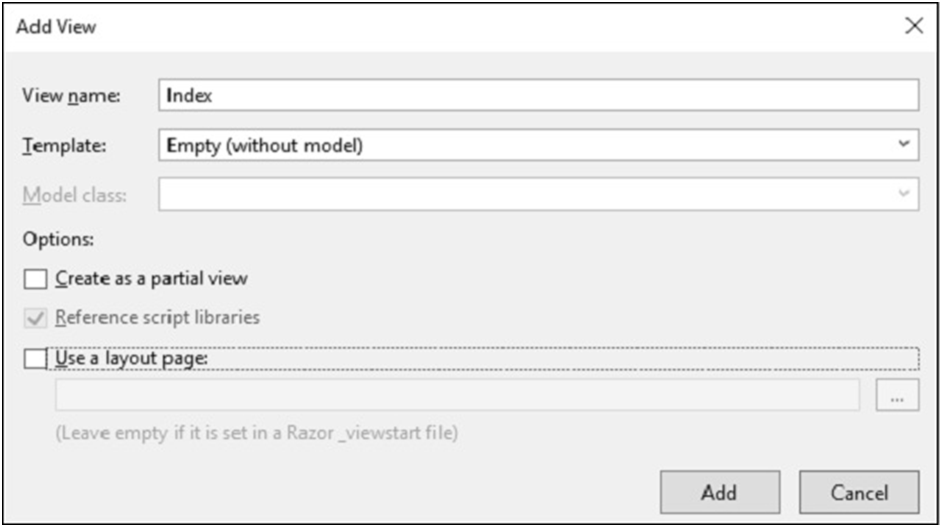
Right-click on the Index action and select Add View…
To keep things simple, select the Empty option and check the MVC checkbox in the ‘Add folders and core references for’ section and click Ok. It will create a basic MVC project with minimal predefined content.
Once the project is created by Visual Studio, you will see a number of files and folders displayed in the Solution Explorer window. As we have created ASP.Net MVC project from an empty project template, so at the moment the application does not contain anything to run. Since we start with an empty application and don’t even have a single controller, let’s add a HomeController.
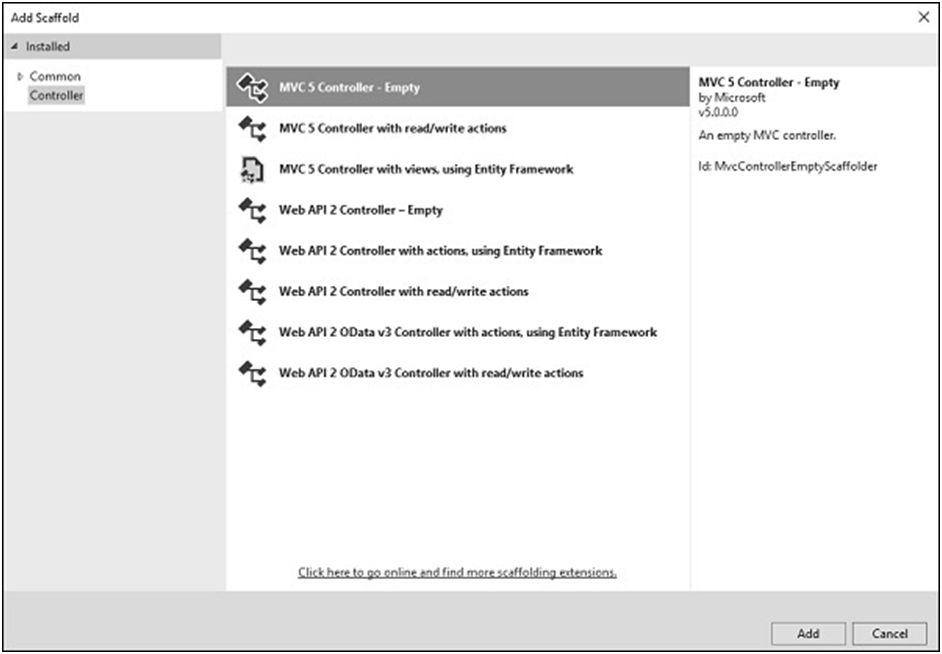
To add a controller right-click on the controller folder in the solution explorer and select Add → Controller. It will display the Add Scaffold dialog.
Select Empty from the Template dropdown and click Add button. Visual Studio will create an Index.cshtml file inside the View/Home folder.
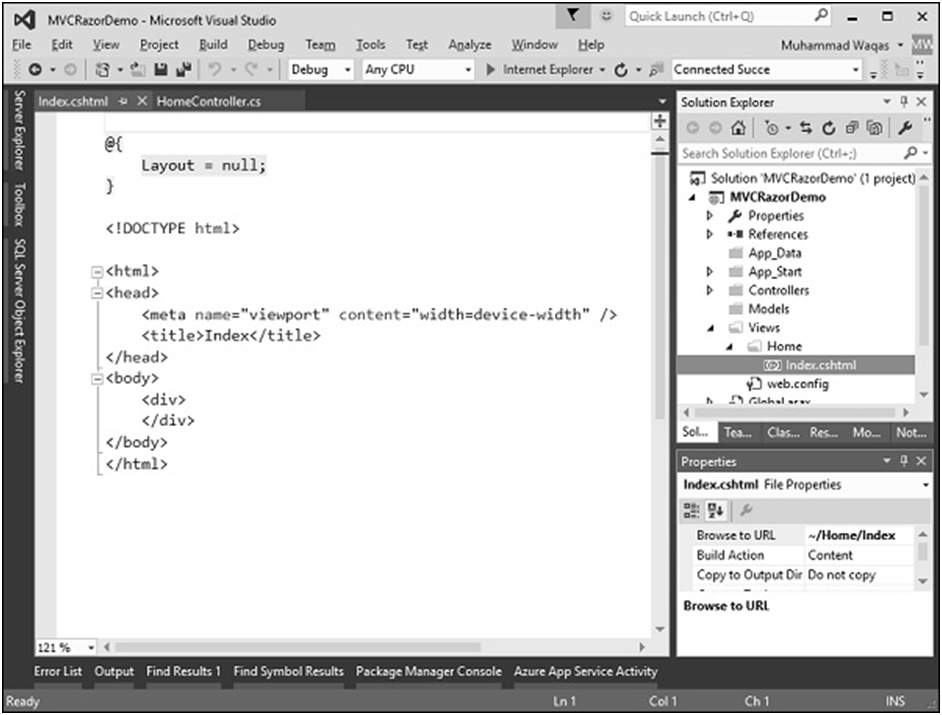
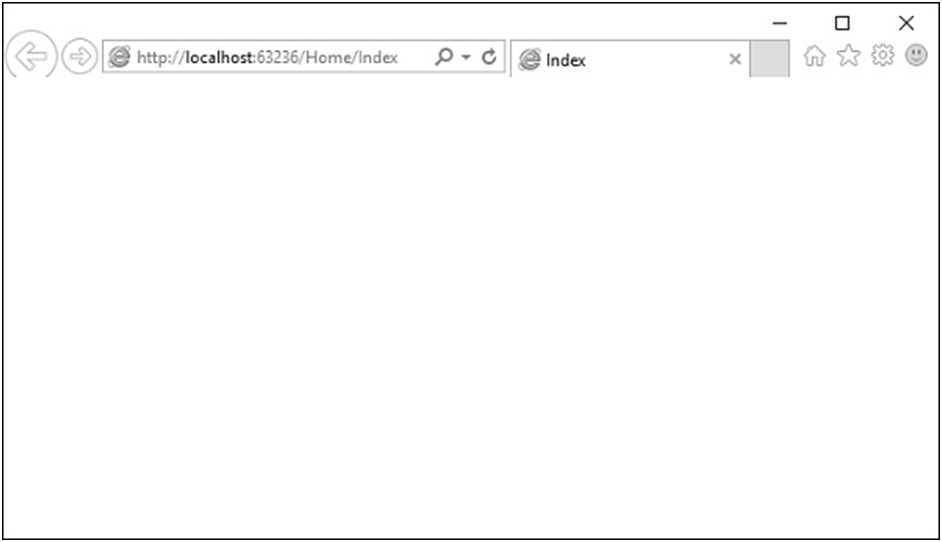
Notice that Razor view has a cshtml extension. If you’re building your MVC application using Visual Basic it will be a VBHTML extension. At the top of this file is a code block that is explicitly setting this Layout property to null.
When you run this application you will see the blank webpage because we have created a View from an Empty template.
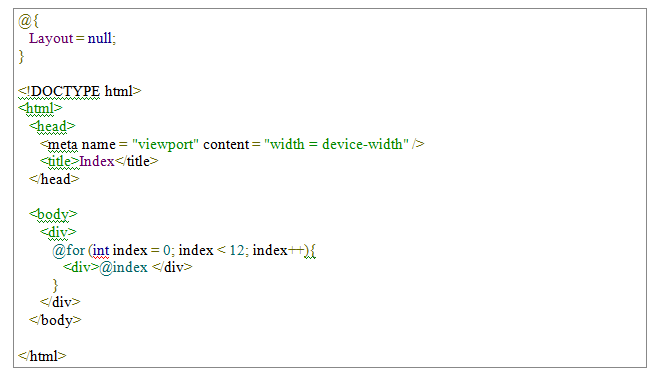
Let’s add some C# code to make things more interesting. To write some C# code inside a Razor view, the first thing we will do is type the ‘@’ symbol that tells the parser that it is going to be doing something in code.
Let’s create a FOR loop specify ‘@i’ inside the curly braces, which is essentially telling Razor to put the value of i.
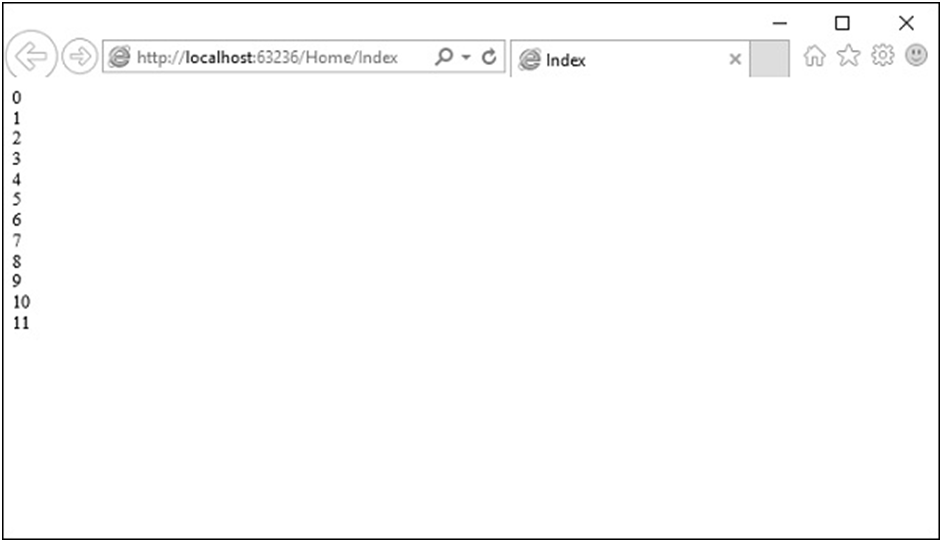
Run this application and you will see the following output
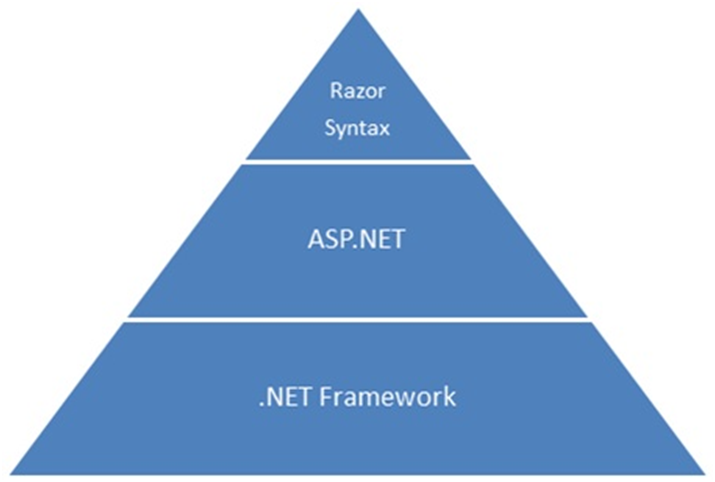
Razor Syntax,.NET Framework and ASP.NET:
The Razor syntax gives you all the power of ASP.NET, but using a simplified syntax that’s easier to learn if you’re a beginner and that makes you more productive if you’re an expert. Even though this syntax is simple to use, its family relationship to ASP.NET and the .NET Framework means that as your websites become more sophisticated, you have the power of the larger frameworks available to you.
IF YOU FIND MY BLOG USEFUL COMMENT & SHARE. THANK YOU!