.NET 8 Preview 6 is the latest preview release of .NET 8, which is expected to be released later this year. It includes many new improvements to blazor, such as:
Form model binding and validation with server-side rendering: Blazor’s new server-side rendering mode can now bind and validate data from HTTP form post values. This means you can use data annotations to specify validation rules for your model classes and display error messages in your UI. You can also use the [SupplyParameterFromForm] attribute to bind data from the form request to your component properties.
Enhanced page navigation and form handling: Blazor now supports more scenarios for navigating between pages and handling form submissions. You can use the NavigationManager.NavigateTo method to navigate to a different page with or without reloading the app. You can also use the NavigationManager.LocationChanged event to react to changes in the URL. You can use the EditForm.OnSubmit event to handle form submissions without reloading the page.
Preserve existing DOM elements with streaming rendering: Blazor’s streaming rendering mode can now preserve existing DOM elements when streaming updates into the page. This means that the UI will not flicker or lose focus when new content is added or removed. This provides a faster and smoother user experience.
Specify component render mode at the call site: You can now specify the render mode for a component instance using the @rendermode directive attribute. The render mode determines how the component is rendered on the page: static (no interactivity), server (server-side rendering), server-prerendered (server-side rendering with interactivity), or webassembly (client-side rendering). This gives you more control over how your components are rendered.
Interactive rendering with Blazor WebAssembly: You can now enable interactive rendering of components with Blazor WebAssembly. This means that you can have components that are initially rendered on the server and then switch to client-side rendering when the user interacts with them. This can improve performance and reduce bandwidth usage by only loading the necessary code and data on demand.
Blazor template consolidation: As part of unifying the various blazor hosting models into a single model in .NET 8, Microsoft has also consolidated the number of blazor project templates. In this preview release, they have removed the Blazor Server template and the ‘ASP.NET Core hosted’ option from the Blazor WebAssembly template. Both of these scenarios will be represented by options when using the new Blazor Web App template.
These are some of the major updates to blazor in .NET 8 Preview 6.
Blazor provides a feature called server-side preloading, which can significantly improve the performance of your application by reducing the initial load time for subsequent pages. By utilizing server-side preloading, you can fetch and render a page on the server before the user even requests it, allowing for a seamless and faster navigation experience.
Here’s how you can implement server-side preloading in Blazor:
Identify the pages that you want to preload. Typically, these are pages that users frequently visit or are likely to navigate to next.
Add the [RouteView] attribute to the components corresponding to the pages you want to preload. This attribute allows Blazor to detect and load the page on the server before the user navigates to it.
Configure the Router component in your App.razor file to enable server-side preloading:
<Router PreRenderPagesOnDemand="true">
<!-- Your route configurations -->
</Router>
Setting the PreRenderPagesOnDemand property to true enables server-side preloading for the specified pages.
Compile and run your Blazor application.
With these steps in place, Blazor will automatically pre-render the specified pages on the server when it detects that the user is likely to navigate to them. As a result, when the user eventually requests a preloaded page, it will load faster since most of the rendering work has already been done on the server.
Note that server-side preloading is an optimization technique and should be used judiciously. It’s essential to identify the pages that will benefit the most from preloading to avoid unnecessary overhead. Additionally, consider monitoring the performance of your application and adjust the preloading strategy as needed.
Utilizing server-side preloading in Blazor can significantly enhance the user experience by reducing page load times, thereby improving engagement and satisfaction with your application.
Blockchain technology has revolutionized numerous industries by providing a secure, decentralized, and transparent platform for conducting transactions and maintaining records. With the increasing demand for blockchain applications, integrating blockchain into web applications has become essential for many businesses. In this article, we will explore how to implement blockchain in ASP.NET Core, one of the most popular web development frameworks, using the C# programming language. We will cover the key concepts of blockchain and walk through code examples to demonstrate its implementation.
Blockchain is a distributed ledger technology that enables the creation of a decentralized, tamper-proof, and transparent system for recording transactions. It consists of a chain of blocks, where each block contains a set of transactions and a reference to the previous block. The key features of blockchain include immutability, transparency, and consensus.
we will use Nethereum, Nethereum is a popular Ethereum library for .NET
Now for the Part of Implementing the Blockchain Logic. First we will create a new folder called “Blockchain” in the project root directory. Now inside the blockchain folder we will add new class file Block.cs This class represents a block in the blockchain.
public class Block
{
public int Index { get; set; }
public DateTime Timestamp { get; set; }
public string Data { get; set; }
public string PreviousHash { get; set; }
public string Hash { get; set; }
}
Below is the description of the Class Block Properties.
Index: It is an integer property representing the index or position of the block within the blockchain.
Timestamp: It is a DateTime property representing the timestamp or the time at which the block was created or added to the blockchain.
Data: It is a string property that holds the data or information associated with the block. The data can vary depending on the purpose of the blockchain.
PreviousHash: It is a string property that stores the hash value of the previous block in the blockchain. This property is used to maintain the integrity and chronological order of the blocks in the blockchain.
Hash: It is a string property that stores the hash value of the current block. The hash is calculated based on the combination of all the block’s properties (including Index, Timestamp, Data, and PreviousHash) and serves as a unique identifier for the block. It ensures the immutability and security of the block’s contents.
next step is to add a new class file called Blockchain.cs to represent the entire blockchain and provide the necessary methods for managing blocks.
public class Blockchain
{
private List<Block> chain;
public Blockchain()
{
chain = new List<Block>();
InitializeGenesisBlock();
}
private void InitializeGenesisBlock()
{
chain.Add(CreateGenesisBlock());
}
private Block CreateGenesisBlock()
{
return new Block
{
Index = 0,
Timestamp = DateTime.Now,
Data = "Genesis Block",
PreviousHash = string.Empty,
Hash = CalculateBlockHash(0, DateTime.Now, "Genesis Block", string.Empty)
};
}
private string CalculateBlockHash(int index, DateTime timestamp, string data, string previousHash)
{
string blockData = $"{index}-{timestamp}-{data}-{previousHash}";
byte[] bytes = Encoding.UTF8.GetBytes(blockData);
byte[] hashBytes;
using (SHA256 sha256 = SHA256.Create())
{
hashBytes = sha256.ComputeHash(bytes);
}
StringBuilder builder = new StringBuilder();
foreach (byte b in hashBytes)
{
builder.Append(b.ToString("x2"));
}
return builder.ToString();
}
}
Futhermore, the detailed explanation of the above code is as follows.
Block Class:
This class represents a block in the blockchain. It contains properties such as Index, Timestamp, Data, PreviousHash, and Hash. The properties store information about the block’s position, creation time, data, and hash values. The Hash property is calculated based on the block’s properties and serves as a unique identifier. Blockchain Class:
This class represents the blockchain itself and manages the chain of blocks. It has a private member variable called chain, which is a list of Block objects representing the blocks in the chain. Blockchain() Constructor:
This constructor initializes a new instance of the Blockchain class. It creates an empty list for the chain and calls the InitializeGenesisBlock() method. InitializeGenesisBlock() Method:
This method adds the genesis block (the first block in the blockchain) to the chain. It calls the CreateGenesisBlock() method to create the genesis block and adds it to the chain list. CreateGenesisBlock() Method:
This method creates and returns the genesis block. It sets the properties of the genesis block, including the index, timestamp, data, previous hash, and calculates the hash value based on these properties using the CalculateBlockHash() method. CalculateBlockHash() Method:
This method calculates and returns the hash value of a block. It concatenates the index, timestamp, data, and previous hash into a single string.It converts the concatenated string to bytes and uses the SHA256 algorithm to compute the hash value.The hash bytes are then converted to a hexadecimal string representation and returned. Overall the Blockchain class, it will automatically initialize with a genesis block. we will add our class as a service in Program.cs services.AddSingleton(); next to test run the application to see the result in json Format.
In the digital age, we generate massive amounts of data every day. Sentiment analysis helps us understand the emotions expressed in text data, such as whether it’s positive, negative, or neutral. ML.NET is a machine learning framework that enables developers to perform sentiment analysis using C# or any .NET programming language. In this blog post, we’ll explore the basics of sentiment analysis in ML.NET and how it can help unlock valuable insights from text data.
Sentiment Analysis:
Sentiment analysis is all about figuring out the emotional tone of a piece of text. It helps us determine whether the sentiment is positive (happy, satisfied), negative (sad, angry), or neutral (neutral, indifferent). By analyzing text from social media posts, customer reviews, and other sources, sentiment analysis allows businesses to make informed decisions, improve customer experiences, and spot emerging trends.
ML.NET:
ML.NET is a machine learning framework developed by Microsoft. It lets developers build custom machine learning models using C# or any .NET language. ML.NET simplifies the integration of machine learning into applications and offers various algorithms and pre-trained models. It’s designed to make machine learning accessible to developers with different levels of expertise.
Performing Sentiment Analysis with ML.NET:
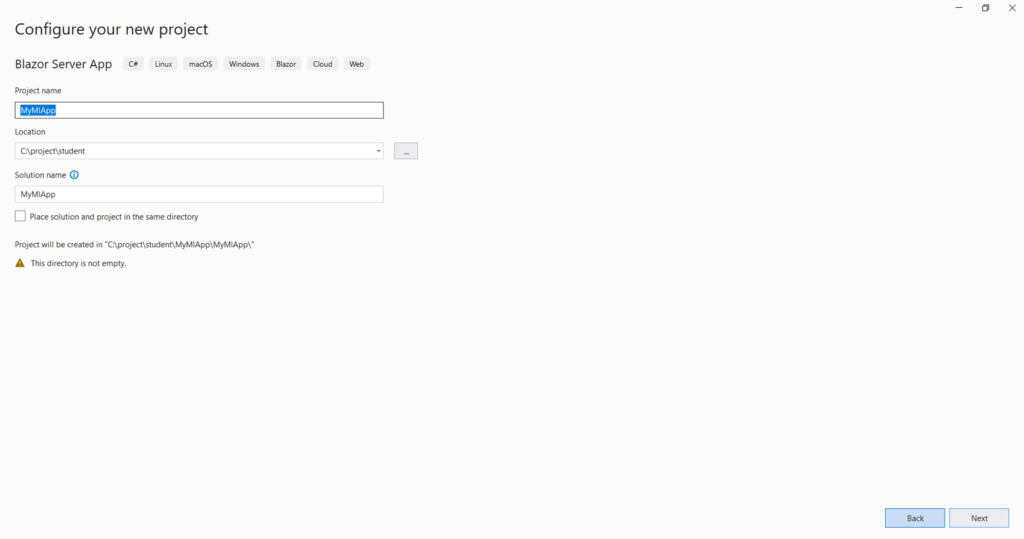
1.Select the C# Console App project template.
2.Change the project name to myMLApp.
3.Make sure Place solution and project in the same directory is unchecked
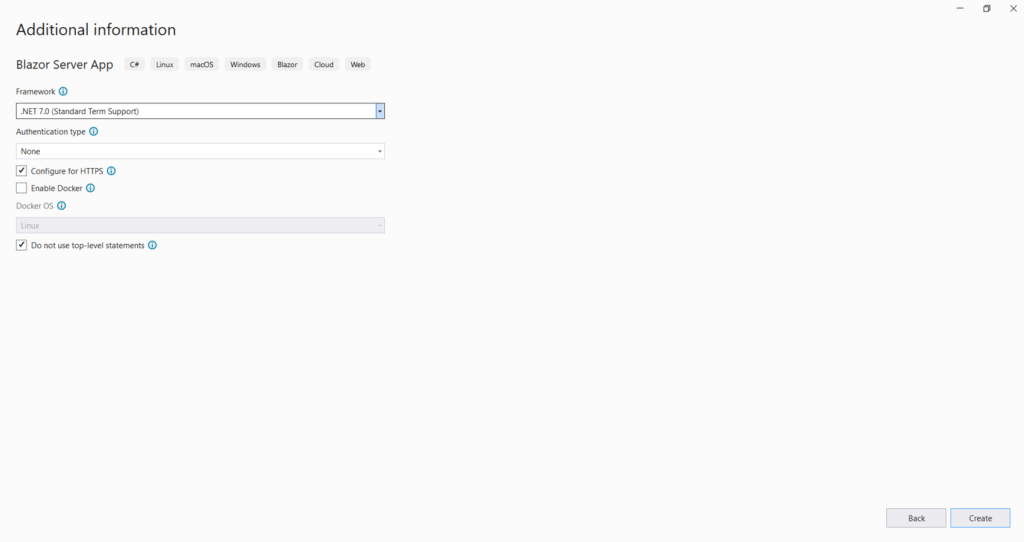
4.Select .NET 7.0 (Standard Term support) as the Framework.
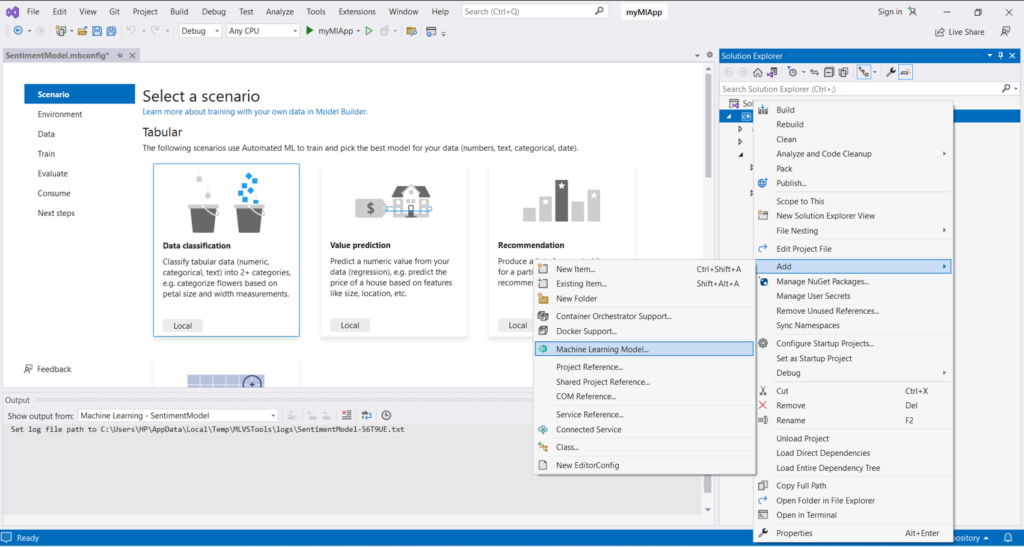
5.Right-click on the myMLApp project in Solution Explorer and select Add > Machine Learning Model.
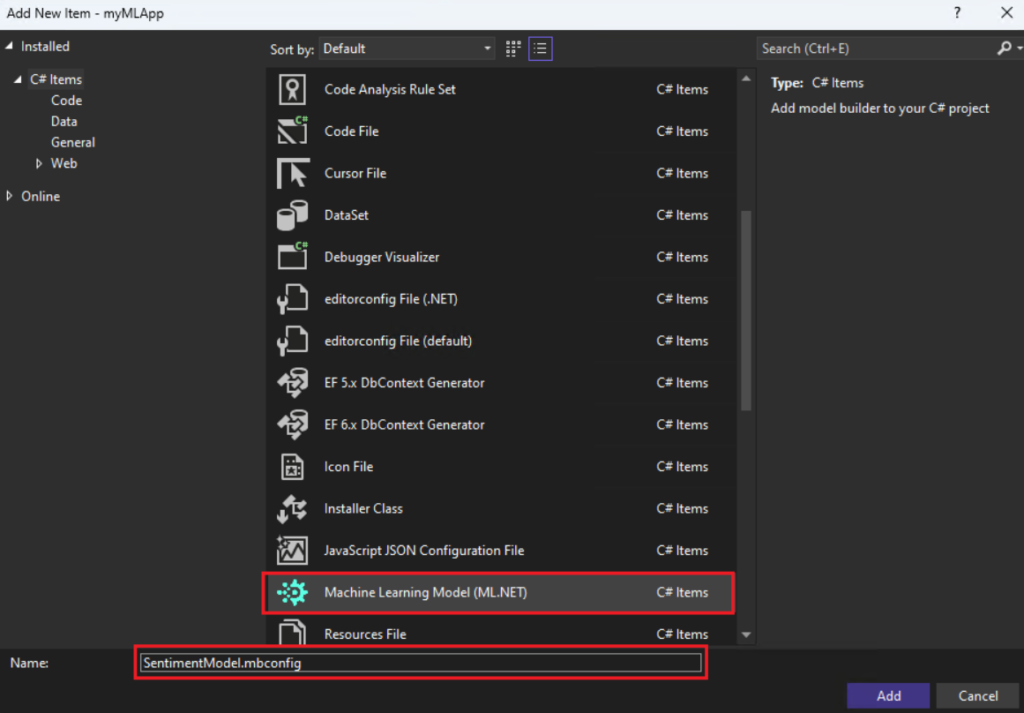
6.In the Add New Item dialog, make sure Machine Learning Model (ML.NET) is selected.
7.Change the Name field to SentimentModel.mbconfig and select the Add button
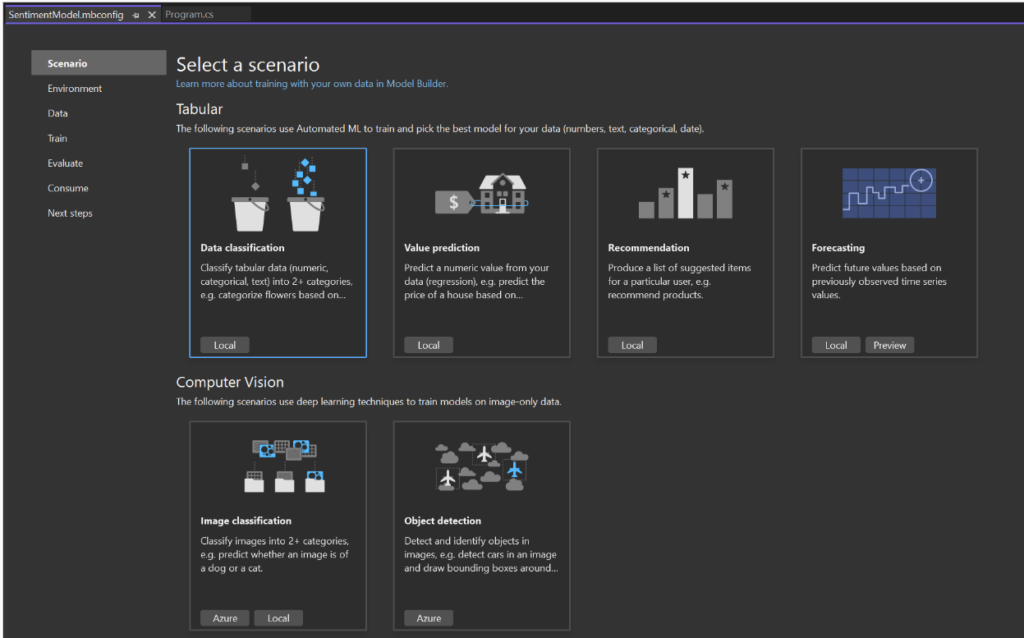
8.Pick a scenario
To begin, open the Model Builder tool and select the “Data classification” scenario from the available options. This scenario is suitable for predicting the category of a comment, such as determining whether it falls into a positive or negative sentiment.
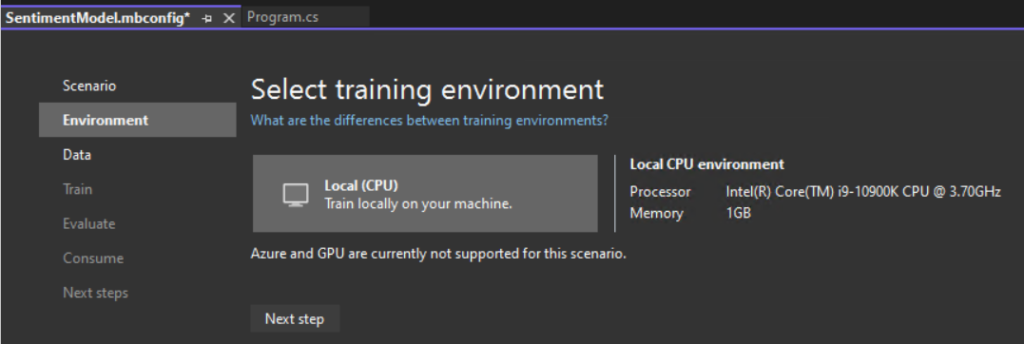
After selecting the “Data classification” scenario, ensure that the training environment is set to “Local.” Although some scenarios allow for training in Azure, classification specifically supports only local training. Once you have confirmed the local environment, proceed to the next step, which is the “Data” step.
Add data
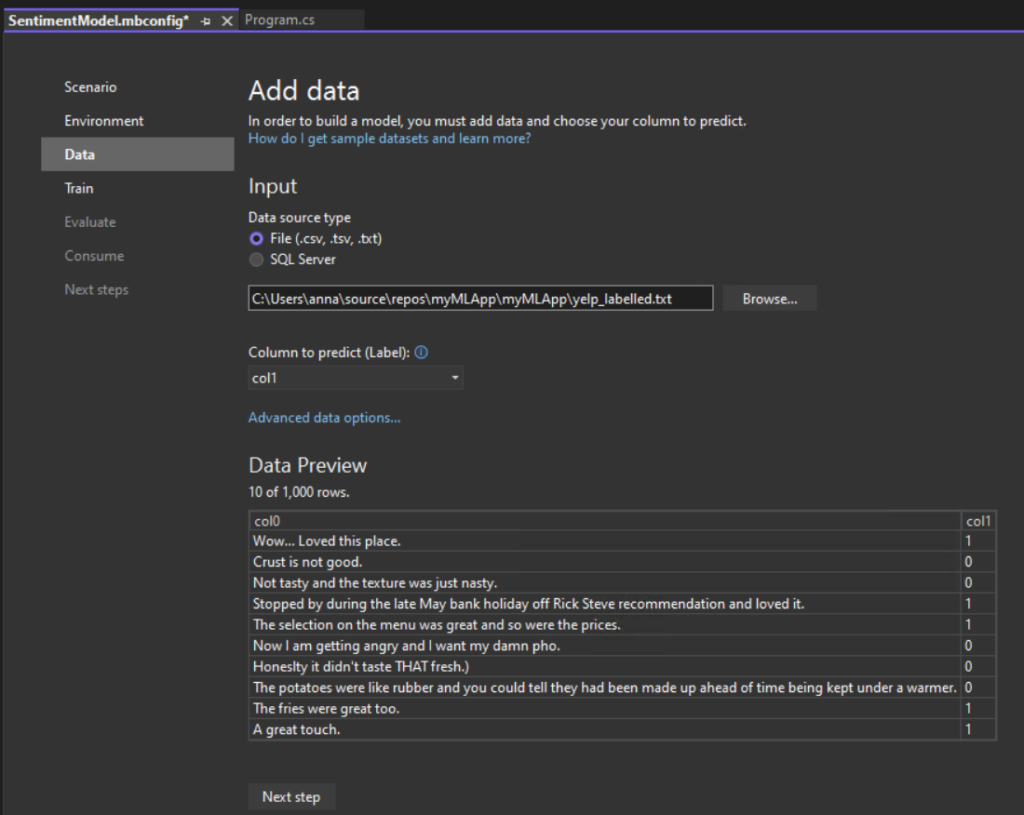
In Model Builder, you can add data from a local file or connect to a SQL Server database. In this case, you’ll add yelp_labelled.txt from a file.
Select File as the input data source type.
Browse for yelp_labelled.txt. Once you select your dataset, a preview of your data appears in the Data Preview section. Since your dataset does not have a header, headers are auto-generated (“col0” and “col1”).
Under Column to predict (Label), select “col1”. The Label is what you’re predicting, which in this case is the sentiment found in the second column (“col1”) of the dataset.
The columns that are used to help predict the Label are called Features. All of the columns in the dataset besides the Label are automatically selected as Features. In this case, the review comment column (“col0”) is the Feature column. You can update the Feature columns and modify other data loading options in Advanced data options, but it is not necessary for this example.
Train your model
Now, you’ll train your model with the yelp_labelled.txt dataset.
Model Builder evaluates many models with varying algorithms and settings based on the amount of training time given to build the best performing model.
Change the Time to train, which is the amount of time you’d like Model Builder to explore various models, to 60 seconds (you can try increasing this number if no models are found after training) . Note that for larger datasets, the training time will be longer. Model Builder automatically adjusts the training time based on the dataset size.
Select Start training to start the training process. Once training starts, you can see the time remaining.
Training results
Best accuracy – This shows you the accuracy of the best model that Model Builder found. Higher accuracy means the model predicted more correctly on test data.
Best model – This shows you which algorithm performed the best during Model Builder’s exploration.
Training time – This shows you the total amount of time that was spent training / exploring models.
Models explored (total) – This shows you the total number of models explored by Model Builder in the given amount of time.
Evaluate your model
Consume your model
The last step is to consume your trained model in the end-user application.
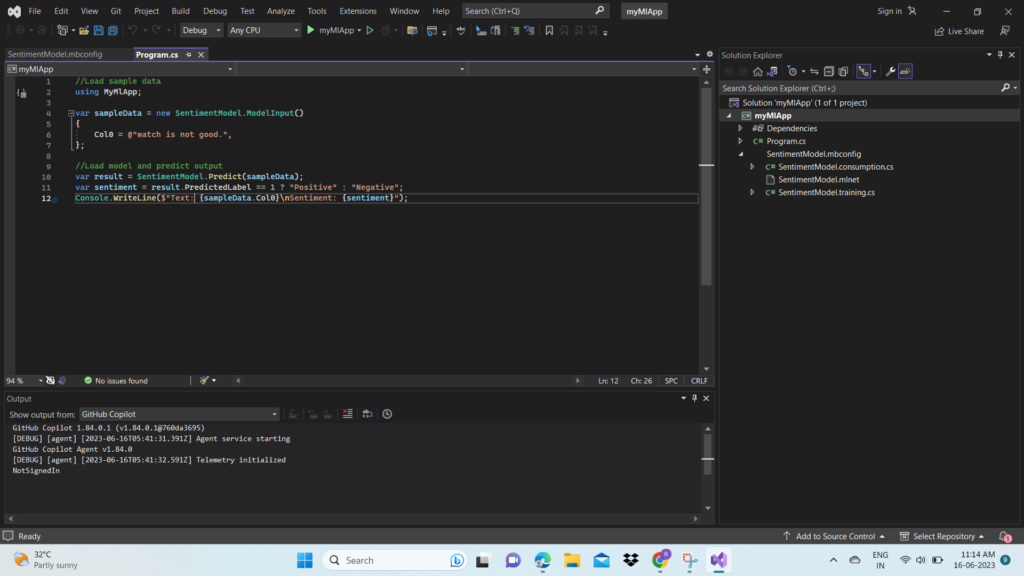
Replace the Program.cs code in your myMLApp project with the following code:
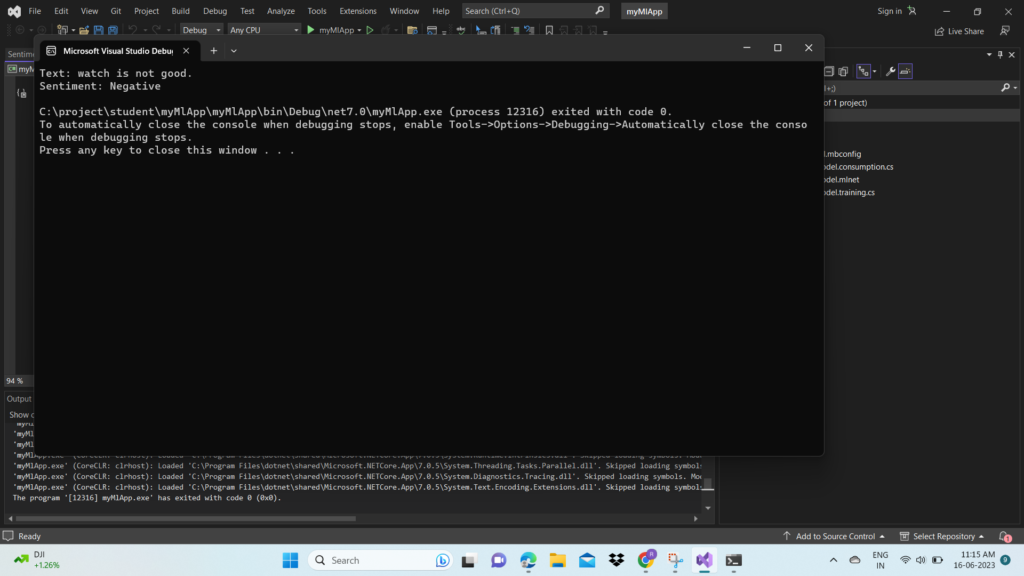
Run myMLApp (select Ctrl+F5 or Debug > Start Without Debugging). You should see the following output, predicting whether the input statement is positive or negative.
The definition of leadership is evolving in every passing year. If earlier it was about authority and dominance, it’s more about collaboration and teamwork nowadays.
Many people assume that leadership is all about high-ranking positions and prestigious titles, money, and fame. However, leadership is not solely defined by the postion or tittle that one holds. In fact it’s about a behaviour that is demonstrated through actions and decision-making and the example you set for others. It goes beyond formal authority and encompasses a set of behaviors and qualities that inspire and influence others to achieve common goals.
Effective leaders exhibit a range of characteristics, including strong communication skills, the ability to inspire and motivate others, and a willingness to take calculated risks. They are able to make difficult decisions and take responsibility for their actions. They are also able to understand and manage their own emotions, as well as empathize with the emotions of others. This allows them to build strong relationships, resolve conflicts, and create a positive and inclusive work environment. These qualities are not necessarily tied to a specific position or title, and anyone can exhibit in any role.
Furthermore, leadership is not limited to a single individual. It can emerge from various levels within an organization and can be practiced by anyone, regardless of their formal position. Leaders empower others, delegate responsibilities, and create opportunities for growth and development. They foster a culture of collaboration and encourage diverse perspectives and contributions from team members.
Another important aspect of leadership is integrity and ethical behavior. Leaders act with honesty, transparency, and fairness. They adhere to a strong set of moral and ethical principles, making decisions that are in the best interest of the team or organization as a whole. They lead by example and inspire trust and respect among their peers and subordinates.
Lastly, effective leaders understand the importance of nurturing and supporting their team members. They provide guidance, mentorship, and recognition to help individuals reach their full potential. They value and appreciate the unique strengths and contributions of each team member, fostering a sense of belonging and empowerment.
In summary, the definition of leadership has shifted from mere authority and dominance to encompass a wide range of qualities and behaviors. It is about collaboration, teamwork, emotional intelligence, adaptability, continuous learning, integrity, and support for others. Leadership is not tied to a specific position or title; rather, it is demonstrated through actions, decision-making, and the ability to inspire and influence others towards common goals.
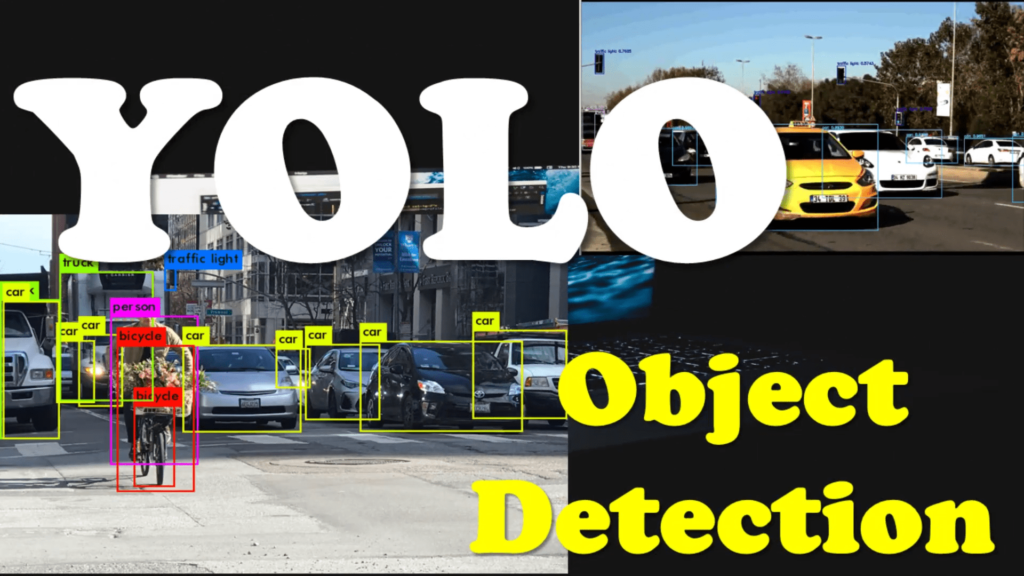
Object detection is a fundamental task in computer vision, and YOLO (You Only Look Once) is a popular real-time object detection algorithm. In this blog, we will explore how to perform object detection using YOLOv3 in C# with the Emgu.CV library. We will build a simple application that can detect objects in real-time using a webcam.
Prerequisites:
To follow along with this tutorial, make sure you have the following prerequisites:
Visual Studio or any C# development environment installed.
Emgu.CV library installed.
Darknet YOLOv3 configuration file (.cfg) and pre-trained weights file (.weights).
COCO dataset class labels file (coco.names).
Webcam or a video source to capture frames.
Step 1: Setting Up the Project First, create a new C# project in your preferred development environment. Make sure you have the Emgu.CV library referenced in your project.
Step 2: Loading YOLOv3 Model and Class Labels In the provided code, we start by loading the YOLOv3 model and the corresponding class labels from the files. Adjust the paths to the configuration file (“yolov3.cfg”), weights file (“yolov3.weights”), and class labels file (“coco.names”) based on your local file system.
Step 3: Setting Backend and Target for DNN Next, we set the preferable backend and target for the DNN (Deep Neural Network) module. In this case, we choose the OpenCV backend and CPU as the target device. However, you can modify these settings based on your hardware capabilities and requirements.
Step 4: Initializing VideoCapture and Frame Processing We create a VideoCapture object to access the webcam or video source. The code inside the while loop continuously captures frames and processes them for object detection.
Step 5: Preprocessing and Forward Pass For each captured frame, we resize it and convert it to the required format for the YOLOv3 model. The frame is then passed through the network for a forward pass, and the output is obtained.
Step 6: Object Detection and Visualization The output from the network is processed to extract the bounding boxes, class indices, and confidence scores for detected objects. We filter out detections with confidence below a certain threshold (0.8 in this case). Non-maximum suppression (NMS) is applied to remove overlapping bounding boxes.
Finally, we draw the bounding boxes and class labels on the frame. The resulting frame is then resized and displayed using the OpenCV imshow function.
Step 7: Exiting the Application The application continues to capture frames and perform object detection until the user presses the ‘Esc’ key. This is achieved by checking for a keyboard event using the CvInvoke.WaitKey function.
Object detection from Webcam
using Emgu.CV; using Emgu.CV.Dnn; using Emgu.CV.Structure; using Emgu.CV.Util;
class Program { static void Main(string[] args) { // Step 2: Loading YOLOv3 Model and Class Labels var net = DnnInvoke.ReadNetFromDarknet(“F:\OpenCVTutorials-masters\OpenCVTutorials-master\detection\yolov3.cfg”, “F:\OpenCVTutorials-masters\OpenCVTutorials-master\detection\yolov3.weights”); var classLabels = File.ReadAllLines(“F:\OpenCVTutorials-masters\OpenCVTutorials-master\detection\coco.names”);
// Step 3: Setting Backend and Target for DNN net.SetPreferableBackend(Emgu.CV.Dnn.Backend.OpenCV); net.SetPreferableTarget(Emgu.CV.Dnn.Target.Cpu);
// Step 4: Initializing VideoCapture and Frame Processing var vc = new VideoCapture(0, VideoCapture.API.DShow); Mat frame = new(); VectorOfMat output = new();
// Step 6: Object Detection and Visualization var bestIndex = DnnInvoke.NMSBoxes(boxes.ToArray(), scores.ToArray(), .8f, .8f);
var frameOut = frame.ToImage<Bgr, byte>();
for (int i = 0; i < bestIndex.Length; i++) { int index = bestIndex[i]; var box = boxes[index]; CvInvoke.Rectangle(frameOut, box, new MCvScalar(0, 255, 0), 2); CvInvoke.PutText(frameOut, classLabels[indices[index]], new System.Drawing.Point(box.X, box.Y – 20), Emgu.CV.CvEnum.FontFace.HersheyPlain, 1.0, new MCvScalar(0, 0, 255), 2); }
CvInvoke.Resize(frameOut, frameOut, new System.Drawing.Size(0, 0), 4, 4); CvInvoke.Imshow(“output”, frameOut);
// Step 7: Exiting the Application if (CvInvoke.WaitKey(1) == 27) break; } }
}
Conclusion: In this blog post, we learned how to perform real-time object detection using YOLOv3 in C# with the Emgu.CV library. We explored the code that loads the YOLOv3 model, captures frames from a video source, and performs object detection using the model’s output. The detected objects are then visualized by drawing bounding boxes and class labels on the frames.
Web3 is a term that refers to the next generation of the World Wide Web, where decentralized technologies are used to build applications that are more open, transparent, and secure. Web3 incorporates blockchain technology and smart contracts to enable peer-to-peer transactions, decentralized identity, and decentralized applications (dApps). In the context of C# and .NET development, Nethereum is a powerful library that allows you to interact with the Ethereum blockchain using C#.
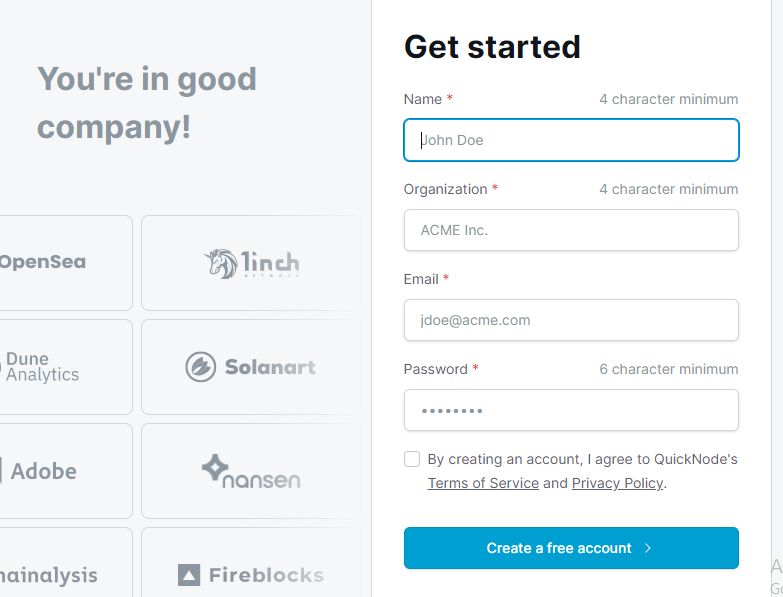
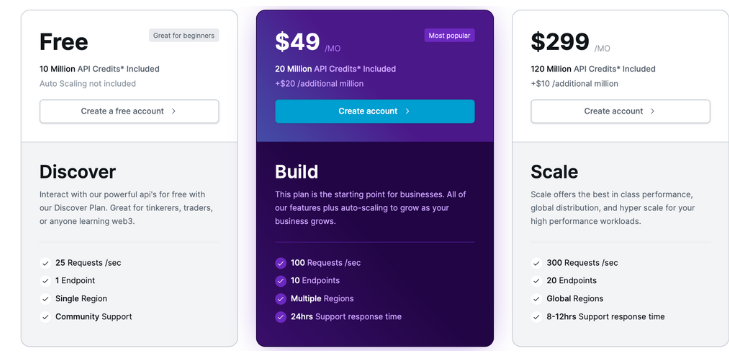
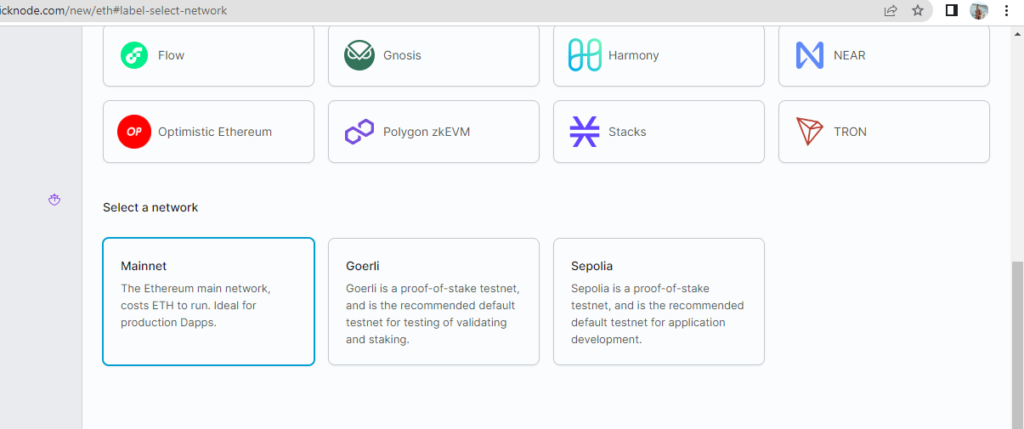
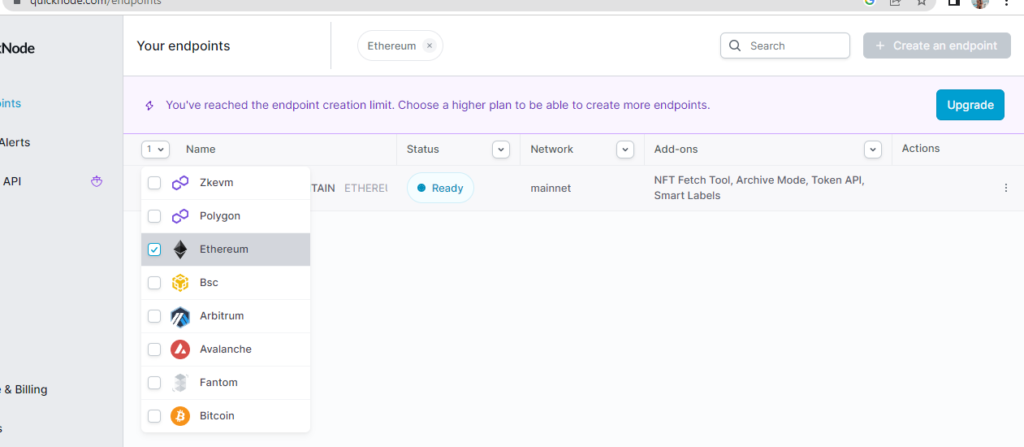
Started with QuickNode
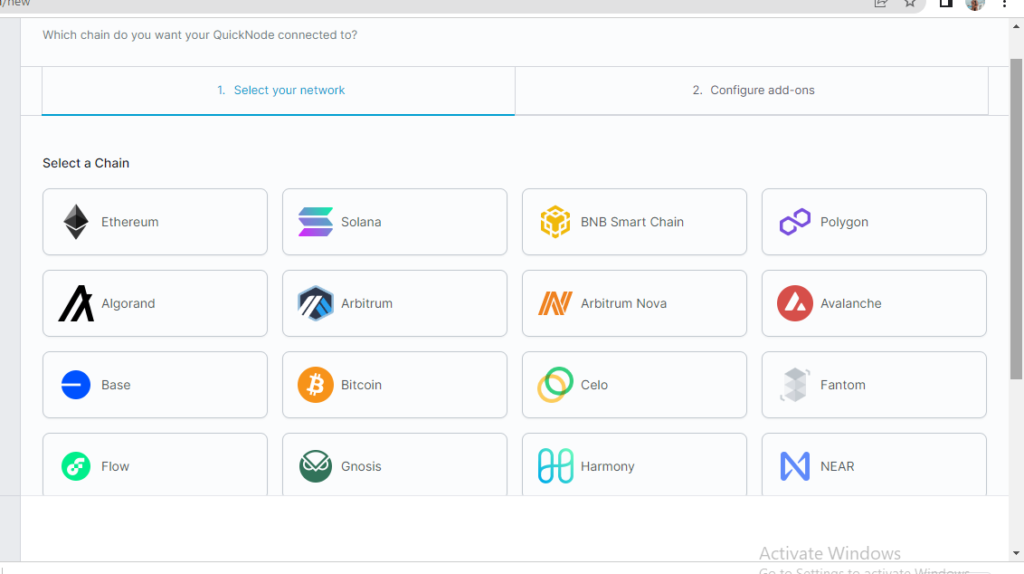
QuickNode is a platform that provides infrastructure and hosting services for blockchain and Web3 applications. It allows developers to easily deploy and manage their own nodes, which are essential for interacting with various blockchain networks. QuickNode supports a wide range of blockchain networks, including Ethereum, Bitcoin, Binance Smart Chain, and more.
By using QuickNode, developers can access the full functionality of blockchain networks without the need to set up and maintain their own infrastructure. QuickNode offers reliable and scalable node hosting, real-time monitoring, API access, and developer tools to simplify the process of building decentralized applications (dApps) and interacting with blockchain networks.
Nethereum is a .NET integration library for Ethereum, which allows developers to interact with the Ethereum blockchain using .NET and C#. It provides a comprehensive set of tools and functionalities for building decentralized applications (dApps) and interacting with Ethereum smart contracts.
Nethereum requires .NET Core or .NET Framework(4.5.1+) installed. We’ll install .NET Core SDK to make Nethereum work. Download and install the .NET Core SDK ver 3.1 based on your operating system. Then go to your terminal/command line and type the following.
$ dotnet new console -o nethereuma
This will create a new .NET application in the current directory. You can give your application any name
Now cd into your application.
$ cd nethereuma
Add package reference to Nethereum.Web3
$ dotnet add package Nethereum.Web3
This might take a while. After the package reference is added, download/update the package by typing the following.
$ dotnet restore
If everything goes right, Nethereum will be added to your system with nethereum web3 package.
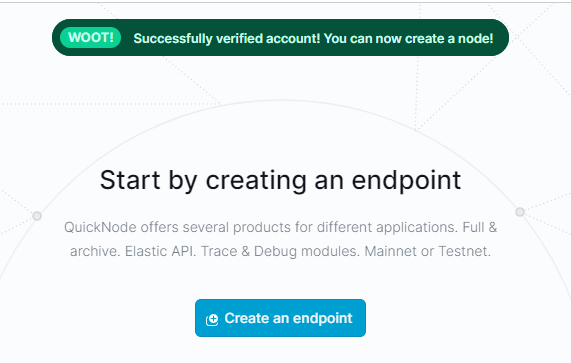
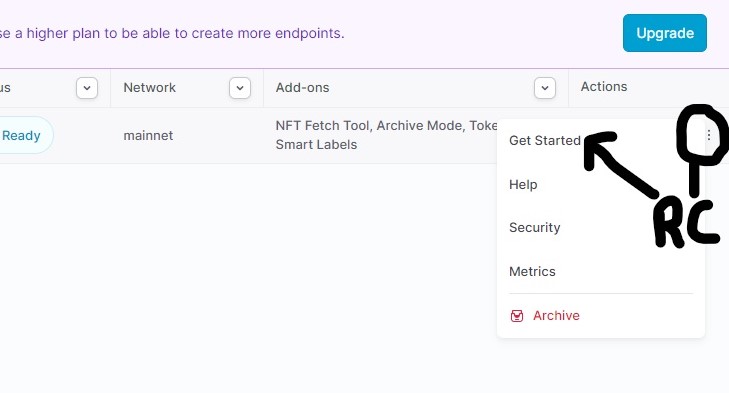
Booting our Ethereum node
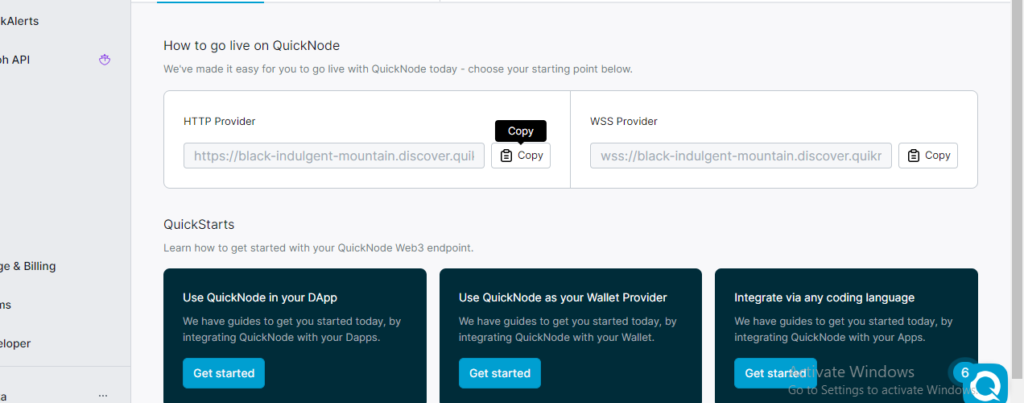
After you’ve created your free ethereum endpoint, copy your HTTP Provider endpoint:
You’ll need this later, so copy it and save it.
Connecting with Ethereum
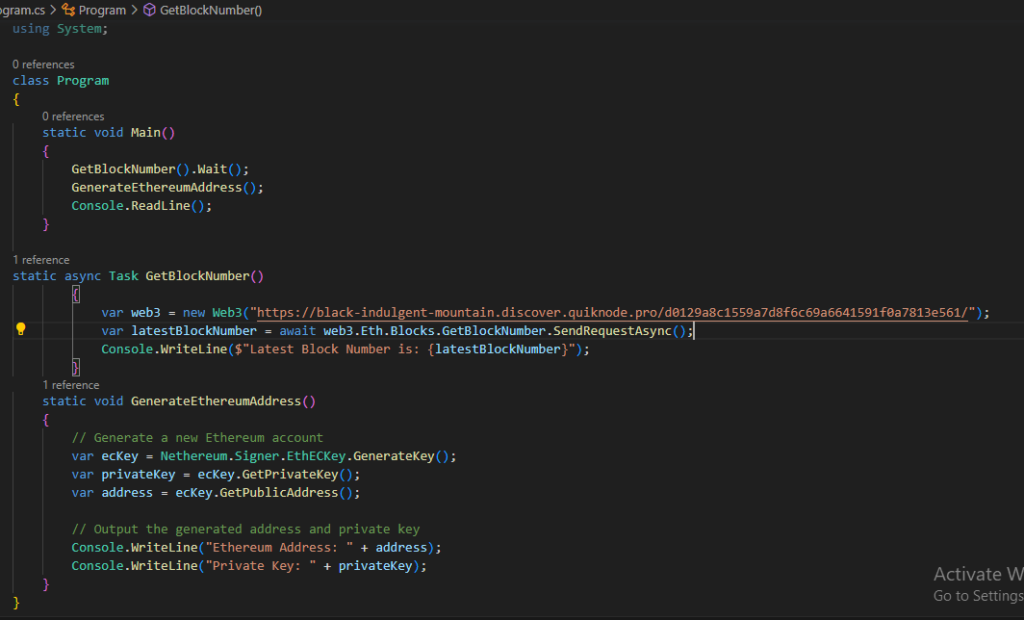
Now go to your .NET app folder and open the Program.cs C# file in a text editor .
Connect with Ethereum and then get the latest block number from the Ethereum blockchain.
class Program
{
static void Main()
{
GetBlockNumber().Wait();
}
static async Task GetBlockNumber()
{
var web3 = new Web3("ADD_YOUR_ETHEREUM_NODE_URL");
var latestBlockNumber = await web3.Eth.Blocks.GetBlockNumber.SendRequestAsync();
Console.WriteLine($"Latest Block Number is: {latestBlockNumber}");
}
}
Generate a Ethereum Address
While signing in to any platform on the internet, you need to authenticate using a combination of credentials. Consider an Ethereum address as your username and a corresponding private key as the password. While your Ethereum address is public and can be shared, the private key must always be kept secret. Using this combination lets you interact with the Ethereum blockchain. An Ethereum address is your identity on the blockchain, and it looks like this “0x6E0d01A76C3Cf4288372a29124A26D4353EE51BE”.
static void GenerateEthereumAddress()
{
// Generate a new Ethereum account
var ecKey = Nethereum.Signer.EthECKey.GenerateKey();
var privateKey = ecKey.GetPrivateKey();
var address = ecKey.GetPublicAddress();
// Output the generated address and private key
Console.WriteLine("Ethereum Address: " + address);
Console.WriteLine("Private Key: " + privateKey);
}
Web 3.0, also known as the third-generation internet, is the next evolution of the World Wide Web. It provides a data-driven Semantic Web employing a machine-based understanding of data with the objective of developing a more intelligent and connected web experience for users.
The Web of today is static and unable to adjust to the individual needs of each person experiencing it. Web 3.0 promises to be more dynamic and interactive. By implementing artificial intelligence and blockchain technology, it will redefine the web experience with structural changes to ensure democratization across all aspects of the internet.
In Web 3.0, data is stored securely and distributed across many devices, removing the need for centralized servers. Such a design also reduces the risks of massive data leaks because data is no longer centrally stored — making it more resilient to compromise.
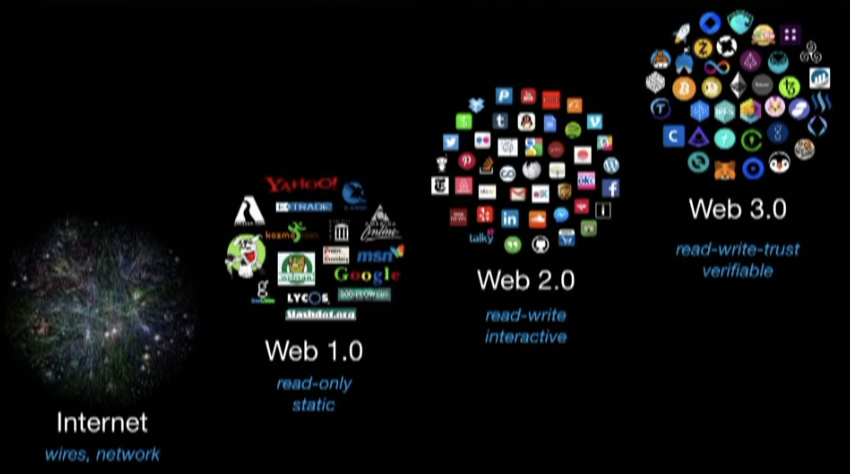
Evolution of Web – 1.0, 2.0, and 3.0
Web 1.0: Static, Read-Only
This first version of the internet is acknowledged as the first stage of the world wide web evolution. It is characterized as a read-only web experience. Users can read information on web pages driven by web browsers, HTML, HTTP and URL technology. The experience is highly decentralized, and there are no search engines. Instead, Web 1.0 content is static and hyperlinked together. Web 1.0 is also referred to as the Syntactic Web, and the user’s role is limited.
Web 2.0: Read-Write
As the second generation of the world wide web, Web 2.0 is known as the read-write Web or the social Web because it facilitates interaction between users and sites. Driven by mobile, social networks and cloud technology, Web 2.0 users can read and write content on websites and applications and distribute it between sites.
A small group of big tech companies like Meta (previously Facebook), YouTube and Twitter own most of the user data associated with Web 2.0. The data is highly centralized with these tech giants. This centralization of data (and power) and monetization of users is spurring the need for Web 3.0.
Web 3.0 Read-Write-Interact-Web
Web 3.0 is highly decentralized, driven by machine learning and artificial intelligence, and leverages blockchain technology. The result is real-world human communication. Users retain control over their data and content, and they can sell or trade their data without losing ownership, risking privacy or relying on intermediaries. In this business model, users can log into a website without having their internet identity tracked.
The term Web 3.0, coined by reporter John Markoff of The New York Times in 2006, refers to a new evolution of the Web which includes specific innovations and practices.
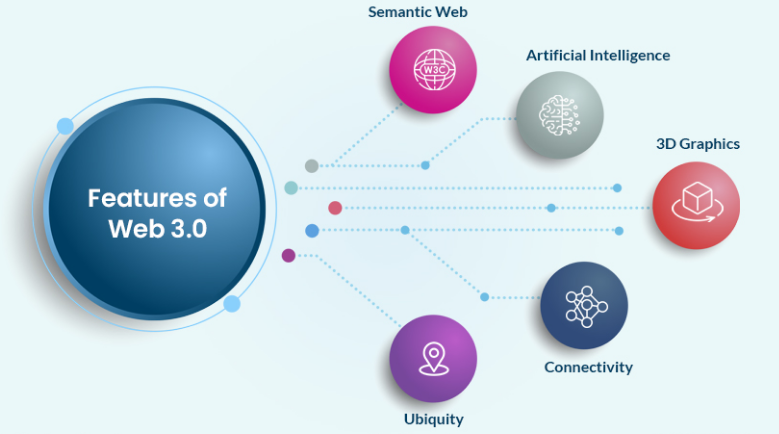
Features of Web3.0
Semantic Web: The next evolution of the Web involves the Semantic Web. The Semantic Web improves the abilities of web technologies to generate, share and connect content through search and analysis by understanding the meaning of words rather than by keywords or numbers.
Artificial Intelligence: By combining semantic capabilities with natural language processing, computers can understand information on a human-like level to provide faster and more relevant results
3D Graphics: Three-dimensional design is used extensively in websites and services in Web 3.0. Museum guides, computer games, eCommerce, geospatial contexts and more are all common examples of this.
Connectivity: With Web 3.0, information is more connected thanks to semantic metadata. As a result, the user experience evolves into a new level of connectivity that leverages all available information.
Ubiquity: Internet content and services can be accessed anywhere at any time via any number of devices, rather than exclusively via computers and smartphones. Web 2.0 is already ubiquitous in many ways, but the growth of IoT devices will take it to new levels.
Blockchain: With blockchain technology, user data is protected and encrypted. This prevents large companies from controlling and/or using users’ personal data for their gain.
Decentralized: Decentralized data networks store data within a peer-to-peer interconnection. Users maintain ownership over their data and digital assets and are able to log in securely over the internet without being tracked.
Examples of Web3 applications
Ethereum. Perhaps the best-known Web3 protocol, this decentralized platform supports a native cryptocurrency plus a vast ecosystem of decentralized apps. The Ethereum platform hosts most of the Web3 apps that exist today.
Brave. Brave is a Web3-based browser that enables users to directly monetize their content consumption and creation. Users are rewarded for viewing ads and can be compensated directly for producing original content.
Uniswap. This Ethereum-based protocol supports a decentralized exchange that aims to be a Web3 version of today’s stock and commodity exchanges. Governance of the Uniswap protocol is also decentralized, with full control distributed among UNI tokenholders.
Aave. This Web3 lending and borrowing platform enables users to earn interest on deposits, plus borrow assets without requiring approval from centralized intermediaries.
RealT. Real estate investors may be interested in RealT, a Web3 app that aims to tokenize real estate. RealT allows investors to earn rental income from fractional ownership shares in properties.
Set protocol. Internet users can access the Set protocol to automate investing and rebalancing of crypto assets. The protocol uses Web3 tech to enable investors to predefine their investing rules and strategies. Perhaps, one day, the protocol could move from crypto assets to traditional asset classes.
Nexus Mutual. Web3 technology can support decentralized insurance platforms, and Nexus Mutual is exactly that. The platform is focused on insuring crypto holdings and covering smart contract failures.
InstaDApp. This Web3 banking portal aims to simplify access to multiple decentralized finance (DeFi) protocols. The dApp features portfolio management and debt refinancing tools.
Nowadays, mental health has become the topmost priority for all employees in the workspace. As a professional, in today’s fast-paced world it’s becoming increasingly difficult to achieve a work-life balance. Achieving a healthy work-life balance is critical for your long term success and well-being. Maintaining a healthy work-life balance is not just a matter of personal wellbeing, but also a critical component of creativity and productivity.
At its core, work-life balance refers to effectively managing your time and energy between work responsibilities and personal life. This includes everything from spending quality time with family and friends, pursuing hobbies and interests, maintaining a healthy lifestyle, and excelling in your professional career.
To achieve work-life balance is essential for overall well-being. It helps reduce stress and burnout while enhancing your personal and professional growth. When individuals can balance their personal and professional lives, they tend to be more productive, efficient, and creative in their work, ultimately leading to better outcomes.
In contrast, when work-life balance is out of sync, individuals may experience a range of negative consequences, such as poor physical and mental health, decreased job satisfaction, and strained relationships with loved ones. Individuals need to prioritize their personal well-being and maintain a healthy work-life balance to achieve long-term success and happiness.
Importance of Work-Life Balance:
Achieving a healthy work-life balance is crucial for maintaining overall well-being and happiness. It is also a critical contributor for improving employee productivity and the performance of an organization. Without a healthy work-life balance, an organization will end up with a burned-out workforce with low motivation, lack of focus and poor performance.
Organizations that can achieve a positive work-life balance for their employees also build a better employer reputation in the process, which helps attract and retain good talent. At the same time, the workforce with a positive work-life balance has fewer health problems, is highly engaged and more mindful of their work commitments.
Ways to achieve a Balanced Life:
Prioritizing your life and settings goals: To achieve work-life balance, prioritize your life and set goals that align with your values. Set SMART goals (specific, measurable, achievable, relevant, and time-bound) that will help you stay focused and motivated. Identify your priorities and set realistic goals for each day or week. Use tools like calendars or planners to keep track of deadlines and appointments.
Setting Realistic Expectations for Yourself and Others: Setting Realistic Setting unrealistic expectations for yourself or others can lead to burnout and stress. Be honest about what you can accomplish in a day or week, both at work and in your personal life. Communicate these expectations clearly with others so they understand what they can expect from you.
Delegating Tasks and Asking for Help When Needed: Don’t be afraid to delegate tasks or ask for help when needed to save you time and allow others to contribute their skills and expertise. This is one of the best work-life balance benefits, so don’t miss it.
Learn to say no: It’s okay to say no when you feel like you have too much on your plate. It’s important to recognize when you are feeling overwhelmed and to communicate your needs effectively. This can include saying “no” to additional tasks or responsibilities prioritizing your workload and delegating tasks to others can also help you manage your workload effectively and avoid burnout. Learning to set boundaries and manage your workload in a healthy way is essential for achieving balance in your life, both at work and at home.
Learn to manage stress: Stress is an inevitable part of life, especially in a corporate environment. Mindfulness can help you stay focused and present in the moment. This can include meditation, deep breathing, exercise etc
Creating a Supportive Work Environment: Creating a supportive work environment is crucial for achieving work-life balance. This means openly communicating with supervisors about workload and expectations. By integrating work and personal life, we can achieve a healthy balance that allows you to professionally and personally thrive.
Conclusion:
Achieving work-life balance may seem like an elusive goal, but it is definitely worth striving for. You can improve your work-life balance and enjoy a happier, healthier life by taking small steps and implementing our discussed tips.
Start with small changes and build from there. Prioritize your time, set boundaries, and practice self-care. Small steps can lead to big results. Don’t forget to celebrate your achievements along the way! Acknowledge your progress towards achieving work-life balance and reward yourself for your hard work. This will help keep you motivated to continue striving for balance.
Prioritizing work-life balance has numerous benefits for both your physical and mental health. It can reduce stress, improve relationships, increase productivity, and lead to greater overall happiness. Remember that to achieve work-life balance is an ongoing process that requires effort and dedication. Don’t give up if you experience setbacks or challenges along the way. Keep striving towards a balanced life – it’s worth it!
In conclusion, prioritizing work-life balance is essential for our well-being in today’s fast-paced world. By implementing these tips and taking small steps towards achieving balance, we can enjoy happier, healthier lives with more time for the things that matter most to us.
If we want to understand the Blockchain we can say that in simple terms, a blockchain is a digital ledger of transactions that is decentralized, meaning that it is not controlled by a central authority, like a bank or government. Instead, it is maintained by a network of computers that all work together to verify and record transactions.
To understand how a blockchain works, imagine a group of people who are all keeping track of their transactions on a piece of paper. Each time someone makes a transaction, they write it down on their paper, along with the time, amount, and other details. This creates a record of all the transactions that have taken place.
Now imagine that instead of just one piece of paper, there are thousands of them, each being kept by a different person. Each time a transaction is made, it is recorded on all of the pieces of paper, and each person checks to make sure that the transaction is valid. If everything checks out, the transaction is added to the ledger, and everyone has a copy of the updated ledger.
This is essentially how a blockchain works, except instead of paper, it uses digital blocks of information that are linked together in a chain. Each block contains a record of several transactions, and when a new block is added to the chain, it is verified by the network of computers to make sure that it is valid. Once it has been verified, it is added to the chain and cannot be changed or deleted.
One of the key features of blockchain technology is its security. Because the ledger is decentralized and maintained by a network of computers, it is extremely difficult for anyone to hack or alter the information. This makes it a great way to store sensitive information, like financial transactions or personal data.
Another advantage of blockchain is its transparency. Because every transaction is recorded and verified by the network, it is possible to trace the history of a particular asset or transaction all the way back to its origin. This can be particularly useful in industries like supply chain management, where it is important to track the movement of goods from one place to another. Blockchain is a digital ledger of transactions that is decentralized and maintained by a network of computers. It is secure, transparent, and can be used for a wide range of applications. While it may seem complex at first, the basic idea is relatively simple, and it has the potential to revolutionize the way we store and share information.
So above we tried to understand what is blockchain and how its used in a layman’s way. Now we will understand it from the prespective of technical view.
a blockchain is a decentralized ledger of transactions that are secured through cryptographic protocols. In other words, it’s a digital database that is distributed across a network of computers, with each computer storing a copy of the database.
The key feature of a blockchain is its decentralized nature. Traditional databases are centralized, meaning that they are owned and operated by a single entity, such as a bank or government. This makes them vulnerable to hacking, censorship, and corruption. In contrast, a blockchain is decentralized, which means that no single entity has control over the data. Instead, it is controlled by the network of computers that participate in the system.
One of the most popular implementations of blockchain technology is Bitcoin. Bitcoin is a decentralized digital currency that operates on a blockchain. It was created in 2009 by an unknown person using the pseudonym Satoshi Nakamoto. Since then, it has grown in popularity, with a market capitalization of over $1 trillion at the time of writing.
The Bitcoin blockchain is a distributed ledger that records every Bitcoin transaction. Each transaction is verified by a network of computers, known as nodes, that are connected to the blockchain. Nodes work together to validate transactions by solving complex mathematical equations, a process known as mining. When a block of transactions is validated, it is added to the blockchain, creating a permanent and unalterable record.
The security of a blockchain is ensured by a combination of cryptographic protocols, including hash functions and digital signatures. Hash functions are algorithms that take an input and generate a fixed-size output, known as a hash. Each block in the blockchain contains a hash of the previous block, creating a chain of blocks that are linked together. This creates an immutable record that cannot be tampered with.
Digital signatures are used to ensure that transactions are authentic. Each user on the network has a public key and a private key. The public key is used to verify the digital signature, while the private key is used to create the signature. When a user makes a transaction, they use their private key to create a digital signature that is attached to the transaction. This ensures that the transaction is authentic and cannot be forged.
Another key feature of a blockchain is its transparency. Because the ledger is distributed across a network of computers, anyone can view the transactions on the blockchain. This makes it ideal for use cases where transparency is important, such as supply chain management or voting systems.
Blockchain technology has the potential to revolutionize many industries, including finance, healthcare, and logistics. Its decentralized and secure nature makes it ideal for storing sensitive information, such as medical records or financial transactions. However, it’s important to note that blockchain technology is still in its early stages and there are many challenges that need to be overcome, such as scalability and energy consumption.
Let’s make a simple Blockchain program in Steps. Step 1: Create the Block class The first step is to create a Block class that will store the data for each block in the blockchain. Here’s an example:
public class Block
{
public int Index { get; set; }
public DateTime Timestamp { get; set; }
public string Data { get; set; }
public string PreviousHash { get; set; }
public string Hash { get; set; }
}
Each block will have an index, a timestamp, some data, a hash of the previous block in the chain, and a hash of the current block.
Step 2: Create the Blockchain class Next, we’ll create a Blockchain class that will manage the chain of blocks. Here’s an example:
public class Blockchain
{
private List<Block> _chain;
public Blockchain()
{
_chain = new List<Block>();
AddGenesisBlock();
}
private void AddGenesisBlock()
{
_chain.Add(new Block
{
Index = 0,
Timestamp = DateTime.Now,
Data = "Genesis Block",
PreviousHash = null,
Hash = CalculateHash(0, DateTime.Now, "Genesis Block", null)
});
}
private string CalculateHash(int index, DateTime timestamp, string data, string previousHash)
{
using (SHA256 sha256 = SHA256.Create())
{
string input = index + timestamp.ToString("yyyy-MM-dd HH:mm:ss.fff") + data + previousHash;
byte[] bytes = sha256.ComputeHash(Encoding.UTF8.GetBytes(input));
StringBuilder builder = new StringBuilder();
for (int i = 0; i < bytes.Length; i++)
{
builder.Append(bytes[i].ToString("x2"));
}
return builder.ToString();
}
}
}
The Blockchain class contains a list of blocks, with the first block being the genesis block. We also have a private method, CalculateHash, that takes in the index, timestamp, data, and previous hash and returns the SHA256 hash of that input.
Step 3: Add blocks to the chain Now that we have our classes set up, we can add some blocks to the chain. Here’s an example:
Blockchain blockchain = new Blockchain();
blockchain.AddBlock("Transaction 1");
blockchain.AddBlock("Transaction 2");
The AddBlock method takes in some data, creates a new block with that data, and adds it to the chain.
Step 4: Verify the blockchain Finally, we can verify that our blockchain is valid by checking that each block’s hash matches the previous block’s hash. Here’s an example:
bool isValid = true;
for (int i = 1; i < blockchain.Count; i++)
{
Block currentBlock = blockchain[i];
Block previousBlock = blockchain[i - 1];
if (currentBlock.PreviousHash != previousBlock.Hash)
{
isValid = false;
break;
}
}
Console.WriteLine($"Is blockchain valid? {isValid}");
This code loops through each block in the chain and checks that its PreviousHash matches the previous block’s Hash. If any of the blocks are invalid, the isValid flag is set to false.
And that’s it! With these simple steps, we’ve created a functioning blockchain in C#.
In conclusion, a blockchain is a decentralized ledger of transactions that is secured through cryptographic protocols. It uses a network of computers to validate transactions and ensure the security of the ledger. Its transparency and security make it ideal for a wide range of applications, but there are still many challenges that need to be addressed before it can reach its full potential.